
ref:
https://redmine.openinfosecfoundation.org/projects/suricata/wiki/Suricata_User_Guide
https://samiux.blogspot.jp/2013/01/howto-suricata-on-ubuntu-1204-lts-server.html
Install
Installation
To setup to install the latest stable Suricata, do:
sudo add-apt-repository ppa:oisf/suricata-stable
sudo apt-get update
Then you can install the latest stable Suricata with:
sudo apt-get install suricata
or for the Suricata package with build in (enabled) debugging!
sudo apt-get install suricata-dbg
After installation, continue with the Basic Setup.
Upgrading
Upgrading is simple:
sudo apt-get update
sudo apt-get upgrade
Remove
To remove Suricata from your system:
sudo apt-get remove suricata
Beta or RC releases
If you would like to help test the beta or RC packages the same procedures as above applies, we’re just using another PPA “suricata-beta”.
sudo add-apt-repository ppa:oisf/suricata-beta
sudo apt-get update
sudo apt-get upgrade
You can use both the suricata-stable and suricata-beta repositories together. Suricata will then always be the latest release, stable or beta.
https://launchpad.net/~oisf/+archive/suricata-beta
Daily releases
If you would like to help test the daily build packages from our latest git(dev) repository , the same procedures as above applies, we’re just using another PPA “suricata-daily”.
sudo add-apt-repository ppa:oisf/suricata-daily
sudo apt-get update
sudo apt-get upgrade
Please have in mind this is packaged from our latest development git master.
We are doing our best to make you aware of continuing development and items within the engine that are not yet complete or optimal. With this in mind, please
notice the list we have included of known items we are working on. See http://redmine.openinfosecfoundation.org/projects/suricata/issues
for an up to date list and to report new issues.
See http://redmine.openinfosecfoundation.org/projects/suricata/wiki/Known_issues for a discussion and time line for the major issues.
https://launchpad.net/~oisf/+archive/suricata-daily
Init Scripts
https://redmine.openinfosecfoundation.org/projects/suricata/wiki/Init_Scripts
For Ubuntu with Upstart, the following can be used in /etc/init/suricata.conf:
# suricata
description "Intruder Detection System Daemon"
start on runlevel [2345]
stop on runlevel [!2345]
expect fork
exec suricata -D --pidfile /var/run/suricata.pid -c /etc/suricata/suricata.yaml -i eth1
Setting up IPS/inline for Linux
In this guide will be explained how to work with Suricata in layer3 inline mode and how to set iptables for that purpose.
First start with compiling Suricata with NFQ support. For instructions see Ubuntu Installation.
For more information about NFQ and iptables, see suricata.yaml.
To check if you have NFQ enabled in your Suricata, enter the following command:
suricata --build-info
and examine if you have NFQ between the features.
To run suricata with the NFQ mode, you have to make use of the -q option. This option tells Suricata which of the queue numbers it should use.
sudo suricata -c /etc/suricata/suricata.yaml -q 0
Iptables configuration
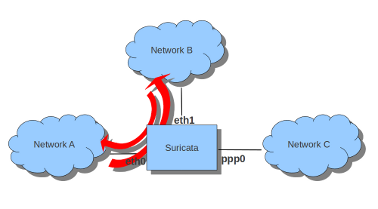
First of all it is important to know which traffic you would like to send to Suricata. Traffic that passes your computer or traffic that is generated by your computer.
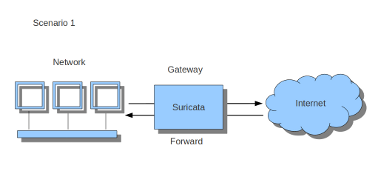
If Suricata is running on a gateway and is meant to protect the computers behind that gateway you are dealing with the first scenario: forward_ing .
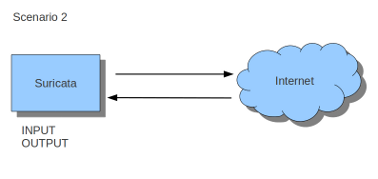
If Suricata has to protect the computer it is running on, you are dealing with the second scenario: host (see drawing 2).
These two ways of using Suricata can also be combined.
The easiest rule in case of the gateway-scenario to send traffic to Suricata is:
sudo iptables -I FORWARD -j NFQUEUE
In this case, all forwarded traffic goes to Suricata.
In case of the host situation, these are the two most simple iptable rules;
sudo iptables -I INPUT -j NFQUEUE
sudo iptables -I OUTPUT -j NFQUEUE
It is possible to set a queue number. If you do not, the queue number will be 0 by default.
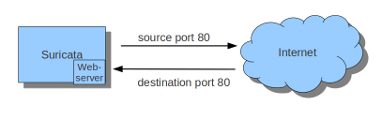
Imagine you want Suricata to check for example just TCP-traffic, or all incoming traffic on port 80, or all traffic on destination-port 80, you can do so like this:
sudo iptables -I INPUT -p tcp  -j NFQUEUE
sudo iptables -I OUTPUT -p tcp -j NFQUEUE
In this case, Suricata checks just TCP traffic.
sudo iptables -I INPUT -p tcp --sport 80  -j NFQUEUE
sudo iptables -I OUTPUT -p tcp --dport 80 -j NFQUEUE
In this example, Suricata checks all input and output on port 80.

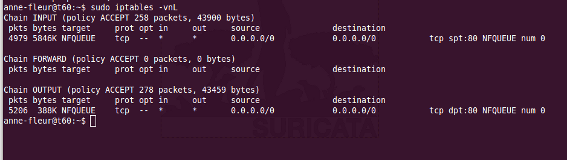
To see if you have set your iptables rules correct make sure Suricata is running and enter:
sudo iptables -vnL
In the example you can see if packets are being logged.
This description of the use of iptables is the way to use it with IPv4. To use it with IPv6 all previous mentioned commands have to start with ‘ip6tables’. It is also possible to let Suricata check both kinds of traffic.
There is also a way to use iptables with multiple networks (and interface cards). Example:
sudo iptables -I FORWARD -i eth0 -o eth1 -j NFQUEUE
sudo iptables -I FORWARD -i eth1 -o eth0 -j NFQUEUE
The options -i (input) -o (output) can be combined with all previous mentioned options
If you would stop Suricata and use internet, the traffic will not come through. To make internet work correctly, you have to erase all iptable rules.
To erase all iptable rules, enter:
sudo iptables -F
Update /etc/init.d/suricata
vi /etc/init.d/suricata
修改
SURICATA_OPTIONS=" -c $SURCONF --pidfile $PIDFILE $LISTEN_OPTIONS -D -vvv $USER_SWITCH"
为
SURICATA_OPTIONS=" -D -c /etc/suricata/suricata.yaml -q 0"
Rule Management with Oinkmaster
It is possible to download and install rules manually, but there is a much easier and quicker way to do so. There are special programs which you can use for downloading and installing rules. There is for example Pulled Pork and Oinkmaster. In this documentation the use of Oinkmaster will be described.
To install Oinkmaster, enter:
sudo apt-get install oinkmaster
There are several rulesets. There is for example Emerging Threats (ET) Emerging Threats Pro and VRT.
In this example we are using Emerging Threats.
Oinkmaster has to know where the rules an be found. These rules can be found at:
http://rules.emergingthreats.net/open/suricata/emerging.rules.tar.gz
open oinkmaster.conf to add this link by entering:
sudo nano /etc/oinkmaster.conf
Place a # in front of the url that is already there and add the new url like this:

(Close oinkmaster.conf by pressing ctrl x, followed by y and enter. )
The next step is to create a directory for the new rules. Enter:
sudo mkdir /etc/suricata/rules
Next enter:
cd /etc
sudo oinkmaster -C /etc/oinkmaster.conf -o /etc/suricata/rules
In the new rules directory a classification.config and a reference.config can be found. The directories of both have to be added in the suricata.yaml file. Do so by entering:
sudo nano /etc/suricata/suricata.yaml
And add the new file locations instead of the file locations already present, like this:

To see if everything works as pleased, run Suricata:
suricata -c /etc/suricata/suricata.yaml -i wlan0 (or eth0)
You will notice there are several rule-files Suricata tries to load, but are not available. It is possible to disable those rule-sets in suricata.yaml by deleting them or by putting a # in front of them.
To stop Suricata from running, press ctrl c.
Emerging Threats contains more rules than loaded in Suricata. To see which rules are available in your rules directory, enter:
ls /etc/suricata/rules/*.rules
Find those that are not yet present in suricata.yaml and add them in yaml if desired.
You can do so by entering :
sudo nano /etc/suricata/suricata.yaml
If you disable a rule in your rule file by putting a # in front of it, it will be enabled again the next time you run Oinkmaster. You can disable it through Oinkmaster instead, by entering the following:
cd /etc/suricata/rules
and find the sid of the rule(s) you want to disable.
Subsequently enter:
sudo nano /etc/oinkmaster.conf
and go all the way to the end of the file.
Type there:
disablesid 2010495
Instead of 2010495, type the sid of the rule you would like to disable. It is also possible to disable multiple rules, by entering their sids separated by a comma.
If you run Oinkmaster again, you can see the amount of rules you have disabled.
You can also enable rules that are disabled by default. Do so by entering:
ls /etc/suricata/rules
In this directory you can see several rule-sets
Enter for example:
sudo nano /etc/suricata/rules/emerging-malware.rules
In this file you can see which rules are enabled en which are not.
You can not enable them for the long-term just by simply removing the #. Because each time you will run Oinkmaster, the rule will be disabled again.
Instead, look up the sid of the rule you want to enable. Place the sid in the correct place of oinkmaster.config:
sudo nano /etc/oinkmaster.conf
do so by typing:
enablesid: 2010495
Instead of 2010495, type the sid of the rule you would like to to enable. It is also possible to enable multiple rules, by entering their sids separated by a comma.
In oinkmaster.conf you can modify rules. For example, if you use Suricata as inline/IPS and you want to modify a rule that sends an alert when it matches and you would like the rule to drop the packet instead, you can do so by entering the following:
sudo nano oinkmaster.conf
At the part where you can modify rules, type:
modifysid 2010495 “alert” | “drop”
The sid 2010495 is an example. Type the sid of the rule you desire to change, instead.
Rerun Oinkmaster to notice the change.
Updating your rules
If you have already downloaded a ruleset (in the way described in this file), and you would like to update the rules, enter:
sudo oinkmaster -C /etc/oinkmaster.conf -o /etc/suricata/rules
It is recommended to update your rules frequently. Emerging Threats is modified daily, VRT is updated weekly or multiple times a week.
Ubuntu下保存iptables规则并开机自动加载的方法:
Saving iptables 保存设置
If you were to reboot your machine right now, your iptables configurationwould disapear. Rather than type this each time you reboot, however, you cansave the configuration, and have it start up automatically. To save theconfiguration, you can use iptables-save and iptables-restore.
机器重启后,iptables中的配置信息会被清空。您可以将这些配置保存下来,让iptables在启动时自动加载,省得每次都得重新输入。iptables-save和iptables-restore 是用来保存和恢复设置的。
Configuration onstartup 开机自动加载配置
Save your firewall rules to a file
先将防火墙规则保存到/etc/iptables.up.rules文件中
# iptables-save > /etc/iptables.up.rules #需要sudo su – root切换用户后执行,直接sudo cmd是不行的
Then modify the/etc/network/interfacesscript to apply the rulesautomatically (the bottom line is added)
然后修改脚本/etc/network/interfaces,使系统能自动应用这些规则(最后一行是我们手工添加的)。
auto eth0
iface eth0 inet dhcp
pre-up iptables-restore < /etc/iptables.up.rules
You can also prepare a set of down rules and apply it automatically
当网络接口关闭后,您可以让iptables使用一套不同的规则集。
auto eth0
iface eth0 inet dhcp
pre-up iptables-restore < /etc/iptables.up.rules
post-down iptables-restore < /etc/iptables.down.rules
HOWTO : Suricata on Ubuntu 12.04 LTS Server
Suricata is an Open Source Next Generation Intrusion Detection and Prevention Engine. This engine is not intended to just replace or emulate the existing tools in the industry, but will bring new ideas and technologies to the field.
There is an Ubuntu PPA of Suricata for Ubuntu 10.04 to 13.04 and the Ubuntu 13.04 is included Suricata in her repositories too. Meanwhile, those packages have IPS mode through NFQUEUE enabled. In addition, Suricata supports nVidia CUDA which requires to recompile the source code with suitable parameter.
Suricata not only can installed on servers but also on desktops and laptops. It performs quiet well on an Intel Atom ITX machine.
For the features, please read here for details.
The following is a basic and general setup of Suricata. For more advanced settings, please refer to the Reference below.
Step 1 :
sudo apt-get install python-software-properties

sudo add-apt-repository ppa:oisf/suricata-stable

sudo apt-get update

sudo apt-get install suricata htp
Step 2 :
To get the Emerging Threats rules :
cd /etc/suricata/
sudo wget https://rules.emergingthreatspro.com/open/suricata/emerging.rules.tar.gz
sudo tar -xvzf emerging.rules.tar.gz
sudo ln -s /etc/suricata/rules/reference.config /etc/suricata/reference.config
sudo ln -s /etc/suricata/UbuntuPPA-configs/classification.config /etc/suricata/classification.config
sudo cp /etc/suricata/UbuntuPPA-configs/suricata-ppa-1.4-6ubuntu6.yaml /etc/suricata/suricata.yaml
*** You can use reference.config and classification.config at /etc/suricata/rules.
sudo mkdir /var/log/suricata

sudo touch /etc/suricata/threshold.config
Step 3 :
sudo nano /etc/suricata/suricata.yaml
Locate the following lines :
default-log-dir: /usr/local/var/log/suricata/

default-rule-path: /usr/local/etc/suricata/rules

classification-file: /usr/local/etc/suricata/classification.config

reference-config-file: /usr/local/etc/suricata/reference.config

#pid-file: /var/run/suricata.pid

#- rule-reload: true

#threshold-file: /usr/local/etc/suricata/threshold.config
– drop
enable: no
Replace with the following lines :
default-log-dir: /var/log/suricata/

default-rule-path: /etc/suricata/rules

classification-file: /etc/suricata/classification.config

reference-config-file: /etc/suricata/reference.config

pid-file: /var/run/suricata.pid

- rule-reload: true

threshold-file: /usr/local/etc/suricata/threshold.config
– drop
enable: yes
To test if it work or not :
sudo suricata -c /etc/suricata/suricata.yaml -i eth0
Several minutes later, check the /var/log/suricata/stats.log and /var/log/suricata/http.log to see if there are some entries or not.
Step 4 :
sudo iptables -A INPUT -j NFQUEUE

sudo iptables -A OUTPUT -j NFQUEUE

sudo iptables -A FORWARD -j NFQUEUE
To test if it work or not :
sudo suricata -c /etc/suricata/suricata.yaml -q 0
Step 5 :
sudo apt-get install oinkmaster
sudo nano /etc/oinkmaster.conf
Append the following line :
url = https://rules.emergingthreatspro.com/open/suricata/emerging.rules.tar.gz
sudo oinkmaster -C /etc/oinkmaster.conf -o /etc/suricata/rules
Step 6 :
When everything is working fine, you can put them in the /etc/rc.local just right above “exit 0” :
#iptables -F

iptables -A INPUT -j NFQUEUE

iptables -A OUTPUT -j NFQUEUE

iptables -A FORWARD -j NFQUEUE
/etc/suricata/ips
Then create a file /etc/suricata/ips :
sudo nano /etc/suricata/ipssuricata -D -c /etc/suricata/suricata.yaml -q 0oinkmaster -C /etc/oinkmaster.conf -o /etc/suricata/ruleskill -USR2 `pidof suricata`
chmod +x /etc/suricata/ips
Then you can write a cron job to update Emerging Threats Rules everyday.
sudo crontab -e
Append the following :
@daily /etc/suricata/update-rules
Then create the update-rule
sudo nano /etc/suricata/update-rules
oinkmaster -C /etc/oinkmaster.conf -o /etc/suricata/rules
kill -USR2 `pidof suricata`
sudo chmod +x /etc/suricata/update-rules
Remarks :
If you want to create a user-interface for the IPS, you can refer to the “Reference” item [12].
If the Suricata acts as IPS gateway, it requires to bridge 2 NICs and 1 NIC for management purpose. In addition, you need to do some changes on the configure files.
If you have 4-cores CPU, you need to change the settings as the following :
iptables -A INPUT -j NFQUEUE --queue-balance 0:3

iptables -A OUTPUT -j NFQUEUE --queue-balance 0:3

iptables -A FORWARD -j NFQUEUE --queue-balance 0:3
suricata -D -c /etc/suricata/suricata.yaml -q 0 -q 1 -q 2 -q 3