update virtualbox kernel modules
ref:https://askubuntu.com/questions/837427/virtualbox-kernel-modules-do-not-match-this-version-of-virtualbox
1、从新安装virtualbox-dkms
2、
/sbin/rcvboxdrv setup
3、
sudo /sbin/vboxconfig

mking007’s blog
update virtualbox kernel modules
ref:https://askubuntu.com/questions/837427/virtualbox-kernel-modules-do-not-match-this-version-of-virtualbox
1、从新安装virtualbox-dkms
2、
/sbin/rcvboxdrv setup
3、
sudo /sbin/vboxconfig
ref:https://communities.vmware.com/t5/VMware-Workstation-Pro/VMware-16-2-3-not-working-on-Ubuntu-22-04-LTS/td-p/2905535
cd /usr/lib/vmware/modules/source
git clone https://github.com/mkubecek/vmware-host-modules
cd vmware-host-modules
git checkout workstation-16.2.4
make
tar -cf vmnet.tar vmnet-only
tar -cf vmmon.tar vmmon-only
mv vmnet.tar /usr/lib/vmware/modules/source/
mv vmmon.tar /usr/lib/vmware/modules/source/
vmware-modconfig --console --install-all
原文地址: http://blog.csdn.net/royer/article/details/11313611
objcopy vmware-vmx -O binary -j bios440 --set-section-flags bios440=a bios440.rom.z
objdump -h vmware-vmx | grep bios440
28bios440 00033d47 0000000000000000 0000000000000000 00d6c0d0 2**0
dd skip=14074064 bs=1 count=212295 ibs=1 obs=1 if=vmware-vmx of=bios440.rom.z
<div class="dp-highlighter bg_plain" style="font-family: Consolas, 'Courier New', Courier, mono, serif; font-size: 12px; width: 621.713px; overflow: auto; padding-top: 1px; margin: 18px 0px !important; background-color: rgb(231, 229, 220);"><div class="bar" style="padding-left: 45px;"><div class="tools" style="padding: 3px 8px 10px 10px; font-stretch: normal; font-size: 9px; line-height: normal; font-family: Verdana, Geneva, Arial, Helvetica, sans-serif; color: silver; border-left-width: 3px; border-left-style: solid; border-left-color: rgb(108, 226, 108); background-color: rgb(248, 248, 248);"><strong>[plain]</strong> <a target=_blank href="http://blog.csdn.net/royer/article/details/11313611#" class="ViewSource" title="view plain" style="color: rgb(160, 160, 160); text-decoration: none; border: none; padding: 1px; margin: 0px 10px 0px 0px; display: inline-block; width: 16px; height: 16px; text-indent: -2000px; background-image: url(http://static.blog.csdn.net/scripts/SyntaxHighlighter/styles/images/default/ico_plain.gif); background-attachment: initial; background-color: inherit; background-size: initial; background-origin: initial; background-clip: initial; background-position: 0% 0%; background-repeat: no-repeat;">view plain</a><span class="tracking-ad" data-mod="popu_168"> <a target=_blank href="http://blog.csdn.net/royer/article/details/11313611#" class="CopyToClipboard" title="copy" style="color: rgb(160, 160, 160); text-decoration: none; border: none; padding: 1px; margin: 0px 10px 0px 0px; display: inline-block; width: 16px; height: 16px; text-indent: -2000px; background-image: url(http://static.blog.csdn.net/scripts/SyntaxHighlighter/styles/images/default/ico_copy.gif); background-attachment: initial; background-color: inherit; background-size: initial; background-origin: initial; background-clip: initial; background-position: 0% 0%; background-repeat: no-repeat;">copy</a></span><div style="position: absolute; left: 557px; top: 1906px; width: 18px; height: 18px; z-index: 99;"></div><span class="tracking-ad" data-mod="popu_169"> </span></div></div><ol start="1" style="padding: 0px; border: none; color: rgb(92, 92, 92); margin: 0px 0px 1px 45px !important; background-color: rgb(255, 255, 255);"><li class="alt" style="border-style: none none none solid; border-left-width: 3px; border-left-color: rgb(108, 226, 108); list-style: decimal-leading-zero outside; color: inherit; line-height: 18px; margin: 0px !important; padding: 0px 3px 0px 10px !important;"><span style="margin: 0px; padding: 0px; border: none; color: black; background-color: inherit;"><span style="margin: 0px; padding: 0px; border: none; background-color: inherit;">perl -e 'use Compress::Zlib; my $v; read STDIN, $v, 212295; $v = uncompress($v); print $v;' < bios440.rom.z > bios440.rom </span></span></li></ol></div>
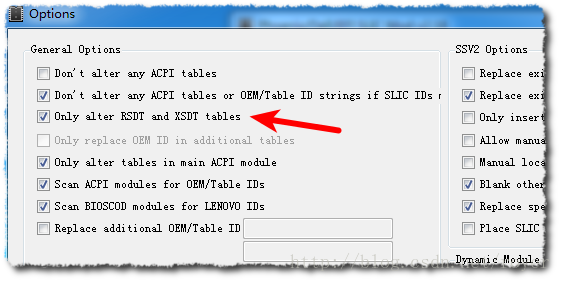
在RW File 里输入刚才rw-everything 生成的AcpiTbls.rw .
点击Advanced 按钮,出现可能会刷砖的警告,点“是”,出现advanced option 对话框,确保” Only alter RSDT and XSDT tables” 选中,点Done 按钮退出设置。
ref:
https://www.virtualbox.org/manual/ch09.html
VirtualBox can be configured to present an custom ACPI table to the guest. Use the following command to configure this:
VBoxManage setextradata "VM name"
      "VBoxInternal/Devices/acpi/0/Config/CustomTable" "/path/to/table.bin"
Configuring a custom ACPI table can prevent Windows Vista and Windows 7 from asking for a new product key. On Linux hosts, one of the host tables can be read from /sys/firmware/acpi/tables/.
在虚拟机配置文件 <ExtraData>节添加以下参数
<ExtraDataItem name="VBoxInternal/Devices/acpi/0/Config/CustomTable" value="/Path Of Slic Table/SLIC.BIN"/>
导入对应Windows版本的产品证书和密钥,激活系统。Dell.xrm-ms,下面密钥为DELL_WIN7-U版的。
slmgr -ipk 342DG-6YJR8-X92GV-V7DCV-P4K27
slmgr -ilc Dell.xrm-ms
slmgr -ato
slmgr -dli
The “USB” section in a virtual machine’s Settings window allows you to configure VirtualBox’s sophisticated USB support.
VirtualBox can allow virtual machines to access the USB devices on your host directly. To achieve this, VirtualBox presents the guest operating system with a virtual USB controller. As soon as the guest system starts using a USB device, it will appear as unavailable on the host.
In addition to allowing a guest access to your local USB devices, VirtualBox even allows your guests to connect to remote USB devices by use of the VirtualBox Remote Desktop Extension (VRDE). For details about this, see Section 7.1.4, “Remote USB”.
In the Settings dialog, you can first configure whether USB is available in the guest at all, and then choose the level of USB support: OHCI for USB 1.1, EHCI (which will also enable OHCI) for USB 2.0, or xHCI for all USB speeds.
The xHCI and EHCI controllers are shipped as a VirtualBox extension package, which must be installed separately. See Section 1.5, “Installing VirtualBox and extension packs” for more information.
When USB support is enabled for a VM, you can determine in detail which devices will be automatically attached to the guest. For this, you can create so-called “filters” by specifying certain properties of the USB device. USB devices with a matching filter will be automatically passed to the guest once they are attached to the host. USB devices without a matching filter can be passed manually to the guest, for example by using the Devices / USB devices menu.
Clicking on the “+” button to the right of the “USB Device Filters” window creates a new filter. You can give the filter a name (for referencing it later) and specify the filter criteria. The more criteria you specify, the more precisely devices will be selected. For instance, if you specify only a vendor ID of 046d, all devices produced by Logitech will be available to the guest. If you fill in all fields, on the other hand, the filter will only apply to a particular device model from a particular vendor, and not even to other devices of the same type with a different revision and serial number.
In detail, the following criteria are available:
046d:c016 stands for Logitech as a vendor, and the “M-UV69a Optical Wheel Mouse” product.Alternatively, you can also specify “Manufacturer” and “Product” by name.To list all the USB devices that are connected to your host machine with their respective vendor and product IDs, you can use the following command (see Chapter 8, VBoxManage):
VBoxManage list usbhost
On Windows, you can also see all USB devices that are attached to your system in the Device Manager. On Linux, you can use the lsusb command.
On a Windows host, you will need to unplug and reconnect a USB device to use it after creating a filter for it.
As an example, you could create a new USB filter and specify a vendor ID of 046d (Logitech, Inc), a manufacturer index of 1, and “not remote”. Then any USB devices on the host system produced by Logitech, Inc with a manufacturer index of 1 will be visible to the guest system.
Several filters can select a single device — for example, a filter which selects all Logitech devices, and one which selects a particular webcam.
You can deactivate filters without deleting them by clicking in the checkbox next to the filter name.
On Windows hosts, a kernel mode device driver provides USB proxy support. It implements both a USB monitor, which allows VirtualBox to capture devices when they are plugged in, and a USB device driver to claim USB devices for a particular virtual machine. As opposed to VirtualBox versions before 1.4.0, system reboots are no longer necessary after installing the driver. Also, you no longer need to replug devices for VirtualBox to claim them.
On newer Linux hosts, VirtualBox accesses USB devices through special files in the file system. When VirtualBox is installed, these are made available to all users in the vboxusers system group. In order to be able to access USB from guest systems, make sure that you are a member of this group.
On older Linux hosts, USB devices are accessed using the usbfs file system. Therefore, the user executing VirtualBox needs read and write permission to the USB file system. Most distributions provide a group (e.g. usbusers) which the VirtualBox user needs to be added to. Also, VirtualBox can only proxy to virtual machines USB devices which are not claimed by a Linux host USB driver. The Driver= entry in /proc/bus/usb/devices will show you which devices are currently claimed. Please refer to Section 12.8.7, “USB not working” also for details about usbfs.
vboxusers group. Please keep in mind that group membership does not take effect immediately but rather at the next login. If available, the newgrp command may avoid the need for logout/login.vboxusers 组中。Add the following line to your /etc/apt/sources.list. According to your distribution, replace ‘<mydist>‘ with ‘artful‘, ‘zesty‘, ‘yakkety‘, ‘xenial‘, ‘vivid‘, ‘utopic‘, ‘trusty‘, ‘raring‘, ‘quantal‘, ‘precise‘, ‘stretch‘, ‘lucid‘, ‘jessie‘, ‘wheezy‘, or ‘squeeze‘:
deb http://download.virtualbox.org/virtualbox/debian <mydist> contrib
(Up to version 3.2 the packages were located in the non-free section. Starting with version 4.0 they are located in the contrib section.)
The Oracle public key for apt-secure can be downloaded
You can add these keys with
sudo apt-key add oracle_vbox_2016.asc
sudo apt-key add oracle_vbox.asc
or combine downloading and registering:
wget -q https://www.virtualbox.org/download/oracle_vbox_2016.asc -O- | sudo apt-key add -
wget -q https://www.virtualbox.org/download/oracle_vbox.asc -O- | sudo apt-key add -
The key fingerprint for oracle_vbox_2016.asc is
B9F8 D658 297A F3EF C18D  5CDF A2F6 83C5 2980 AECF
Oracle Corporation (VirtualBox archive signing key) <[email protected]>
The key fingerprint for oracle_vbox.asc is
7B0F AB3A 13B9 0743 5925  D9C9 5442 2A4B 98AB 5139
Oracle Corporation (VirtualBox archive signing key) <[email protected]>
(As of VirtualBox 3.2, the signing key was changed. The old Sun public key for apt-secure can be downloaded here.)
To install VirtualBox, do
sudo apt-get update
sudo apt-get install virtualbox-5.2
Replace virtualbox-5.2 by virtualbox-5.1 to install VirtualBox 5.1.30 Note: Ubuntu/Debian users might want to install the dkms package to ensure that the VirtualBox host kernel modules (vboxdrv, vboxnetflt and vboxnetadp) are properly updated if the linux kernel version changes during the next apt-get upgrade. For Debian it is available in Lenny backports and in the normal repository for Squeeze and later. The dkms package can be installed through the Synaptic Package manager or through the following command:
sudo apt-get install dkms
What to do when experiencing The following signatures were invalid: BADSIG … when refreshing the packages from the repository?
# sudo -s -H
# apt-get clean
# rm /var/lib/apt/lists/*
# rm /var/lib/apt/lists/partial/*
# apt-get clean
# apt-get update
Starting with VirtualBox 3.0.12 we provide a yum-style repository for Oracle Linux/Fedora/RHEL/openSUSE. Note that 3.0.x .rpm packages are named VirtualBox-3.0.x while 3.1.x .rpm packages are named VirtualBox-3.1-3.1.x. This naming scheme allows to use the older 3.0.x packages without changing the repository.
Furthemore, all .rpm packages are signed. The Oracle public key for rpm can be downloaded here. You can add this key (not necessary for yum users, see below!) with
sudo rpm --import oracle_vbox.asc
or combine downloading and registering:
wget -q https://www.virtualbox.org/download/oracle_vbox.asc -O- | rpm --import -
The key fingerprint is
7B0F AB3A 13B9 0743 5925  D9C9 5442 2A4B 98AB 5139
Oracle Corporation (VirtualBox archive signing key) <[email protected]>
After importing the public key, the package signature can be checked with
rpm --checksig PACKAGE_NAME
Note that importing the key is not necessary for yum users (Oracle Linux/Fedora/RHEL/CentOS) when using one of the virtualbox.repo files from below as yum downloads and imports the public key automatically!
The package signature is checked by yum/zypper as well:
来源:https://forums.mydigitallife.net/threads/oa-2-x-slic-oemcert-collection.5952/
Share any new SLIC 2.x bins & certs here.
Only new bins will be added if the OEMID & OEMTableID differ from the bins in the list.
** NO 2.x BIN MODDING REQUESTS **
** KEEP DISCUSSIONS ABOUT 2.x BIN SHARING-COLLECTING ONLY **
SLIC 2.0 is needed for offline activation of Windows Vista and Server 2008 OEM SLP.
SLIC 2.1 is needed for offline activation of Windows 7 and Server 2008 R2 OEM SLP.
SLIC 2.2 is needed for offline activation of Windows Server 2012 OEM SLP.
SLIC 2.3 is needed for offline activation of Windows Server 2012 R2 OEM SLP.
SLIC 2.4 is needed for offline activation of Windows Server 2016 OEM SLP.
SLICs are backward compatible, which means SLIC 2.4 still can activate Windows 7.
下载:https://forums.mydigitallife.net/attachments/oemcert_and_slics_2017-09-02-7z.42836/
https://resource.mking007.com/bios/OEMCERT_AND_SLICS_2017-09-02.7z
激活:
slmgr.vbs -ipk xxxxx-xxxxx-xxxxx-xxxxx-xxxxx
导入证书:
slmgr.vbs -ilc [盘符]:\[路径]\ASUS-_ASUS_-2.1.XRM-MS
slmgr.vbs -ato
原文:https://forums.mydigitallife.info/threads/42317-Vmware-Mega-Bios-pack-v3
Vmware Bios Mega Pack (337 bios files, 168MB uncompressed, 1.08MB zipped)
http://www.mediafire.com/download/4i0m5ak4z7xp44m/vmware_bios_mega_pack_v4_397.7z
This bios pack contains Vmware bios v295 slp1.0, Vmware bios v314 slp1.0, Vmware bios v314 slic 2.0 + slp 1.0, Vmware bios v314 slic 2.0 no slp 1.0, Vmware bios v314 slic 2.1 + slp 1.0, and Vmware bios v314 slic 2.1 no slp 1.0.
Add “bios440.filename = name_of_bios.rom” to your vmx file.
Vmware bios v295 slp1.0- Older Bios revision. Kept for compatability. Manufactures below are:
acer
Acer_travelmate
Actebis
alienware
american future
amoi
aquarius
Asus
atcomputer
benq
brain technology
dell
dixonsxp
elitegroup
emachines
emaxs
epson
equus
founder
fujitsu
gateway
genuine
gigabyte
greatwall
haiercomputer
hasee
hedy
hi-grade
hitachi
HP
ibm
iqon
itautec
kohjinsha
kraftway
k-systems
lan plus
legend
lenovo
lg
matsus
matsus**ta
maxdata
medion
mitsubishi
mouse
msi
nca
nec
optima
oqo
positivo
powerspec
roverbook
Samsung
seanix
seneca
shanda
sharp
shuttle
sony
sotec
synnex
sysfic
systemax
targa
tarox
tcl
tektronix
time computer
toshiba
trigem
tsinghua
unmodified
vpr matrix
Vmware bios v314 slp1.0-Newest bios works with Vmware 6.X-7.X. Manufacturers include all of V295 plus the following:
jvc
viewsonic
xp virtual mode
Vmware bios v314 slic 2.0 + slp1.0-Newest bios works with Vmware 6.X-7.X. There is (1) bios per bin
file, each containing the slic 2.0 for that bin file and the corresponding slp 1.0 for that manufacturer. Manufacturers are :
acer
alienware
asus
averatec
benq
chiligrren-maxdata
dell
elitegroup-ecs
emachines-gateway
everex-fic
founder
fujitsu
gigabyte
greatwall
haier
hasee
hedy
hp-compaq
ibm-lenovo
iqon
kohjinsha
ksystems
lg
medion
msi
nec
oqo
panasonic
powerspec
roverbook
samsung
sharp
sony
sotec
systemax
targa
tcl
toshiba
tsinghua
Vmware bios v314 slic 2.0 no slp1.0-Newest bios works with Vmware 6.X-7.X. There is (1) bios per bin file containing the slic 2.0. There are no slp 1.0 for these manufacturers. Manufacturers are :
advent
ctlcom
dealin
egolife
general-dyn
gericom
getac
kouziro
meshpc
olidata
packard
velocity
Vmware bios v314 slic 2.1 no slp1.0-Newest bios works with Vmware 6.X-7.X. There is (1) bios per bin file containing the slic 2.1. There are no slp 1.0 for these manufacturers. Manufacturers are :
advent
fsc
nokia
quanmax
Vmware bios v314 slic 2.1 + slp1.0-Newest bios works with Vmware 6.X-7.X. There is (1) bios per bin
file, each containing the slic 2.1 for that bin file and the corresponding slp 1.0 for that manufacturer. Manufacturers are :
acer
alienware
asus
benq
compaq-hp
dell
founder
fujitsu
gigabyte
lenovo-ibm
lg
medion
msi
samsung
sony
toshiba
trigem
This bios pack is based on the XP oembios archive, Slic 2.0 bins, and Slic 2.1 bins.
If there are any problems with a bios, pls post which folder and bios.
Happy VM’ing.
联想/DELL/Acer Windows10 旗舰版及部分专业版OEM序列号
联想旗舰版:22TKD-F8XX6-YG69F-9M66D-PMJBM
DELL旗舰版:342DG-6YJR8-X92GV-V10DCV-P4K210
Acer旗舰版:FJGCP-4DFJD-GJY49-VJBQ10-HYRR2
Acer专业版:YKHFT-KW986-GK4PY-FDWYH-10TP9F
使用方法:我的电脑右键-管理-本地用户组-用户-双击右边的Administrator-账号已禁用前面的钩去掉。
切换用户,用Administrator登录,Win+R运行CMD,CMD下执行slmgr.vbs -ipk 序列号即可激活。