NVIDIA FFmpeg Transcoding Guide

来源:

1. https://developer.nvidia.com/blog/nvidia-ffmpeg-transcoding-guide/

2. https://docs.nvidia.com/video-technologies/video-codec-sdk/ffmpeg-with-nvidia-gpu/

All NVIDIA GPUs starting with the Kepler generation support fully-accelerated hardware video encoding, and all GPUs starting with Fermi generation support fully-accelerated hardware video decoding.  As of July 2019 Kepler, Maxwell, Pascal, Volta and Turing generation GPUs support hardware encoding, and Fermi, Kepler, Maxwell, Pascal, Volta and Turing generation GPUs support hardware decoding.

The processing demands from high quality video applications have pushed limits for broadcast and telecommunication networks. Consumer behavior has evolved, evident in the trends of OTT video subscription and the rapid uptake of live streaming. All social media applications now include the feature on their respective platforms. Live streaming will drive overall video data traffic growth for both cellular and Wi-Fi as consumers move beyond watching on-demand video to viewing live streams.

Video content distributed to viewers is often transcoded into several adaptive bit rate (ABR) profiles for delivery. Content in production may arrive in one of the large numbers of codec formats that needs to be transcoded into another for distribution or archiving.

This makes video transcoding a critical piece of an efficient video pipeline – whether it is 1:N or M:N profiles. The ideal solution for transcoding needs to be cost effective in terms of cost (Dollar/stream) and power efficiency (Watts/stream) along with delivering high quality content with maximum throughput for the datacenter. Video providers want to reduce the cost of delivering more content with great quality to more screens.

The massive video content generated on all fronts requires robust hardware acceleration of video encoding, decoding, and transcoding. Let’s take a look at how NVIDIA GPUs incorporate dedicated video processing hardware and how you can take advantage of it.

NVIDIA Encoding and Decoding Hardware

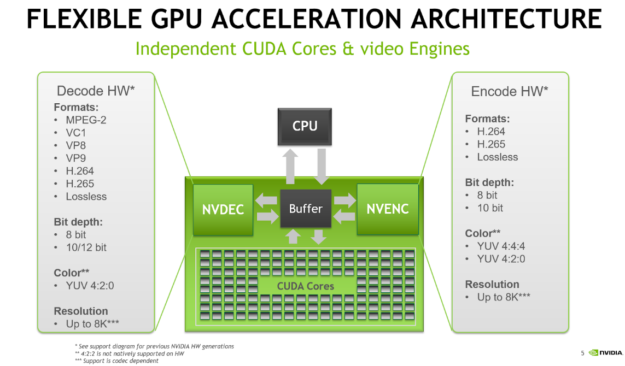
NVIDIA GPUs ship with an on-chip hardware encoder and decoder unit often referred to as NVENC and NVDEC. Separate from the CUDA cores, NVENC/NVDEC run encoding or decoding workloads without slowing the execution of graphics or CUDA workloads running at the same time.

NVENC and NVDEC support the many important codecs for encoding and decoding. Figure 1 lists many of the codecs, format and features supported with current NVIDIA hardware. Actual support depends on the GPU that is used. An up-to-date support matrix can be found at the Video Encode and Decode Support Matrix page.

GPU encode and decode capabilities image
Figure 1: GPU hardware capabilities

Hardware accelerated transcoding with FFmpeg

Using the FFmpeg library is common practice when transcoding video data. Hardware acceleration dramatically improves the performance of the workflow. Figure 2 shows the different elements of the transcoding process with FFmpeg.

Transcoding pipeline with ffmpeg flow diagram
Figure 2: Transcoding pipeline with FFmpeg using NVIDIA hardware acceleration

FFmpeg supports hardware accelerated decoding and encoding via the hwaccel cudah264_cuvidhevc_cuvid and h264_nvenchevc_nvenc modules. Activating support for hardware acceleration when building from source requires some extra steps:

  • Clone the FFmpeg git repository https://git.ffmpeg.org/ffmpeg.git
  • Download and install a compatible driver from the NVIDIA web site
  • Download and install the CUDA toolkit
  • Clone the nv-codec-headers repository  and install using this repository as header-only: make install
  • Configure FFmpeg using the following command (use correct CUDA library path):
./configure --enable-cuda --enable-cuvid --enable-nvdec --enable-nvenc --enable-nonfree --enable-libnpp --extra-cflags=-I/usr/local/cuda/include  --extra-ldflags=-L/usr/local/cuda/lib64
  • Build with multiple processes to increase build speed and suppress excessive output: make -j -s

Using FFmpeg to do software 1:1 transcode is simple:

ffmpeg -i input.mp4 -c:a copy -c:v h264 -b:v 5M output.mp4
-c:a copy copies the audio stream without any re-encoding
-c:v h264 selects the software H.264 encoder for the output stream
-b:v 5M sets the output bitrate to 5Mb/s

But this is going to be slow slow since it only uses the CPU-based software encoder and decoder. Using the hardware encoder NVENC and decoder NVDEC requires adding some more parameters to tell ffmpeg which encoder and decoders to use. Maximizing the transcoding speed also means making sure that the decoded image is kept in GPU memory so the encoder can efficiently access it.

ffmpeg -hwaccel cuda -hwaccel_output_format cuda -i input.mp4 -c:v h264_nvenc -b:v 5M output.mp4
-hwaccel cuda chooses appropriate hw accelerator
-hwaccel_output_format cuda keeps the decoded frames in GPU memory
-c:v h264_nvenc selects the NVIDIA hardware accelerated H.264 encoder

Without the -hwaccel cuda -hwaccel_output_format cuda option, the decoded raw frames would be copied back to system memory via the PCIe bus, shown in figure 3. Later, the same image would be copied back to GPU memory via PCIe to encode on the GPU. These two additional transfers create latency due to the transfer time and will increase PCIe bandwidth occupancy.

Memory flow without hwaccel diagram
Figure 3: Memory flow without hwaccel

Adding the -hwaccel cuvid option means the raw decoded frames will not be copied and the transcoding will be faster and use less system resources, as shown in figure 4.

Memory flow with hwaccel diagram
Figure 4: Memory flow with hwaccel

Given PCIe bandwidth limits, copying uncompressed image data would quickly saturate the PCIe bus. Prevent unnecessary copies between system and GPU memory, using -hwaccel cuda -hwaccel_output_format cuda result in up to 2x the throughput compared to the unoptimized call not using -hwaccel cuvid.

Processing filters

Transcoding often involves not only changing format or bitrate of the input stream, but also resizing it. Two options exist for resizing on the GPU: using the npp_scale filter or the nvcuvid resize option. The nvcuvid resize option can be used when transcoding from one input to one output stream with different resolution (1:1 transcode). See the next line for an example.

ffmpeg -vsync 0 hwaccel cuvid -c:v h264_cuvid resize 1280x720 -i input.mp4 -c:a copy -c:v h264_nvenc -b:v 5M output.mp4

If multiple output resolutions are needed (1:N transcode), the scale_npp filter can resize decoded frames on the GPU. This way we can generate multiple output streams with multiple different resolutions but only using one resize step for all streams. See the next line for an example of 1:2 transcode.

ffmpeg -vsync 0 -hwaccel cuda -hwaccel_output_format cuda -i input.mp4 \ -c:a copy vf scale_npp=1280:720 -c:v h264_nvenc -b:v 5M output_720.mp4 \ -c:a copy -vf scale_npp=640:320 -c:v h264_nvenc -b:v 3M output_360.mp4

Using -vf "scale_npp=1280:720" will set scale_npp as filter for the decoded images

The interpolation algorithm can be defined for scale_npp as an additional argument. Cubic interpolation is used by default but other algorithms might give better results depending on scale factor and images. Using the super-sampling algorithm is recommended for best quality when downscaling. See below for an example:

ffmpeg -vsync 0 -hwaccel cuda -hwaccel_output_format cuda -i input.mp4 -c:a copy vf scale_npp=1280:720:interp_algo=super -c:v h264_nvenc -b:v 5M output_720.mp4

Mixing CPU and GPU processing

Sometimes it might be necessary to mix CPU and GPU processing. For example you may need to decode on the CPU, because the format is unsupported on the GPU decoder, or because a filter is not available on the GPU. In those cases, you can’t use the -hwaccel cuvid or -hwaccel cuda flag. Instead, you need to manage uploading the data from system to GPU memory using the hwupload_cuda filter. In the example below, an H.264 stream is decoded on the GPU and downloaded to system memory since -hwaccel cuvid is not set. The fade filter is applied in system memory and the processed image uploaded to GPU memory using the hwupload_cuda filter. Finally, the image is scaled using scale_npp and encoded on the GPU.

ffmpeg -vsync 0 -c:v h264_cuvid -i input.264 -vf "fade,hwupload_cuda,scale_npp=1280:720" -c:v h264_nvenc output.264

Multi-GPU

Encoding and decoding work must be explicitly assigned to a GPU when using multiple GPUs in one system. GPUs are identified by their index number; by default all work is performed on the GPU with index 0. Use the following command to obtain a list of all NVIDIA GPUs in the system and their corresponding ID numbers:

ffmpeg -vsync 0 -i input.mp4 -c:v h264_nvenc -gpu list -f null 

Once you know the index, the -hwaccel_device index flag can be used to set the active GPU for decoding and encoding. In the example below the work will be executed on the gpu with index 1.

ffmpeg -vsync 0 -hwaccel cuvid -hwaccel_device 1 -hwaccel cuda -hwaccel_output_format cuda -i input.mp4 -c:a copy -c:v h264_nvenc -b:v 5M output.mp4

Optimizations

All encoder and decoder units should be utilized as much as possible for best throughput. nvidia-smi can be used to generate real-time information about NVENC, NVDEC and general GPU utilization.

nvidia-smi dmon
nvidia-smi -q -d UTILIZATION

Multiple actions may be taken depending on those results. If encoder utilization is low, it might be feasible to introduce another transcoding pipeline that uses CPU decode and NVENC encode to generate additional workload for the hardware encoder.

PCIe bandwidth might become the bottleneck when using CPU filters. If possible, filters should run on the GPU. Several CUDA filters exist in FFmpeg that can be used as templates to implement your own high-performance CUDA filter.

You can always track GPU utilization and memory transfers between host and device by profiling the ffmpeg application using the Nvidia Visual Profiler, part of the CUDA SDK. Simply launch “Run application to generate CPU and GPU timeline” and select the ffmpeg application with relevant CLI options. The application timeline is illustrated on fig. 5

ffmpeg in nvprof image
Figure 5: ffmpeg application timeline

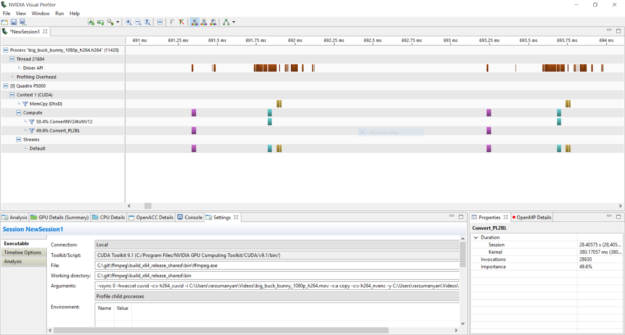
Turquoise blocks show colorspace conversion done by CUDA kernels while yellow blocks show memory transfer between host and device. Using Visual profiler allows users to easily track operations done on GPU, such as CUDA-accelerated filters and data transfers to ensure no excessive memory copies are done.

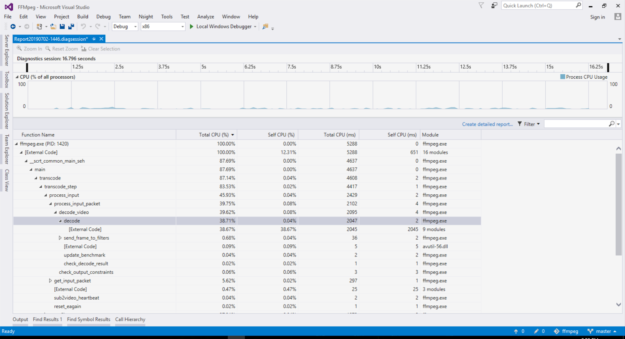
Collect CPU-side perforamnce statistics by compiling ffmpeg with the --disable-stripping CLI option to enable performance profiling.

This prevents the compiler from stripping function names so that commodity profilers like Gprof or Visual Studio profiler can collect performance statistics. CPU load level should be low with hardware acceleration on and most time should be spent within the Video Code SDK API calls, which are marked as “External Code” as function names are stripped from driver libraries. Figure 6 shows an example screenshot.

ffmpeg profiling in Visual Studio image
Figure 6: ffmpeg performance profiling with Visual Studio

Further Reading

For more examples on how to use FFmpeg and a look at the advanced quality settings that are available please take a look at the “Using FFmpeg With NVIDIA GPU Hardware Acceleration” guide.

Conclusion

FFmpeg is a powerful and flexible open source video processing library with hardware accelerated decoding and encoding backends. It allows rapid video processing with full NVIDIA GPU hardware support in minutes. Commodity developer tools such as Gprof, Visual Profiler, and Microsoft Visual Studio may be used for fine performance analysis and tuning. Check out the ffmpeg sources and give it a go!

【原】用wget和ffmpeg抓取m3u8格式的视频

1.先下载后转码

以reuters.tv为例

1.手动解析出m3u8文件并下载到本地

2.利用wget下载视频片段

wget -c -r -np -i ignored.m3u8

3.将m3u8文件里的https://替换为 file ./

4.ffmpeg合并文件并用hevc转码,使用vaapi硬件加速

ffmpeg -hwaccel vaapi -hwaccel_output_format vaapi -hwaccel_device /dev/dri/renderD128 -f concat -safe 0 -i ignored.m3u8 -c:v hevc_vaapi output.mp4


2.直接下载

以CNTV 为例

视频地址:

https://tv.cctv.com/2020/05/21/VIDEtOJBS1JDMtj8hQAKachO200521.shtml

1.解析m3u8地址

https://newcntv.qcloudcdn.com/asp/hls/8000/0303000a/3/default/656069b44bb94a6c9128c14b4f100c1f/8000.m3u8


ffmpeg直接下载(使用“-c copy”,直接用原编码,不转码)

ffmpeg -i "https://hls.cntv.myalicdn.com/asp/hls/8000/0303000a/3/default/656069b44bb94a6c9128c14b4f100c1f/8000.m3u8" -c copy out.mp4


手动提取爱奇艺Cookie教程-免密码登录

这里我就直接引用(我还没跟你说我就直接引用了没事吧?)
http://passport.iqiyi.com/user/relogin.php?keep=0&openurl=http%3A%2F%2Fwww.iqiyi.com%2Fu%2F&authcookie=
复制代码
这是用来提交Cookie的链接。。

接下来抓爱奇艺Cookie的教程:
方法一:利用Console运行document.cookie来直接提取

allCookies = document.cookie


方法二:
Network中搜索:authcookie      然后在Headers中Query String Parameters,找到authcookie

颜色列表(RGB,HSV,CYMK/CMYK,HEX)

来源:https://zh.wikipedia.org/wiki/%E9%A2%9C%E8%89%B2%E5%88%97%E8%A1%A8

维基百科,自由的百科全书

颜色列表

此列表仅列出常见的色彩,色彩的多样性使得在实际上难以全部列举或命名。另外由于各种显示器在未经校正前有色差存在,因此以下的色彩呈现仅供参考。

色彩列表[编辑]

本列表依三原色光模式印刷四分色模式HSV色彩属性模式排列:

RGB CMYK HSV
颜色 名称 英语 十六进制 R G B C M Y K H S V
黑色 Black #000000 0 0 0 0 0 0 100 0 0 0
昏灰 Dimgray #696969 105 105 105 0 0 0 59 0 0 41
灰色 Gray #808080 128 128 128 0 0 0 50 0 0 50
暗灰 Dark Gray #A9A9A9 169 169 169 0 0 0 34 0 0 66
银色 Silver #C0C0C0 192 192 192 0 0 0 25 0 0 75
亮灰色 Light Gray #D3D3D3 211 211 211 0 0 0 17 0 0 83
庚斯博罗灰 Gainsboro #DCDCDC 220 220 220 0 0 0 14 0 0 86
白烟色 White Smoke #F5F5F5 245 245 245 0 0 0 4 0 0 96
白色 White #FFFFFF 255 255 255 0 0 0 0 0 0 100
雪色 Snow #FFFAFA 255 250 250 0 2 2 0 0 2 100
铁灰色 Iron Gray #625B57 98 91 87 60 55 55 25 21 12 39
沙棕 Sand Beige #E6C3C3 230 195 195 0 15 15 10 0 15 90
玫瑰褐 Rosy Brown #BC8F8F 188 143 143 0 24 24 26 0 24 74
亮珊瑚色 Light Coral #F08080 240 128 128 0 47 47 6 0 47 94
印度红 Indian Red #CD5C5C 205 92 92 0 55 55 20 0 55 80
褐色 Brown #A52A2A 165 42 42 0 75 75 35 0 75 65
耐火砖红 Fire Brick #B22222 178 34 34 0 81 81 30 0 81 70
栗色 Maroon #800000 128 0 0 0 100 100 50 0 100 50
暗红 Dark Red #8B0000 139 0 0 0 100 100 45 0 100 55
鲜红 Strong Red #E60000 230 0 0 0 100 100 10 0 100 90
红色 Red #FF0000 255 0 0 0 100 100 0 0 100 100
柿子橙 Persimmon #FF4D40 255 77 64 0 70 75 0 4 75 100
雾玫瑰色 Misty Rose #FFE4E1 255 228 225 0 11 12 0 6 12 100
鲑红 Salmon #FA8072 250 128 114 0 49 54 2 6 54 98
腥红 Scarlet #FF2400 255 36 0 0 86 100 0 8 100 100
蕃茄红 Tomato #FF6347 255 99 71 0 61 72 0 9 72 100
暗鲑红 Dark Salmon #E9967A 233 150 122 0 36 48 9 15 48 91
珊瑚红 Coral #FF7F50 255 127 80 0 50 69 0 16 69 100
橙红 Orange Red #FF4500 255 69 0 0 73 100 0 16 100 100
亮鲑红 Light Salmon #FFA07A 255 160 122 0 37 52 0 17 52 100
朱红 Vermilion #FF4D00 255 77 0 0 70 100 0 18 100 100
赭黄 Sienna #A0522D 160 82 45 0 49 72 37 19 72 63
热带橙 Tropical Orange #FF8033 255 128 51 0 50 80 0 23 80 100
驼色 Camel #A16B47 161 107 71 0 34 56 37 24 56 63
杏黄 Apricot #E69966 230 153 102 0 33 56 10 24 56 90
椰褐 Coconut Brown #4D1F00 77 31 0 0 60 100 70 24 100 30
海贝色 Seashell #FFF5EE 255 245 238 0 4 7 0 25 7 100
鞍褐 Saddle Brown #8B4513 139 69 19 0 50 86 45 25 86 55
巧克力色 Chocolate #D2691E 210 105 30 0 50 86 18 25 86 82
燃橙 Burnt Orange #CC5500 204 85 0 0 58 100 20 25 100 80
阳橙 Sun Orange #FF7300 255 115 0 0 55 100 0 27 100 100
粉扑桃色 Peach Puff #FFDAB9 255 218 185 0 15 27 0 28 27 100
沙褐 Sand Brown #F4A460 244 164 96 0 33 61 4 28 61 96
铜色 Bronze #B87333 184 115 51 0 38 72 28 29 72 72
亚麻色 Linen #FAF0E6 250 240 230 0 4 8 2 30 8 98
蜜橙 Honey Orange #FFB366 255 179 102 0 30 60 0 30 60 100
秘鲁色 Peru #CD853F 205 133 63 0 35 69 20 30 69 80
乌贼墨色 Sepia #704214 112 66 20 0 41 82 56 30 82 44
赭色 Ocher #CC7722 204 119 34 0 42 83 20 30 83 80
陶坯黄 Bisque #FFE4C4 255 228 196 0 11 23 0 33 23 100
橘色 Tangerine #F28500 242 133 0 0 45 100 5 33 100 95
暗橙 Dark Orange #FF8C00 255 140 0 0 45 100 0 33 100 100
古董白 Antique White #FAEBD7 250 235 215 0 6 14 2 34 14 98
日晒色 Tan #D2B48C 210 180 140 0 14 33 18 34 33 82
硬木色 Burly Wood #DEB887 222 184 135 0 17 39 13 34 39 87
杏仁白 Blanched Almond #FFEBCD 255 235 205 0 8 20 0 36 20 100
那瓦霍白 Navajo White #FFDEAD 255 222 173 0 13 32 0 36 32 100
万寿菊黄 Marigold #FF9900 255 153 0 0 40 100 0 36 100 100
蕃木瓜色 Papaya Whip #FFEFD5 255 239 213 0 6 16 0 37 16 100
灰土色 Pale Ocre #CCB38C 204 179 140 0 12 31 20 37 31 80
卡其色 Khaki #996B1F 153 107 31 0 30 80 40 37 80 60
鹿皮鞋色 Moccasin #FFE4B5 255 228 181 0 11 29 0 38 29 100
旧蕾丝色 Old Lace #FDF5E6 253 245 230 0 3 9 1 39 9 99
小麦色 Wheat #F5DEB3 245 222 179 0 9 27 4 39 27 96
桃色 Peach #FFE5B4 255 229 180 0 10 29 0 39 29 100
橙色 Orange #FFA500 255 128 0 0 35 100 0 30 100 100
花卉白 Floral White #FFFAF0 255 250 240 0 2 6 0 40 6 100
金菊色 Goldenrod #DAA520 218 165 32 0 24 85 15 43 85 85
暗金菊色 Dark Goldenrod #B8860B 184 134 11 0 27 94 28 43 94 72
咖啡色 Coffee #4D3900 77 57 0 0 26 100 70 44 100 30
茉莉黄 Jasmine #E6C35C 230 195 92 0 15 60 10 45 60 90
琥珀色 Amber #FFBF00 255 191 0 0 25 100 0 45 100 100
玉米丝色 Cornsilk #FFF8DC 255 248 220 0 3 14 0 48 14 100
铬黄 Chrome Yellow #E6B800 230 184 0 0 20 100 10 48 100 90
金色 Golden #FFD700 255 215 0 0 16 100 0 51 100 100
柠檬绸色 Lemon Chiffon #FFFACD 255 250 205 0 2 20 0 54 20 100
亮卡其色 Light Khaki #F0E68C 240 230 140 0 4 42 6 54 42 94
灰金菊色 Pale Goldenrod #EEE8AA 238 232 170 0 3 29 7 55 29 93
暗卡其色 Dark Khaki #BDB76B 189 183 107 0 3 43 26 56 43 74
含羞草黄 Mimosa #E6D933 230 217 51 0 6 78 10 56 78 90
奶油色 Cream #FFFDD0 255 253 208 0 1 18 0 57 18 100
象牙色 Ivory #FFFFF0 255 255 240 0 0 6 0 60 6 100
米黄色 Beige #F5F5DC 245 245 220 0 0 10 4 60 10 96
亮黄 Light Yellow #FFFFE0 255 255 224 0 0 12 0 60 12 100
亮金菊黄 Light Goldenrod Yellow #FAFAD2 250 250 210 0 0 16 2 60 16 98
香槟黄 Champagne Yellow #FFFF99 255 255 153 0 0 40 0 60 40 100
芥末黄 Mustard #CCCC4D 204 204 77 0 0 62 20 60 62 80
月黄 Moon Yellow #FFFF4D 255 255 77 0 0 70 0 60 70 100
橄榄色 Olive #808000 128 128 0 0 0 100 50 60 100 50
鲜黄 Canary Yellow #FFFF00 255 239 0 0 0 100 0 56 100 100
黄色 Yellow #FFFF00 255 255 0 0 0 100 0 60 100 100
苔藓绿 Moss Green #697723 105 119 35 12 0 71 53 70 71 47
亮柠檬绿 Light Lime #CCFF00 204 255 0 20 0 100 0 72 100 100
橄榄军服绿 Olive Drab #6B8E23 107 142 35 25 0 75 44 80 75 56
黄绿 Yellow Green #9ACD32 154 205 50 25 0 76 20 80 76 80
暗橄榄绿 Dark Olive Green #556B2F 85 107 47 21 0 56 58 82 56 42
苹果绿 Apple Green #8CE600 140 230 0 39 0 100 10 83 100 90
绿黄 Green Yellow #ADFF2F 173 255 47 32 0 82 0 84 82 100
草绿 Grass Green #99E64D 153 230 77 33 0 67 10 90 67 90
草坪绿 Lawn Green #7CFC00 124 252 0 51 0 100 1 90 100 99
查特酒绿 Chartreuse #7FFF00 127 255 0 50 0 100 0 90 100 100
叶绿 Foliage Green #73B839 115 184 57 38 0 69 28 93 69 72
嫩绿 Fresh Leaves #99FF4D 153 255 77 40 0 70 0 94 70 100
明绿 Bright Green #66FF00 102 255 0 60 0 100 0 96 100 100
钴绿 Cobalt Green #66FF59 102 255 89 60 0 65 0 115 65 100
蜜瓜绿 Honeydew #F0FFF0 240 255 240 6 0 6 0 120 6 100
暗海绿 Dark Sea Green #8FBC8F 143 188 143 24 0 24 26 120 24 74
亮绿 Light Green #90EE90 144 238 144 39 0 39 7 120 39 93
灰绿 Pale Green #98FB98 152 251 152 39 0 39 2 120 39 98
常春藤绿 Ivy Green #36BF36 54 191 54 72 0 72 25 120 72 75
森林绿 Forest Green #228B22 34 139 34 76 0 76 45 120 76 55
柠檬绿 Lime Green #32CD32 50 205 50 76 0 76 20 120 76 80
暗绿 Dark Green #006400 0 100 0 100 0 100 61 120 100 39
绿色 Green #008000 0 128 0 100 0 100 50 120 100 50
鲜绿色 Lime #00FF00 0 255 0 100 0 100 0 120 100 100
孔雀石绿 Malachite #22C32E 34 195 46 83 0 76 24 124 83 76
薄荷绿 Mint #16982B 22 152 43 86 0 72 40 130 86 60
青瓷绿 Celadon Green #73E68C 115 230 140 50 0 39 10 133 50 90
碧绿 Emerald #50C878 80 200 120 60 0 40 22 140 60 78
绿松石绿 Turquoise Green #4DE680 77 230 128 67 0 44 10 140 67 90
铬绿 Viridian #127436 18 116 54 84 0 53 55 142 84 45
苍色 Horizon Blue #A6FFCC 166 255 204 35 0 20 0 146 35 100
海绿 Sea Green #2E8B57 46 139 87 67 0 37 45 146 67 55
中海绿 Medium Sea Green #3CB371 60 179 113 66 0 37 30 147 66 70
薄荷奶油色 Mint Cream #F5FFFA 245 255 250 4 0 2 0 150 4 100
春绿 Spring Green #00FF80 0 255 128 100 0 50 0 150 100 100
孔雀绿 Peacock Green #00A15C 0 161 92 100 0 43 37 154 100 63
中春绿色 Medium Spring Green #00FA9A 0 250 154 100 0 38 2 157 100 98
中碧蓝色 Medium Aquamarine #66CDAA 102 205 170 50 0 17 20 160 50 80
碧蓝色 Aquamarine #7FFFD4 127 255 212 50 0 17 0 160 50 100
青蓝 Cyan Blue #0DBF8C 13 191 140 93 0 27 25 163 93 75
水蓝 Aqua Blue #66FFE6 102 255 230 70 15 0 0 170 60 100
土耳其蓝 Turquoise Blue #33E6CC 51 230 204 78 0 11 10 171 78 90
绿松石色 Turquoise #30D5C8 48 213 200 77 0 6 16 175 77 84
亮海绿 Light Sea Green #20B2AA 32 178 170 82 0 4 30 177 82 70
中绿松石色 Medium Turquoise #48D1CC 72 209 204 66 0 2 18 178 66 82
亮青 Light Cyan #E0FFFF 224 255 255 12 0 0 0 180 12 100
浅蓝 Baby Blue #89CFF0 137 207 240 43 14 0 6 199 43 94
灰绿松石色 Pale Turquoise #AFEEEE 175 238 238 26 0 0 7 180 26 93
暗岩灰 Dark Slate Gray #2F4F4F 47 79 79 41 0 0 69 180 41 31
凫绿 Teal #008080 0 128 128 100 0 0 50 180 100 50
暗青 Dark Cyan #008B8B 0 139 139 100 0 0 45 180 100 55
青色 Cyan #00FFFF 0 255 255 100 0 0 0 180 100 100
水色 Aqua #AFDFE4 175 223 228 25 0 8 0 186 23 89
暗绿松石色 Dark Turquoise #00CED1 0 206 209 100 1 0 18 181 100 82
军服蓝 Cadet Blue #5F9EA0 95 158 160 41 1 0 37 182 41 63
孔雀蓝 Peacock Blue #00808C 0 128 140 100 9 0 45 185 100 55
婴儿粉蓝 Powder Blue #B0E0E6 176 224 230 23 3 0 10 187 23 90
浓蓝 Strong Blue #006374 0 99 116 100 15 0 55 189 100 45
亮蓝 Light Blue #ADD8E6 173 216 230 25 6 0 10 195 25 90
灰蓝 Pale Blue #7AB8CC 122 184 204 40 10 0 20 195 40 80
萨克斯蓝 Saxe Blue #4798B3 71 152 179 60 15 0 30 195 60 70
深天蓝 Deep Sky Blue #00BFFF 0 191 255 100 25 0 0 195 100 100
天蓝 Sky Blue #87CEEB 135 206 235 43 12 0 8 197 43 92
浅天蓝 Light Sky Blue #87CEFA 135 206 250 46 18 0 2 203 46 98
水手蓝 Marine Blue #00477D 0 71 125 100 43 0 51 206 100 49
普鲁士蓝 Prussian blue #003153 0 49 83 63 35 14 72 205 100 43
钢青色 Steel Blue #4682B4 70 130 180 61 28 0 29 207 61 71
爱丽丝蓝 Alice Blue #F0F8FF 240 248 255 6 3 0 0 208 6 100
岩灰 Slate Gray #708090 112 128 144 22 11 0 44 210 22 56
亮岩灰 Light Slate Gray #778899 119 136 153 22 11 0 40 210 22 60
道奇蓝 Dodger Blue #1E90FF 30 144 255 88 44 0 0 210 88 100
矿蓝 Mineral Blue #004D99 0 77 153 100 50 0 40 210 100 60
湛蓝 Azure #007FFF 0 127 255 100 50 0 0 210 100 100
韦奇伍德瓷蓝 Wedgwood Blue #5686BF 86 134 191 55 30 0 25 213 55 75
亮钢蓝 Light Steel Blue #B0C4DE 176 196 222 21 12 0 13 214 21 87
钴蓝 Cobalt Blue #0047AB 0 71 171 100 58 0 33 215 100 67
灰丁宁蓝 Pale Denim #5E86C1 94 134 193 51 31 0 24 216 51 76
矢车菊蓝 Cornflower Blue #6495ED 100 149 237 58 37 0 7 219 58 93
鼠尾草蓝 Salvia Blue #4D80E6 77 128 230 67 44 0 10 220 67 90
暗婴儿粉蓝 Dark Powder Blue #003399 0 51 153 100 67 0 40 220 100 60
蓝宝石色 Sapphire #082567 8 37 103 92 64 0 60 222 92 40
国际奇连蓝 International Klein Blue #002FA7 0 47 167 100 72 0 35 223 100 65
蔚蓝 Cerulean blue #2A52BE 42 82 190 78 57 0 25 224 78 75
品蓝 Royal Blue #4169E1 65 105 225 71 53 0 12 225 71 88
暗矿蓝 Dark Mineral Blue #24367D 36 54 125 71 57 0 51 228 71 49
极浓海蓝 Ultramarine #0033FF 0 51 255 100 80 0 0 228 100 100
天青石蓝 Lapis Lazuli #0D33FF 13 51 255 95 80 0 0 231 95 100
幽灵白 Ghost White #F8F8FF 248 248 255 3 3 0 0 240 3 100
薰衣草紫 Lavender #E6E6FA 230 230 250 8 8 0 2 240 8 98
长春花色 Periwinkle #CCCCFF 204 204 255 20 20 0 0 240 20 100
午夜蓝 Midnight Blue #191970 25 25 112 78 78 0 56 210 100 40
藏青 Navy Blue #000080 0 0 128 100 100 0 50 240 100 50
暗蓝 Dark Blue #00008B 0 0 139 100 100 0 45 240 100 55
中蓝 Medium Blue #0000CD 0 0 205 100 100 0 20 240 100 80
蓝色 Blue #0000FF 0 0 255 100 100 0 0 240 100 100
紫藤色 Wisteria #5C50E6 92 80 230 60 65 0 10 245 65 90
暗岩蓝 Dark Slate Blue #483D8B 72 61 139 48 56 0 45 248 56 55
岩蓝 Slate Blue #6A5ACD 106 90 205 48 56 0 20 248 56 80
中岩蓝 Medium Slate Blue #7B68EE 123 104 238 48 56 0 7 249 56 93
木槿紫 Mauve #6640FF 102 64 255 60 75 0 0 252 75 100
紫丁香色 Lilac #B399FF 179 153 255 30 40 0 0 255 40 100
中紫红 Medium Purple #9370DB 147 112 219 33 49 0 14 260 49 86
紫水晶色 Amethyst #6633CC 102 51 204 50 75 0 20 260 75 80
浅灰紫红 Grayish Purple #8674A1 134 116 161 17 28 0 37 264 28 63
缬草紫 Heliotrope #5000B8 80 0 184 57 100 0 28 266 100 72
矿紫 Mineral Violet #B8A1CF 184 161 207 11 22 0 19 270 22 81
蓝紫 Blue Violet #8A2BE2 138 43 226 39 81 0 11 271 81 89
紫罗兰色 Violet #8B00FF 139 0 255 45 100 0 0 273 100 100
靛色 Indigo #4B0080 75 0 128 41 100 0 50 275 100 50
暗兰紫 Dark Orchid #9932CC 153 50 204 25 75 0 20 280 75 80
暗紫 Dark Violet #9400D3 148 0 211 30 100 0 17 282 100 83
三色堇紫 Pansy #7400A1 116 0 161 28 100 0 37 283 100 63
锦葵紫 Mallow #D94DFF 217 77 255 15 70 0 0 287 70 100
优品紫红 Opera Mauve #E680FF 230 128 255 10 50 0 0 288 50 100
中兰紫 Medium Orchid #BA55D3 186 85 211 12 60 0 17 288 60 83
淡紫丁香色 Pail Lilac #E6CFE6 230 207 230 0 10 0 10 300 10 90
蓟紫 Thistle #D8BFD8 216 191 216 0 12 0 15 300 12 85
铁线莲紫 Clematis #CCA3CC 204 163 204 0 20 0 20 300 20 80
梅红色 Plum #DDA0DD 221 160 221 0 28 0 13 300 28 87
亮紫 Light Violet #EE82EE 238 130 238 0 45 0 7 300 45 93
紫色 Purple #800080 128 0 128 0 100 0 50 300 100 50
暗洋红 Dark Magenta #8B008B 139 0 139 0 100 0 45 300 100 55
洋红 Magenta #FF00FF 255 0 255 0 100 20 0 300 100 100
品红 Fuchsia #F400A1 244 0 161 0 100 0 0 320 100 96
兰紫 Orchid #DA70D6 218 112 214 0 49 2 15 302 49 85
浅珍珠红 Pearl Pink #FFB3E6 255 179 230 0 30 10 0 320 30 100
陈玫红 Old Rose #B85798 184 87 152 0 53 17 28 320 53 72
浅玫瑰红 Rose Pink #FF66CC 255 102 204 0 60 20 0 320 60 100
中青紫红 Medium Violet Red #C71585 199 21 133 0 89 33 22 322 89 78
洋玫瑰红 Magenta Rose #FF0DA6 255 13 166 0 95 35 0 322 95 100
玫瑰红 Rose #FF007F 255 0 127 0 100 50 0 330 100 100
红宝石色 Ruby #CC0080 204 0 128 0 100 37 20 322 100 80
山茶红 Camellia #E63995 230 57 149 0 75 35 10 328 75 90
深粉红 Deep Pink #FF1493 255 20 147 0 92 42 0 328 92 100
火鹤红 Flamingo #E68AB8 230 138 184 0 40 20 10 330 40 90
浅珊瑚红 Coral Pink #FF80BF 255 128 191 0 50 25 0 330 50 100
暖粉红 Hot Pink #FF69B4 255 105 180 0 59 29 0 330 59 100
勃艮第酒红 Burgundy #470024 71 0 36 0 100 49 72 330 100 28
尖晶石红 Spinel Red #FF73B3 255 115 179 0 55 30 0 333 55 100
胭脂红 Carmine #E6005C 230 0 92 0 100 60 10 336 100 90
浅粉红 Baby Pink #FFD9E6 255 217 230 0 15 10 0 339 15 100
枢机红 Cardinal Red #990036 153 0 54 0 100 65 40 339 100 60
薰衣草紫红 Lavender Blush #FFF0F5 255 240 245 0 6 4 0 340 6 100
灰紫红 Pale Violet Red #DB7093 219 112 147 0 49 33 14 340 49 86
樱桃红 Cerise #DE3163 222 49 99 0 78 55 13 343 78 87
浅鲑红 Salmon Pink #FF8099 255 128 153 0 50 40 0 348 50 100
绯红 Crimson #DC143C 220 20 60 0 91 73 14 348 91 86
粉红 Pink #FFC0CB 255 192 203 0 25 20 0 350 25 100
亮粉红 Light Pink #FFB6C1 255 182 193 0 29 24 0 351 29 100
壳黄红 Shell Pink #FFB3BF 255 179 191 0 30 25 0 351 30 100
茜红 Alizarin Crimson #E32636 227 38 54 0 83 76 11 355 83 89

常用色系[编辑]

名称 颜色 十六进制 RGB CMYK HSV 英语
红色 #FF0000 255, 0, 0 0, 100, 100, 0 0, 100, 100 red
猩红色 #FF2400 255, 36, 0 0, 86, 100, 0 8, 100, 100 scarlet
朱红色 #FF4D00 255, 77, 0 0, 70, 100, 0 18, 100, 100 vermilion
橙色 #FFA500 255, 165, 0 0, 40, 100, 0 39, 100, 100 orange
琥珀色 #FFBF00 255, 191, 0 0, 35, 100, 0 51, 100, 100 amber
金色 #FFD700 255, 215, 0 0, 25, 100, 0 45, 100, 100 gold
黄色 #FFFF00 255, 255, 0 0, 0, 100, 0 60, 100, 100 yellow
柠檬绿色 #CCFF00 204, 255, 0 20, 0, 100, 0 72, 100, 100 lime
黄绿色 #66FF00 102, 255, 0 60, 0, 100, 0 96, 100, 100 bright green
绿色 #00FF00 0, 255, 0 100, 0, 100, 0 120, 100, 100 green
青色 #00FFFF 0, 255, 255 100, 0, 0, 0 180, 100, 100 cyan
蔚蓝色 #007FFF 0, 127, 255 100, 50, 0, 0 210, 100, 100 azure
蓝色 #0000FF 0, 0, 255 100, 100, 0, 0 240, 100, 100 blue
蓝绿色 #7FFFD4 127, 255, 212 50, 0, 17, 0 160, 50, 100 Aquamarine
浅蓝色 #E0FFFF 137, 207, 240 43, 14, 0, 6 199,43 ,94 Baby blue
爱丽丝蓝 #F0F8FF 240, 248, 245 4, 1, 0, 0 208, 6, 100 Alice-Blue
绿松色 #30D5C8 48, 213, 200 100, 50, 0, 0 210, 100, 100 Turquoise
矢车菊蓝 #6495ED 100, 149, 237 59, 37, 0, 0 219, 58, 93 Cornflower blue
粉末蓝 #003399 0, 51, 153 100, 67, 0, 40 220, 100, 60 Powder blue
皇室蓝 #4169E1 65, 105, 225 181, 136, 0, 30 225, 71, 88 Royal blue
普鲁士蓝 #003153 0, 49, 83 63, 35, 14, 72 205, 100, 43 Prussian blue
午夜蓝 #003366 0, 51, 102 243, 205, 108, 80 210, 100, 40 Midnight Blue
天青蓝 #2A52BE 42, 82, 190 78, 57, 0, 25 224, 78, 75 Cerulean blue
钴蓝色 #0047AB 0, 71, 171 255, 149, 0, 84 215, 100, 67 Cobalt blue
道奇蓝 #1E90FF 30, 144, 255 88, 44, 0, 0 210, 88, 100 Dodger blue
国际奇连蓝 #002FA7 0, 47, 167 98, 84, 0, 0 223, 100, 65 International Klein Blue
海军蓝 #000080 0, 0, 128 255, 255, 0, 127 240, 100, 50 Navy blue
白牛仔布色 #5E86C1 94, 134, 193 131, 78, 0, 62 216, 51, 76 Pale Denim
长春花色 #CCCCFF 204, 204, 255 51, 51, 0, 0 240, 20, 100 Periwinkle
青玉色 #082567 8, 37, 103 235, 163, 0, 152 222, 92, 40 Sapphire
紫罗兰色 #8B00FF 139, 0, 255 45, 100, 0, 0 273, 100, 100 Violet
深茜红 #E32636 227, 38, 54 1, 92, 82, 0 355, 83, 89 Alizarin Crimson
洋红色 #FF00FF 255, 0, 255 0, 100, 20, 0 300, 100, 100 magenta

深色系[编辑]

名称 颜色 十六进制 RGB CMYK HSV 英语
栗色 #800000 128, 0, 0 0, 100, 100, 50 0, 100, 50 maroon
橙黄色 #FFCC00 255, 204, 0 0, 51, 100, 0 48, 100, 100 tangerine
橄榄色 #808000 128, 128, 0 0, 0, 100, 50 60, 100, 50 olive
春绿色 #00FF80 0, 255, 128 100, 0, 50, 0 150, 100, 100 spring green
鸭绿色 #008080 0, 128, 128 100, 0, 0, 50 180, 100, 50 teal
海军蓝 #000080 0, 0, 128 100, 100, 0, 50 240, 100, 50 navy
靛色 #4B0080 75, 0, 128 42, 100, 0, 50 275, 100, 50 indigo

浅色系[编辑]

名称 颜色 十六进制 RGB CMYK HSV 英语
鲑肉色 #FF8C69 255, 140, 105 0, 45, 59, 0 14, 59, 100 salmon
桃色 #FFE5B4 255, 229, 180 0, 10, 29, 0 40, 29, 100 peach
奶油色 #FFFDD0 255, 253, 208 1, 0, 22, 0 57, 18, 100 cream
米色 #F5F5DC 245, 245, 210 3, 1, 15, 0 60, 10, 96 beige
薰衣草色 #E6E6FA 230, 230, 250 8, 8, 0, 0 240, 8, 98 lavender
兰花色 #DA70D6 218, 112, 214 24, 66, 0, 0 302, 49, 85 orchid
粉红色 #FFC0CB 255, 192, 203 0, 63, 52, 0 350, 25, 100 pink

中性色系[编辑]

名称 颜色 十六进制 RGB CMYK HSV 英语
珊瑚红 #FF7F50 255, 127, 80 0, 128, 175, 0 16, 69, 100 coral
燃橙色 #CC5500 204, 85, 0 15, 78, 100, 4 25, 100, 80 burnt orange
铜色 #B87333 184, 115, 51 23, 59, 93, 8 29, 72, 72 bronze
赭色 #CC7722 204, 119, 34 0, 85, 170, 50 30, 83, 80 ocher
深褐色 #704214 112, 66, 20 39, 69, 100, 41 30, 82, 44 sepia
碧绿 #50C878 80, 200, 120 60, 0, 40, 22 140, 60, 78 emerald
樱桃色 #DE3163 222, 49, 99 7, 95, 45, 0 343, 78, 87 cerise

无彩色系[编辑]

名称 颜色 十六进制 RGB CMYK HSV 英语
白色 #FFFFFF 255, 255, 255 0, 0, 0, 0 0, 0, 100 white
银色 #C0C0C0 192, 192, 192 0, 0, 0, 25 0, 0, 75 silver
灰色 #808080 128, 128, 128 0, 0, 0, 50 0, 0, 50 gray
暗灰色 #404040 64, 64, 64 0, 0, 0, 75 0, 0, 25 dimgray
黑色 #000000 0, 0, 0 0, 0, 0, 100 0, 0, 0 black

能表达颜色的中文字[编辑]

红色[编辑]

𫄸

棕色[编辑]

橙色[编辑]

绿色[编辑]

黄色[编辑]

(浅黄色)

紫色[编辑]

蓝色[编辑]

黑色[编辑]

白色[编辑]

灰色[编辑]


使用ffmpeg合并(连接)文件

Pipe friendly formats

原文:

https://www.nmm-hd.org/newbbs/viewtopic.php?t=1533

https://superuser.com/questions/277642/how-to-merge-audio-and-video-file-in-ffmpeg

https://trac.ffmpeg.org/wiki/Concatenate

关键词:concatenate;append;合并;连接
使用ffmpeg连接文件分两类,连接编码完全相同的文件;连接编码不同的文件

连接编码完全相同的文件
有两种方式,使用concat “分离器(demuxer)”和concat “协议(protocol)。demuxer比较自由,编码相同、但是多媒体文件容器不同也能连接。因此demuxer能处理各种容器,而protocol只能处理区区几种容器。老版本的ffmpeg只能用protocol,最近demuxer在ffmpeg中出现。

concat demuxer是FFmpeg 1.1添加进来的,文档见此
使用方法
创建一个 mylist.txt 文件,每行写一个想要连接的文件的路径,格式如下:

代码: 全选

#该行为注释
file '/path/to/file1'
file '/path/to/file2'
file '/path/to/file3'

可以用绝对路径,也可以用相对路径。然后使用stream copy或重编码:

代码: 全选

ffmpeg -f concat -safe 0 -i mylist.txt -c copy output


demuxer在“流”层面工作,与之不同的 是protocol在文件层面工作,因此只有特定格式的文件能连接(像mpg或mpeg transport stream文件,也可能有其他的),类似于UNIX类系统里的cat和windows系统里的copy。

代码: 全选

ffmpeg -i "concat:input1.mpg|input2.mpg|input3.mpg" -c copy output.mpg

如果不是mpg格式的文件呢?可以先用ffmpeg转成mpeg transport stream,再连接。举个例子,h264视频和aac音频的mp4:

代码: 全选

ffmpeg -i input1.mp4 -c copy -bsf:v h264_mp4toannexb -f mpegts intermediate1.ts
ffmpeg -i input2.mp4 -c copy -bsf:v h264_mp4toannexb -f mpegts intermediate2.ts
ffmpeg -i "concat:intermediate1.ts|intermediate2.ts" -c copy -bsf:a aac_adtstoasc output.mp4

这种方法会产生不少临时文件,如果你会用named pipe,原帖有方法可以一行解决。
所有mpeg编码的格式(H.264, MPEG4/divx/xvid, MPEG2; MP2, MP3, AAC)都可以转成mpeg transport stream,不过有时需要加一些额外的命令(具体的-bsf命令)。

连接不同编码的多媒体文件
concat滤镜
最近新版本的ffmpeg里有concat滤镜。更多信息参考concat滤镜文档。
使用方法用例子说明

代码: 全选

ffmpeg -i input1.mp4 -i input2.webm \
-filter_complex '[0:0] [0:1] [1:0] [1:1] concat=n=2:v=1:a=1 [v] [a]' \
-map '[v]' -map '[a]' <encoding options> output.mkv

-filter_complex这行的 ‘[0:0] [0:1] [1:0] [1:1] 是告诉ffmpeg将哪些码流送到concat滤镜里。这里,代表输入文件0(例子中的input1.mp4)的0号流和1号流、输入文件1(栗子中的input2.webm)的0号流和1号流。

concat=n=2:v=1:a=1 [v] [a]’ 就是调用concat滤镜。n=2告诉滤镜有两个输入文件;v=1告诉滤镜有1个视频流,a=1告诉滤镜有1个音频流。 [v]和[a]定义输出流的名称,ffmpeg的其他部分就知道concat的输出了。
需要注意的是,整个滤镜需要用单引号包围。

代码: 全选

-map '[v]' -map '[a]'

告诉ffmpeg用concat滤镜的输出流,而不是用原来文件的流。
注意:此滤镜和重新封装(流复制stream copying)不兼容,不能用-c copy。另外,不知道这种方式支不支持软字幕。
这个例子还告诉我们,输入文件格式不同concat也是支持的。ffmpeg能够解码的任何格式都可以操作,但是分辨率和一些其他的属性需要匹配。

Merging video and audio, with audio re-encoding

See this example, taken from this blog entry but updated for newer syntax. It should be something to the effect of:

ffmpeg -i video.mp4 -i audio.wav \
-c:v copy -c:a aac -strict experimental output.mp4

Here, we assume that the video file does not contain any audio stream yet, and that you want to have the same output format (here, MP4) as the input format.

The above command transcodes the audio, since MP4s cannot carry PCM audio streams. You can use any other desired audio codec if you want. See the AAC Encoding Guide for more info.

If your audio or video stream is longer, you can add the -shortest option so that ffmpeg will stop encoding once one file ends.

Copying the audio without re-encoding

If your output container can handle (almost) any codec – like MKV – then you can simply copy both audio and video streams:

ffmpeg -i video.mp4 -i audio.wav -c copy output.mkv

Replacing audio stream

If your input video already contains audio, and you want to replace it, you need to tell ffmpeg which audio stream to take:

ffmpeg -i video.mp4 -i audio.wav \
-c:v copy -c:a aac -strict experimental \
-map 0:v:0 -map 1:a:0 output.mp4

The map option makes ffmpeg only use the first video stream from the first input and the first audio stream from the second input for the output file.


Concatenating media files

If you have media files with exactly the same codec and codec parameters you can concatenate them as described in “Concatenation of files with same codecs“. If you have media with different codecs you can concatenate them as described in “Concatenation of files with different codecs” below.

Concatenation of files with same codecs

There are two methods within ffmpeg that can be used to concatenate files of the same type: the concat ”demuxer” and the concat ”protocol”. The demuxer is more flexible – it requires the same codecs, but different container formats can be used; and it can be used with any container formats, while the protocol only works with a select few containers. However, the concat protocol is available in older versions of ffmpeg, where the demuxer isn’t. The demuxer also requires that the inputs have a consistent bitrate setting, the concat protocol is more flexible in this regard.

Concat demuxer

The concat demuxer was added to FFmpeg 1.1. You can read about it in the documentation.

Instructions

Create a file mylist.txt with all the files you want to have concatenated in the following form (lines starting with a # are ignored):

# this is a comment
file '/path/to/file1'
file '/path/to/file2'
file '/path/to/file3'

Note that these can be either relative or absolute paths. Then you can stream copy or re-encode your files:

ffmpeg -f concat -safe 0 -i mylist.txt -c copy output

The -safe 0 above is not required if the paths are relative.

It is possible to generate this list file with a bash for loop, or using printf. Either of the following would generate a list file containing every *.wav in the working directory:

# with a bash for loop
for f in ./*.wav; do echo "file '$f'" >> mylist.txt; done
# or with printf
printf "file '%s'\n" ./*.wav > mylist.txt

On Windows Command-line:

(for %i in (*.wav) do @echo file '%i') > mylist.txt

If your shell supports process substitution (like Bash and Zsh), you can avoid explicitly creating a list file and do the whole thing in a single line. This would be impossible with the concat protocol (see below). Make sure to generate absolute paths here, since ffmpeg will resolve paths relative to the list file your shell may create in a directory such as “/proc/self/fd/”.

ffmpeg -f concat -safe 0 -i <(for f in ./*.wav; do echo "file '$PWD/$f'"; done) -c copy output.wav
ffmpeg -f concat -safe 0 -i <(printf "file '$PWD/%s'\n" ./*.wav) -c copy output.wav
ffmpeg -f concat -safe 0 -i <(find . -name '*.wav' -printf "file '$PWD/%p'\n") -c copy output.wav

You can also loop a video. This example will loop input.mkv 10 times:

for i in {1..10}; do printf "file '%s'\n" input.mkv >> mylist.txt; done
ffmpeg -f concat -i mylist.txt -c copy output.mkv

Concatenation becomes troublesome, if next clip for concatenation does not exist at the moment, because decoding won’t start until the whole list is read. However, it is possible to refer another list at the end of the current list:

#!/bin/bash

fn_concat_init() {
    echo "fn_concat_init"
    concat_pls=`mktemp -u -p . concat.XXXXXXXXXX.txt`
    concat_pls="${concat_pls#./}"
    echo "concat_pls=${concat_pls:?}"
    mkfifo "${concat_pls:?}"
    echo
}

fn_concat_feed() {
    echo "fn_concat_feed ${1:?}"
    {
        >&2 echo "removing ${concat_pls:?}"
        rm "${concat_pls:?}"
        concat_pls=
        >&2 fn_concat_init
        echo 'ffconcat version 1.0'
        echo "file '${1:?}'"
        echo "file '${concat_pls:?}'"
    } >"${concat_pls:?}"
    echo
}

fn_concat_end() {
    echo "fn_concat_end"
    {
        >&2 echo "removing ${concat_pls:?}"
        rm "${concat_pls:?}"
        # not writing header.
    } >"${concat_pls:?}"
    echo
}

fn_concat_init

echo "launching ffmpeg ... all.mkv"
timeout 60s ffmpeg -y -re -loglevel warning -i "${concat_pls:?}" -pix_fmt yuv422p all.mkv &

ffplaypid=$!


echo "generating some test data..."
i=0; for c in red yellow green blue; do
    ffmpeg -loglevel warning -y -f lavfi -i testsrc=s=720x576:r=12:d=4 -pix_fmt yuv422p -vf "drawbox=w=50:h=w:t=w:c=${c:?}" test$i.mkv
    fn_concat_feed test$i.mkv
    ((i++));
    echo
done
echo "done"

fn_concat_end

wait "${ffplaypid:?}"

echo "done encoding all.mkv"

Concat protocol

While the demuxer works at the stream level, the concat protocol works at the file level. Certain files (mpg and mpeg transport streams, possibly others) can be concatenated. This is analogous to using cat on UNIX-like systems or copy on Windows.

Instructions

ffmpeg -i "concat:input1.mpg|input2.mpg|input3.mpg" -c copy output.mpg

If you have MP4 files, these could be losslessly concatenated by first transcoding them to mpeg transport streams. With h.264 video and AAC audio, the following can be used:

ffmpeg -i input1.mp4 -c copy -bsf:v h264_mp4toannexb -f mpegts intermediate1.ts
ffmpeg -i input2.mp4 -c copy -bsf:v h264_mp4toannexb -f mpegts intermediate2.ts
ffmpeg -i "concat:intermediate1.ts|intermediate2.ts" -c copy -bsf:a aac_adtstoasc output.mp4

If you’re using a system that supports named pipes, you can use those to avoid creating intermediate files – this sends stderr (which ffmpeg sends all the written data to) to /dev/null, to avoid cluttering up the command-line:

mkfifo temp1 temp2
ffmpeg -i input1.mp4 -c copy -bsf:v h264_mp4toannexb -f mpegts temp1 2> /dev/null & \
ffmpeg -i input2.mp4 -c copy -bsf:v h264_mp4toannexb -f mpegts temp2 2> /dev/null & \
ffmpeg -f mpegts -i "concat:temp1|temp2" -c copy -bsf:a aac_adtstoasc output.mp4

All MPEG codecs (H.264, MPEG4/divx/xvid, MPEG2; MP2, MP3, AAC) are supported in the mpegts container format, though the commands above would require some alteration (the -bsf bitstream filters will have to be changed).

Concatenation of files with different codecs

Concat filter

The concat filter is available in recent versions of ffmpeg. See the concat filter documentation for more info.

Instructions

This is easiest to explain using an example:

ffmpeg -i input1.mp4 -i input2.webm \
-filter_complex "[0:v:0] [0:a:0] [1:v:0] [1:a:0] concat=n=2:v=1:a=1 [v] [a]" \
-map "[v]" -map "[a]" <encoding options> output.mkv

On the -filter_complex line, the following:

[0:v:0] [0:a:0] [1:v:0] [1:a:0]

tells ffmpeg what streams to send to the concat filter; in this case, video stream 0 [0:v:0] and audio stream 0 [0:a:0] from input 0 (input1.mp4 in this example), and video stream 0 [1:v:0] and audio stream 0 [1:v:0] from input 1 (input2.webm).

concat=n=2:v=1:a=1 [v] [a]'

This is the concat filter itself. n=2 is telling the filter that there are two input files; v=1 is telling it that there will be one video stream; a=1 is telling it that there will be one audio stream. [v] and [a] are names for the output streams to allow the rest of the ffmpeg line to use the output of the concat filter.

Note that the single quotes around the whole filter section are required.

-map '[v]' -map '[a]'

This tells ffmpeg to use the results of the concat filter rather than the streams directly from the input files.

Note that filters are incompatible with stream copying; you can’t use -c copy with this method. Also, I’m not sure whether softsubs are supported.

As you can infer from this example, multiple types of input are supported, and anything readable by ffmpeg should work. The inputs have to be of the same frame size, and a handful of other attributes have to match.

Using an external script

With any vaguely-modern version of ffmpeg, the following script is made redundant by the advent the concat filter, which achieves the same result in a way that works across platforms. It is a clever workaround of ffmpeg’s then-limitations, but most people (i.e. anyone not stuck using an ancient version of ffmpeg for whatever reason) should probably use one of the methods listed above.

The following script can be used to concatenate multiple input media files (containing audio/video streams) into one output file (just like as if all the inputs were played in a playlist, one after another). It is based on this FAQ item: How can I join video files, which also contains other useful information.

If you find any bugs, feel free to correct the script, add yourself to the list of contributors and change the version string to reflect your change(s) or email the author with your patch, whatever you find more convenient.

Instructions

Save the script in a file named mmcat (or some other name), make it executable (chmod +x mmcat) and run it, using the syntax:

./mmcat <input1> <input2> <input3> ... <output>

If you get an error like this:

#/tmp/mcs_v_all: Operation not permitted

that could mean that you don’t have correct permissions set on /tmp directory (or whatever you set in TMP variable) or that decoding of your input media has failed for some reason. In this case it would be the best to turn on the logging (as described in the script’s comments)

Script

#!/bin/bash

################################################################################
#
# Script name: MultiMedia Concat Script (mmcat)
# Author: burek ([email protected])
# License: GNU/GPL, see http://www.gnu.org/copyleft/gpl.html
# Date: 2012-07-14
#
# This script concatenates (joins, merges) several audio/video inputs into one
# final output (just like as if all the inputs were played in a playlist, one
# after another).
#
# All input files must have at least one audio and at least one video stream.
# If not, you can easily add audio silence, using FFmpeg. Just search the
# internet for "ffmpeg add silence".
#
# The script makes use of FFmpeg tool (www.ffmpeg.org) and is free for use under
# the GPL license. The inspiration for this script came from this FAQ item:
# http://ffmpeg.org/faq.html#How-can-I-join-video-files_003f
#
# If you find any bugs, please send me an e-mail so I can fix it.
#
################################################################################
#
# General syntax: mmcat <input1> <input2> <input3> ... <output>
#
# For example: mmcat file1.flv file2.flv output.flv
# would create "output.flv" out of "file1.flv" and "file2.flv".
#
################################################################################

# change this to what you need !!!
EXTRA_OPTIONS='-vcodec libx264 -crf 23 -preset medium -acodec aac -strict experimental -ac 2 -ar 44100 -ab 128k'

################################################################################
#
# NO NEED TO TOUCH ANYTHING AFTER THIS LINE!
#
################################################################################

# the version of the script
VERSION=1.3

# location of temp folder
TMP=/tmp

################################################################################

echo "MultiMedia Concat Script v$VERSION (mmcat) - A script to concatenate multiple multimedia files."
echo "Based on FFmpeg - www.ffmpeg.org"
echo "Don't forget to edit this script and change EXTRA_OPTIONS"
echo ""

################################################################################
# syntax check (has to have at least 3 params: infile1, infile2, outfile
################################################################################
if [ -z $3 ]; then
	echo "Syntax: $0 <input1> <input2> <input3> ... <output>"
	exit 1
fi

################################################################################
# get all the command line parameters, except for the last one, which is output
################################################################################
# $first  - first parameter
# $last   - last parameter (output file)
# $inputs - all the inputs, except the first input, because 1st input is
#           handled separately
################################################################################
first=${@:1:1}
last=${@:$#:1}
len=$(($#-2))
inputs=${@:2:$len}

# remove all previous tmp fifos (if exist)
rm -f $TMP/mcs_*

################################################################################
# decode first input differently, because the video header does not have to be
# kept for each video input, only the header from the first video is needed
################################################################################
mkfifo $TMP/mcs_a1 $TMP/mcs_v1

ffmpeg -y -i $first -vn -f u16le -acodec pcm_s16le -ac 2 -ar 44100 $TMP/mcs_a1 2>/dev/null </dev/null &
ffmpeg -y -i $first -an -f yuv4mpegpipe -vcodec rawvideo $TMP/mcs_v1 2>/dev/null </dev/null &

# if you need to log the output of decoding processes (usually not necessary)
# then replace the "2>/dev/null" in 2 lines above with your log file names, like this:
#ffmpeg -y -i $first -vn -f u16le -acodec pcm_s16le -ac 2 -ar 44100 $TMP/mcs_a1 2>$TMP/log.a.1 </dev/null &
#ffmpeg -y -i $first -an -f yuv4mpegpipe -vcodec rawvideo $TMP/mcs_v1 2>$TMP/log.v.1 </dev/null &

################################################################################
# decode all the other inputs, remove first line of video (header) with tail
# $all_a and $all_v are lists of all a/v fifos, to be used by "cat" later on
################################################################################
all_a=$TMP/mcs_a1
all_v=$TMP/mcs_v1
i=2
for f in $inputs
do
	mkfifo $TMP/mcs_a$i $TMP/mcs_v$i

	ffmpeg -y -i $f -vn -f u16le -acodec pcm_s16le -ac 2 -ar 44100 $TMP/mcs_a$i 2>/dev/null </dev/null &
	{ ffmpeg -y -i $f -an -f yuv4mpegpipe -vcodec rawvideo - 2>/dev/null </dev/null | tail -n +2 > $TMP/mcs_v$i ; } &

	# if you need to log the output of decoding processes (usually not necessary)
	# then replace the "2>/dev/null" in 2 lines above with your log file names, like this:
	#ffmpeg -y -i $f -vn -f u16le -acodec pcm_s16le -ac 2 -ar 44100 $TMP/mcs_a$i 2>$TMP/log.a.$i </dev/null &
	#{ ffmpeg -y -i $f -an -f yuv4mpegpipe -vcodec rawvideo - 2>$TMP/log.v.$i </dev/null | tail -n +2 > $TMP/mcs_v$i ; } &

	all_a="$all_a $TMP/mcs_a$i"
	all_v="$all_v $TMP/mcs_v$i"
	let i++
done

################################################################################
# concatenate all raw audio/video inputs into one audio/video
################################################################################
mkfifo $TMP/mcs_a_all
mkfifo $TMP/mcs_v_all
cat $all_a > $TMP/mcs_a_all &
cat $all_v > $TMP/mcs_v_all &

################################################################################
# finally, encode the raw concatenated audio/video into something useful
################################################################################
ffmpeg -f u16le -acodec pcm_s16le -ac 2 -ar 44100 -i $TMP/mcs_a_all \
       -f yuv4mpegpipe -vcodec rawvideo -i $TMP/mcs_v_all \
	$EXTRA_OPTIONS \
	$last

################################################################################
# remove all fifos
################################################################################
rm -f $TMP/mcs_*

The script above can be modified to use the ‘-f avi’ insted of ‘-f yuv4mpegpipe’. Benefits:

  • unlike yuv4mpegpipe, just one pipe for both video and audio
  • unlike yuv4mpegpipe, matroska and flv, no need to skip header in second file using tail, because avi demuxer will skip it automatically
  • unlike mpegts, avi supports rawvideo and pcm

Pipe-friendly formats

Pipe friendly formats