原文:https://letsencrypt.org/docs/client-options/
Let’s Encrypt uses the ACME protocol to verify that you control a given domain name and to issue you a certificate. To get a Let’s Encrypt certificate, you’ll need to choose a piece of ACME client software to use.
Recommended: Certbot
We recommend that most people start with the Certbot client. It can simply get a cert for you or also help you install, depending on what you prefer. It’s easy to use, works on many operating systems, and has great documentation.
If certbot does not meet your needs, or you’d simply like to try something else, there are many more clients to choose from below, grouped by the language or environment they run in.
Bash
Browser
C
Go
HAProxy
nginx
Node.js
Perl
PHP
Python
Ruby
Rust
Windows
Libraries
Go
Java
Node.js
Perl
PHP
Python
Ruby
Rust
Windows
Projects integrating with Let’s Encrypt
原文:http://www.jianshu.com/p/eaac0d082ba2
HTTPS 那些事
鹅厂Bugly公众号这篇《全站HTTPS来了》写得比较全面了,不再废话。
Let’s Encrypt 介绍
Let’s Encrypt 是一个免费、开放,自动化的证书颁发机构,由 ISRG(Internet Security Research Group)运作。
ISRG 是一个关注网络安全的公益组织,其赞助商从非商业组织到财富100强公司都有,包括 Mozilla、Akamai、Cisco、Facebook,密歇根大学等等。ISRG 以消除资金,技术领域的障碍,全面推进加密连接成为互联网标配为自己的使命。
Let’s Encrypt 项目于2012年由 Mozilla 的两个员工发起,2014年11年对外宣布公开,2015年12月3日开启公测。
Let’s Encrypt 目前处于公测期间,文档,工具还不完善,请谨慎用于生产环境。
Let’s Encrypt 指南
Let’s Encrypt 安装
Let’s Encrypt 目前仅支持 Unix-like 系统,需要 Python 2.6 或 2.7,暂不支持 Python 3。
可以使用 pip 安装 Let’s Encrypt 客户端,或到其 wiki 上查看已打包的各操作系统安装方式。
下面以官方推荐的 letsencrypt-auto 脚本为例进行安装:
$ git clone https://github.com/letsencrypt/letsencrypt

$ cd letsencrypt

$ ./letsencrypt-auto --help
Let’s Encrypt 验证方式
Let’s Encrypt 使用两种方式对申请的域名进行验证:
1、 手动验证 按照提示在申请证书的服务器上使用一个指定的URL提供一个指定的文件内容来进行验证,进行手动验证的服务器IP地址会被 Let’s Encrypt 服务端记录在案。
2、 自动验证 在 目标服务器 (指域名解析对应的IP地址的服务器,下同)上运行客户端,并启动一个 80 或 443 端口进行自动验证。包括独立模式和其他web sever验证模式,在 Plugins 中详细解释
Let’s Encrypt Plugins
Let’s Encrypt 使用不同的 Plugins 来进行证书的获取和安装
Manual
当你在非 目标服务器 上申请证书,或希望进行手动验证时,可以使用 manual 插件,运行命令:
$ ./letsencrypt-auto certonly --manual -d test.example.com
会得到提示:
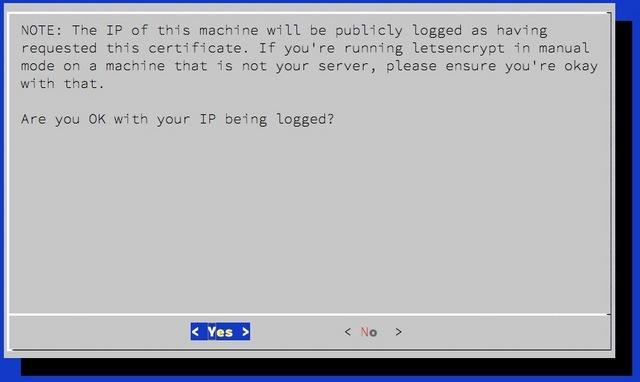
manual-log-ip
选择 Yes 继续后,便会提示创建一个指定内容的 URL 用来验证对域名及服务器的所有权,注意这个URL仍然需要部署在 目标服务器 上:
Make sure your web server displays the following content at
http://test.example.com/.well-known/acme-challenge/N4mCfskoOSX_7ikZDoEH3iyIqFAUg4Kdg36ecpeUwkw before continuing:
N4mCfskoOSX_7ikZDoEH3iyIqFAUg4Kdg36ecpeUwkw.J7NHjRSPwMW99A2XJv49FTnNu-MSCCebRjccMFZVRic
If you don't have HTTP server configured, you can run the following
command on the target server (as root):
mkdir -p /tmp/letsencrypt/public_html/.well-known/acme-challenge
cd /tmp/letsencrypt/public_html
printf "
# run only once per server:
$(command -v python2 || command -v python2.7 || command -v python2.6) -c
"import BaseHTTPServer, SimpleHTTPServer;
s = BaseHTTPServer.HTTPServer(('', 80), SimpleHTTPServer.SimpleHTTPRequestHandler);
s.serve_forever()"
Press ENTER to continue
Standalone
使用独立模式进行自动验证,需要在 目标服务器 上运行 Let’s Encrypt 客户端,并指定 certonly 和 --standalone参数。本模式需要绑定 80 或 443 端口进行域名验证,所以如果服务器上已有web server运行并侦听这2个端口,则需要先关闭web server。
Webroot
如果 目标服务器 已有web server运行,并且不能够关闭服务来获取和安装证书,可以使用 Webroot plugin。在运行 Let’s Encrypt 客户端时指定 certonly 和 --webroot 参数,并使用 --webroot-path 或 -w 参数来指定 webroot 目录,比如 --webroot-path /usr/share/nginx/html
Apache
Apache plugin 可以用来为 Apache 2.4 服务器自动获取和安装证书,需要运行在基于 Debian 的操作系统上,并且要求1.0+以上版本的 libaugeas0。如需要运行 Apache plugin,在运行客户端时指定 --apache 参数。本 plugin 仍处在 Alpha 阶段。
Nginx
Nginx plugin 用于为 Nginx 服务器自动获取和安装证书,仍然处在实验阶段,并且 letsencrypt-auto 没有安装这个 plugin,如需使用,运行 pip install letsencrypt-nginx 进行安装后,通过 --nginx 参数调用 plugin。
证书位置
所有版本已申请的证书放在 /etc/letsencrypt/archive下,/etc/letsencrypt/live是指向最新版本的符号链接。web server中关于证书的配置建议指向 live 目录下的文件,以免证书更新后还需要更改配置。
每个域名一个目录,主要包含以下几个文件:
- cert.pem 申请的服务器证书文件
- privkey.pem 服务器证书对应的私钥
- chain.pem 除服务器证书外,浏览器解析所需的其他全部证书,比如根证书和中间证书
- fullchain.pem 包含服务器证书的全部证书链文件
证书更新
Let’s Encrypt 颁发的服务器证书有效期为90天,官方表示此为出于安全原因,降低错发证书,证书泄漏的危害。通过自动续期来解决有效期短的问题,官方建议每2个月更新证书。
如果到期没有更新证书,CA会向申请证书时提交的邮件地址发送提醒email。
自动续期可以使用 crontab 实现。注意更新证书后重启 web server !
申请频率限制
- 注册IP限制:每IP每3个小时不超过10次
- 域名数量限制:每个域名(包含子域名)每7天不超过5个
安装实践
系统环境
- Ubuntu 14.04.3 LTS x86_64
- Nginx 1.9.3
- Python 2.7.6
- www.saxieyu.com
获取证书
由于 www.saxieyu.com 的 nginx 已在运行中,故使用 webroot 模式来获取证书,使用命令:
$ ./letsencrypt-auto certonly --webroot --webroot-path /usr/share/nginx/html -d www.saxieyu.com --agree-tos --email admin@saxieyu.com
证书申请成功后会提示证书的文件路径,以及证书到期时间:
IMPORTANT NOTES:
- Congratulations! Your certificate and chain have been saved at
/etc/letsencrypt/live/www.saxieyu.com/fullchain.pem. Your cert will
expire on 2016-04-01. To obtain a new version of the certificate in
the future, simply run Let's Encrypt again.
- If you like Let's Encrypt, please consider supporting our work by:
Donating to ISRG / Let's Encrypt: https:
Donating to EFF: https:
配置Nginx
生成2048位 DH parameters:
$ sudo openssl dhparam -out /etc/ssl/certs/dhparams.pem 2048
接下来,修改 nginx 配置文件:
server {

    listen 443 ssl;

    server_name www.saxieyu.com;

    ssl_certificate /etc/letsencrypt/live/www.saxieyu.com/fullchain.pem;

    ssl_certificate_key /etc/letsencrypt/live/www.saxieyu.com/privkey.pem;

    ssl_dhparam /etc/ssl/certs/dhparams.pem;

    ssl_ciphers 'ECDHE-RSA-AES128-GCM-SHA256:ECDHE-ECDSA-AES128-GCM-SHA256:ECDHE-RSA-AES256-GCM-SHA384:ECDHE-ECDSA-AES256-GCM-SHA384:DHE-RSA-AES128-GCM-SHA256:DHE-DSS-AES128-GCM-SHA256:kEDH+AESGCM:ECDHE-RSA-AES128-SHA256:ECDHE-ECDSA-AES128-SHA256:ECDHE-RSA-AES128-SHA:ECDHE-ECDSA-AES128-SHA:ECDHE-RSA-AES256-SHA384:ECDHE-ECDSA-AES256-SHA384:ECDHE-RSA-AES256-SHA:ECDHE-ECDSA-AES256-SHA:DHE-RSA-AES128-SHA256:DHE-RSA-AES128-SHA:DHE-DSS-AES128-SHA256:DHE-RSA-AES256-SHA256:DHE-DSS-AES256-SHA:DHE-RSA-AES256-SHA:AES128-GCM-SHA256:AES256-GCM-SHA384:AES128-SHA256:AES256-SHA256:AES128-SHA:AES256-SHA:AES:CAMELLIA:DES-CBC3-SHA:!aNULL:!eNULL:!EXPORT:!DES:!RC4:!MD5:!PSK:!aECDH:!EDH-DSS-DES-CBC3-SHA:!EDH-RSA-DES-CBC3-SHA:!KRB5-DES-CBC3-SHA';

    ssl_prefer_server_ciphers  on;

    ……

}
配置 http 强制跳转到 https:
server {

    listen 80;

    server_name www.saxieyu.com;

    return 301 https://$server_name$request_uri;

}
验证服务器证书
如上修改过 nginx 配置,并 reload 过 nginx 服务后,使用浏览器访问 https://www.saxieyu.com,验证服务器证书是否正确生效
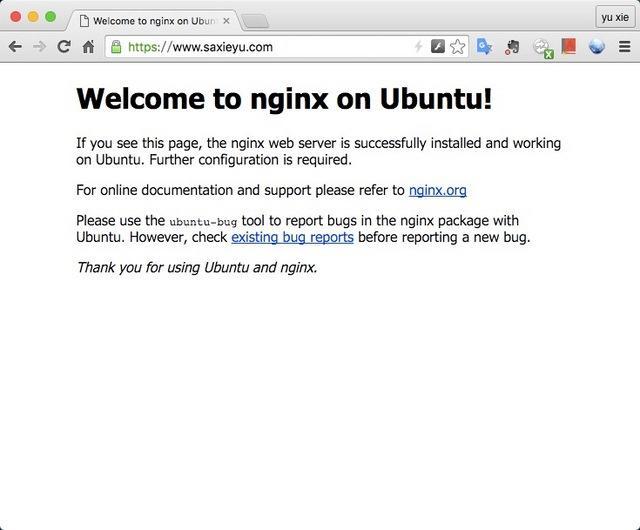
https
查看服务器证书信息
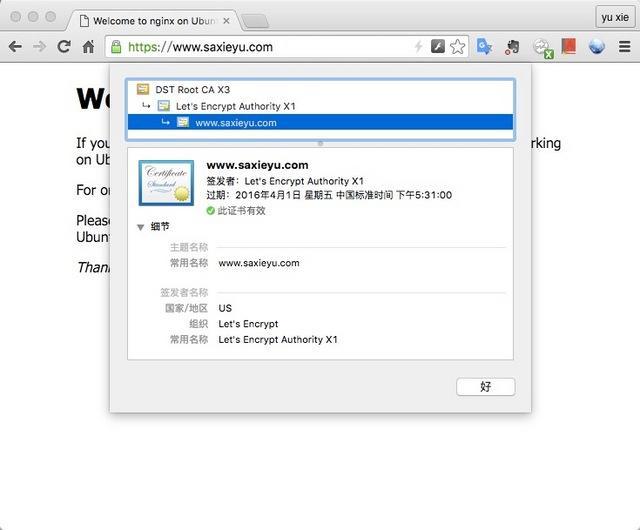
cert-info
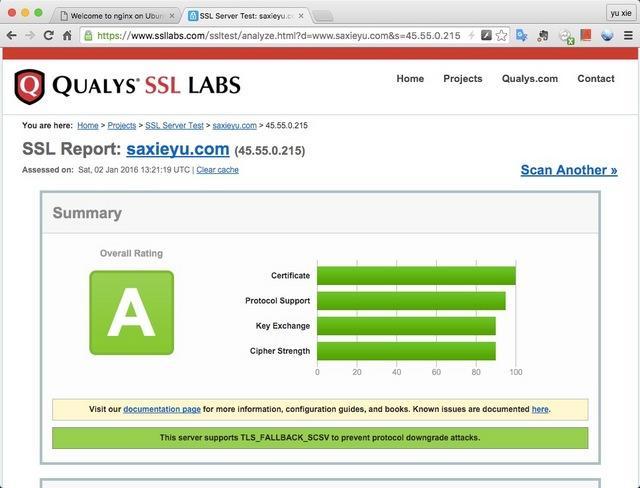
使用 ssllabs 在线测试服务器证书强度及配置正确性
文/saxieyu(简书作者)
原文链接:http://www.jianshu.com/p/eaac0d082ba2
著作权归作者所有,转载请联系作者获得授权,并标注“简书作者”。