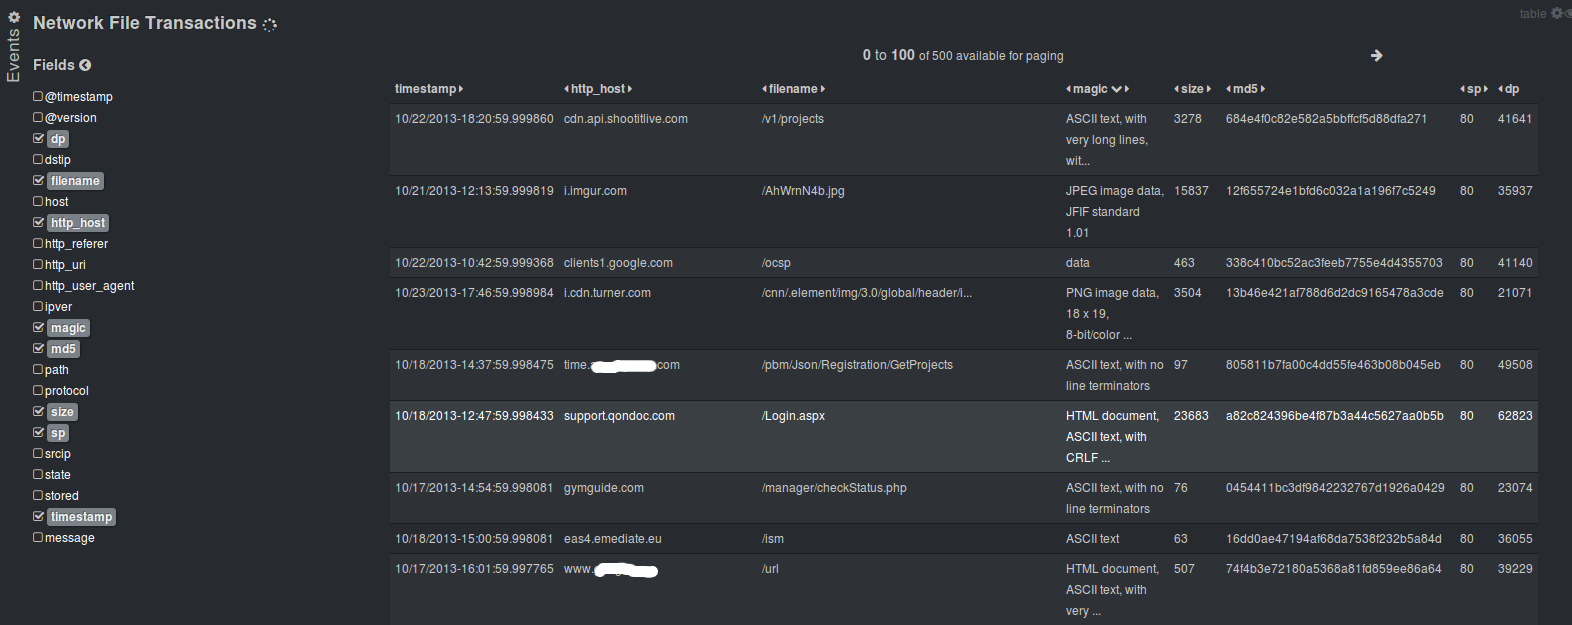
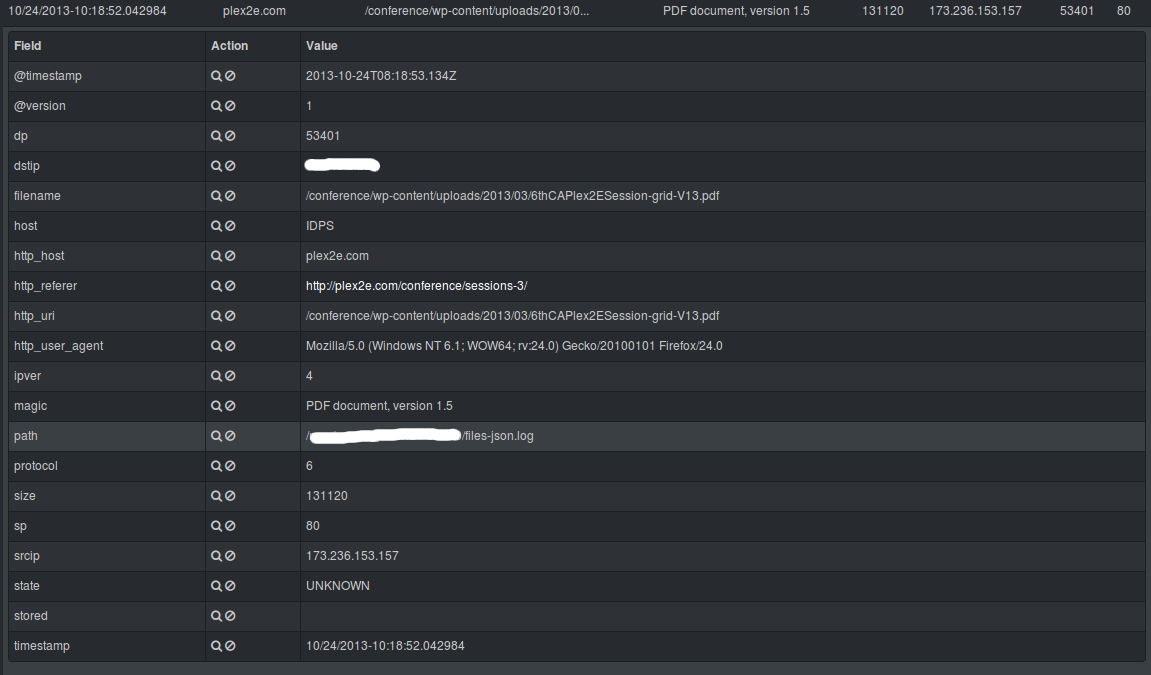
Logstash Kibana and Suricata JSON output

https://redmine.openinfosecfoundation.org/projects/suricata/wiki/_logstash_kibana_and_suricata_json_output


With the release of Suricata 2.0rc1 , Suricata introduces all JSON output capability.
What is JSON – http://en.wikipedia.org/wiki/JSON

One way to handle easily Suricata’s JSON log outputs is through Kibana – http://kibana.org/ :

Kibana is a highly scalable interface for Logstash (http://logstash.net/) and ElasticSearch (http://www.elasticsearch.org/) that allows you to efficiently search, graph, analyze and otherwise make sense of a mountain of logs.

The installation is very simple/basic start up with minor specifics for ubuntu. You can be up and running, looking through the logs in under 5 min.
The downloads can be found here – http://www.elasticsearch.org/overview/elkdownloads/

This is what yo need to do.

Suricata

Make sure your Suricata is compiled/installed with libjansson support enabled:

$ suricata --build-info
This is Suricata version 2.0 RELEASE
Features: NFQ PCAP_SET_BUFF LIBPCAP_VERSION_MAJOR=1 AF_PACKET HAVE_PACKET_FANOUT LIBCAP_NG LIBNET1.1 HAVE_HTP_URI_NORMALIZE_HOOK HAVE_NSS HAVE_LIBJANSSON 
...
  libnss support:                          yes
  libnspr support:                         yes
  libjansson support:                     --> yes <--
  Prelude support:                         no
  PCRE jit:                                no
  libluajit:                               no
  libgeoip:                                yes
  Non-bundled htp:                         yes
  Old barnyard2 support:                   no
  CUDA enabled:                            no
...

If it isn’t check out the Suricata_installation page to install or compile Suricata for your distribution.
NOTE: you will need these packages installed -> libjansson4 and libjansson-dev before compilation.

Configure suricata

In your suricata.yaml

  # "United" event log in JSON format
  - eve-log:
      enabled: yes
      type: file #file|syslog|unix_dgram|unix_stream
      filename: eve.json
      # the following are valid when type: syslog above
      #identity: "suricata" 
      #facility: local5
      #level: Info ## possible levels: Emergency, Alert, Critical,
                   ## Error, Warning, Notice, Info, Debug
      types:
        - alert
        - http:
            extended: yes     # enable this for extended logging information
        - dns
        - tls:
            extended: yes     # enable this for extended logging information
        - files:
            force-magic: yes   # force logging magic on all logged files
            force-md5: yes     # force logging of md5 checksums
        #- drop
        - ssh
        - smtp
        - flow

Install ELK (elasticsearch, logstash, kibana)

First install the dependencies
(
NOTE:
ELK recommends running with Oracle Java – how to ->
http://www.elasticsearch.org/guide/en/elasticsearch/reference/current/setup-service.html#_installing_the_oracle_jdk
)

Otherwise you can install the openjdk:

apt-get install apache2 openjdk-7-jdk openjdk-7-jre-headless

Then download and install the software.

Make sure you download the latest versions –
http://www.elasticsearch.org/overview/elkdownloads/
The installation process is simple (for example):

wget https://download.elasticsearch.org/kibana/kibana/kibana-3.0.0.tar.gz
wget https://download.elasticsearch.org/elasticsearch/elasticsearch/elasticsearch-1.6.1.deb
wget https://download.elastic.co/logstash/logstash/packages/debian/logstash_1.5.3-1_all.deb

tar -C /var/www/ -xzf kibana-3.0.0.tar.gz
dpkg -i elasticsearch-1.6.1.deb
dpkg -i logstash_1.5.3-1_all.deb

Logstash configuration

Create and save a logstash.conf file with the following content in the /etc/logstash/conf.d/ directory :

touch /etc/logstash/conf.d/logstash.conf

Insert the following(make sure the directory path is correct):

input {
  file { 
    path => ["/var/log/suricata/eve.json"]
    sincedb_path => ["/var/lib/logstash/"]
    codec =>   json 
    type => "SuricataIDPS" 
  }

}

filter {
  if [type] == "SuricataIDPS" {
    date {
      match => [ "timestamp", "ISO8601" ]
    }
    ruby {
      code => "if event['event_type'] == 'fileinfo'; event['fileinfo']['type']=event['fileinfo']['magic'].to_s.split(',')[0]; end;" 
    }
  }

  if [src_ip]  {
    geoip {
      source => "src_ip" 
      target => "geoip" 
      #database => "/opt/logstash/vendor/geoip/GeoLiteCity.dat" 
      add_field => [ "[geoip][coordinates]", "%{[geoip][longitude]}" ]
      add_field => [ "[geoip][coordinates]", "%{[geoip][latitude]}"  ]
    }
    mutate {
      convert => [ "[geoip][coordinates]", "float" ]
    }
    if ![geoip.ip] {
      if [dest_ip]  {
        geoip {
          source => "dest_ip" 
          target => "geoip" 
          #database => "/opt/logstash/vendor/geoip/GeoLiteCity.dat" 
          add_field => [ "[geoip][coordinates]", "%{[geoip][longitude]}" ]
          add_field => [ "[geoip][coordinates]", "%{[geoip][latitude]}"  ]
        }
        mutate {
          convert => [ "[geoip][coordinates]", "float" ]
        }
      }
    }
  }
}

output { 
  elasticsearch {
    host => localhost
    #protocol => http
  }
}

Configure the start-up services

update-rc.d elasticsearch defaults 95 10
update-rc.d logstash defaults

service apache2 restart
service elasticsearch start
service logstash start

Enjoy

That’s all. Now make sure Suricata is running and you have logs written in your JSON log files and you point your browser towards ->

http://localhost/kibana-3.0.0

NOTE:
Some ready to use templates – Templates for Kibana/Logstash to use with Suricata IDPS

From here on if you would like to customize and familiarize yourself more with the interface you should read the documentation about Kibana and Logstash.
Please have in mind that this is a very quick(under 5 min) tutorial. You should customize and review the proper way for you of using it as a service and/or consider using httpS web interface and reversy proxy with some authentication.

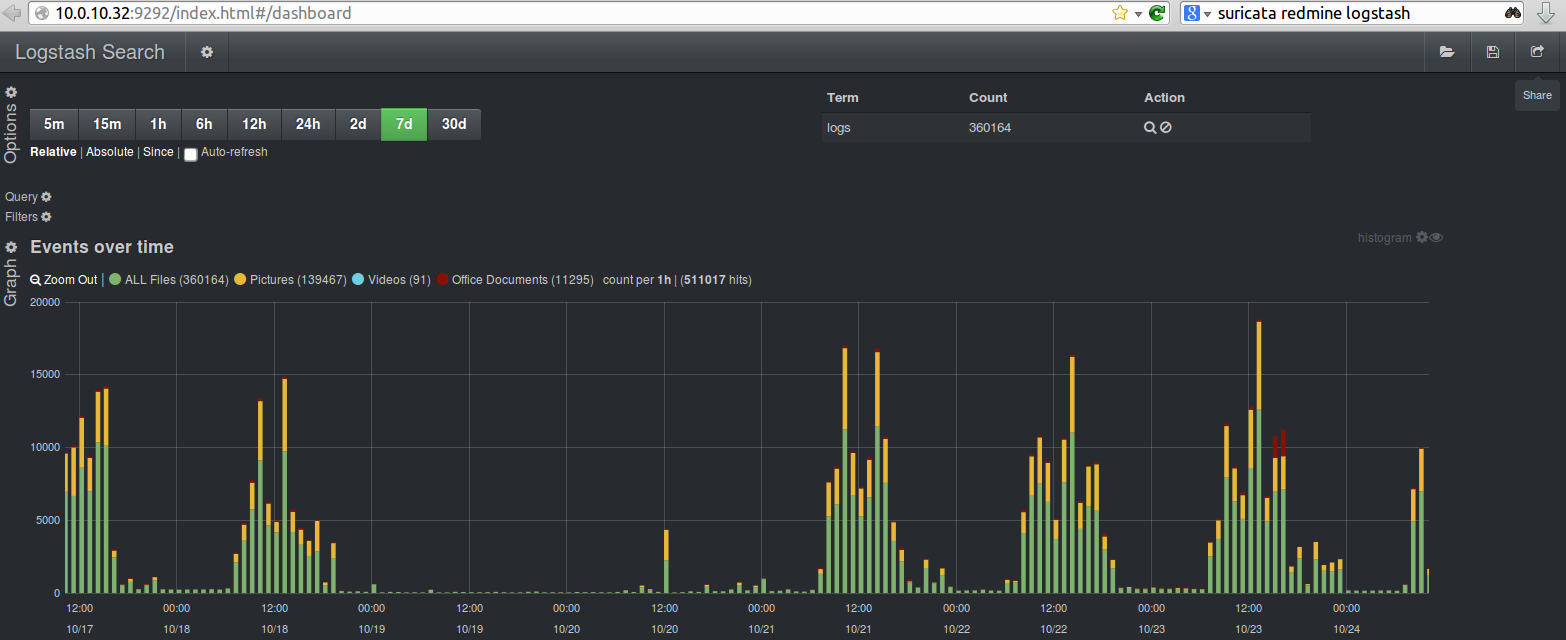
Some possible customization of the output of Logstash and Kibana – >
wps office 2013 专业版下载地址

昔阳县政府购买的wps office 2013 专业版下载地址
发布时间 :2014-11-06 15:53:25

必须从下面的网址下载专业版,序列号THUV2-32HH7-6NMHN-PTX7Y-QQCTH。

在其他地方下载针对个人授权的免费版,装在政府工作的电脑上,不算作正版软件。

下载地址:http://www.wpsoffice.com/product/wps-office-pro.html

WPS Office 2013 专业版+有效密钥

首先说说WPS的研发历史沿革:1988年5月,一个名叫求伯君的程序员凭借一台386电脑写出了WPS 1.0,从此开创了中文字处理时代,并迅速占领中国市场。1993年,为了迎接微软挺进中国后Word的挑战,求伯君带领“金山”开发出了类似Office套件的《盘古组件》,但是并未占领市场。为了起死回生收复失地,此后又研发出WPS Office与Microsoft Office抗衡时至今日。现提供WPS Office 2013专业版 + 有效密钥如下——

WPS Office 2013 Professional (专业版):

http://kad.www.wps.cn/wps/download/WPS2012Pro.exe

http://kad.www.wps.cn/wps/download/ep/WPS2013Pro_normal.exe

WPS Office 2013 Pro Plus (专业增强版)

http://kad.www.wps.cn/wps/download/ep/WPS2013ProPlus_normal.exe

【WPS Office Pro 2016】

http://kad.www.wps.cn/wps/download/ep/WPS2016Pro_normal.exe

【WPS Office Pro Plus 2016】

http://kad.www.wps.cn/wps/download/ep/WPS2016ProPlus_normal.exe

【注意:以下序列号上述版本都通用】

序列号:
9DP6T-9AGWG-KWV33-9MPC8-JDCVF
7G2HE-JR8KL-ABB9D-Y7789-GLNFL
U2PWU-H7D9H-69T3B-JEYC2-3R2NG
R8R8P-MTT6F-KLRPM-J7CAB-PJM8C
A4XV7-QP9JN-E7FCB-VQFRD-4NLKC
U272H-HH2F6-WDG36-ULUPX-PCHTJ
7LR67-WTXPA-KLUHV-GEK2E-QW4CK
EUYTH-3KWKL-PJMX7-XBCPW-9U2DD

利用dnsmasq自动翻墙及防dns劫持

首先dnsmasq是什么
它是一个dns缓存转发器,它先缓存一些dns记录,我们再用的时候就是直接访问路由里面的dns条目,而不会再去解析一次,节省了时间
比如说我们访问g.cn,因为最近这个域名会被先转到google.cn,再转到google.com.hk,所以每次解释域名就得等待10来秒,用dnsmasq之后这个时间就省了
当然第一次的时候还是要解析一次,以后就好了,缓存过多自动删掉一些就另当别论了
最近网上出现各种hosts,虽然可以直接放到电脑和手机里,但是用路由器更加方便一点
好谈翻墙的问题
将dd切换到服务界面,会看到dnsmasq下面有一个很空的地方让你填,这个就是今天最主要的地方了

address=/.youtube.com/203.208.46.30
address=/.ytimg.com/203.208.46.30
address=/.googlevideo.com/203.208.46.30
address=/.2mdn.net/203.208.46.30
将上面的复制进去就行了
在开浏览器试试上youtube就可以了
意思很简单address后面的域名会自动解析到后面的ip,类似于hosts 的效果
不过不用像hosts一样复制一长串,因为这个有点通配符的意思,*.youtube.com都是到203.208.46.30

我还尝试加ipv6的地址,可惜路由会挂掉,只能插网线,并且电脑配固定ip改回来
address=/.blogger.com/2001:4860:8006::bf
address=/.blogspot.com/2001:4860:8006::62
address=/.appspot.com/2001:4860:8006::8d
有兴趣的看可以尝试一下
照http://www.linuxidc.com/Linux/2011-03/33072.htm 看是支持这样写ipv6的,可能是dd里面的不支持

当然dnsmasq是支持hosts文件的,它会默认读取/etc/hosts文件
不过有一个问题重启后hosts文件就还原了,总不能一次次传吧
当然你可以把hosts文件传到网上去,然后用命令wget下来(可以到管理里面设为开机命令,cd /tmp wget http://xxx.xxx/host(放在tmp比较好))
对了dnsmasq可以指定hosts
addn-hosts=/tmp/dnsmasq.hosts
还是填在刚才的地方,那地方相当于在配置dnsmasq的配置文件linux上在/etc/dnsmasq.conf可惜dd上找不到在哪

一般情况下dns解析是从你的isp的dns服务器那缓存下来的,当然也可以改
设置#不读取/etc/resolv.conf文件
no-resolv
#不扫描/etc/resolv.conf和/etc/dnsmasq.conf文件的改动,如果有改动直接重启程序即可
no-poll
#设置dns服务器
server=8.8.8.8
server=8.8.8.4 #google的dns,你也可以使用opendns的server
这样以后就会从google的dns缓存

至于dns劫持,比较常见的一种情况就是输错网址然后跳动isp的广告页面如 http://nfdnserror8.wo.com.cn:8080/?HOST=fuck.U&R=/&
这种一般勉强还能接受,严重的如这里 http://www.cnbeta.com/articles/23851.htm
我这的会劫持一些它不想我访问的网站如google的一些服务
先获得这些地址的ip
然后还是刚才的地方
bogus-nxdomain=123.129.254.11
bogus-nxdomain=123.129.254.12
bogus-nxdomain=123.129.254.13
bogus-nxdomain=123.129.254.14
bogus-nxdomain=123.129.254.15
bogus-nxdomain=123.129.254.16
bogus-nxdomain=123.129.254.17
bogus-nxdomain=123.129.254.18
这些填进去,后面的ip换成你的可以有多个

更新:关于这个,这里还有 http://blog.kangkang.org/index.php/archives/141 跟我们没关系,上面已经实现了,这是openwrt的(其实也可以改配置文件)留着作为研究之用

前面有写server=8.8.8.8这里是全部的
也可以只让部分网站从自定义的dns解析
用server=/google.com/8.8.8.8
详见这里http://bbs.pku6.edu.cn/bbs/bbstc … p;threadid=12826958

参考资料,除了上面的还有
http://server.blog.163.com/blog/static/1076358201162424629295/

openwrt的配置文件在/etc/dnsmasq.conf直接改就行了

OpenWRT 设置 IPv6 的问题

发信人: MasterXJ (Master), 信区: Networking
标 题: Re: OpenWRT 设置 IPv6 的问题
发信站: 北大未名站 (2015年07月16日20:48:44 星期四), 站内信件

1. 有。
2. 不是。

OpenWrt安装之后的默认配置是在wan口使用DHCPv6的客户端,在lan口开启RA和DHCPv6的
服务端(odhcpd)。这个默认配置应该适用于国外主流ISP,因为他们通过DHCPv6-PD (pre
fix delegation)把一个至少/64的地址段都分配用户使用。不过我们学校现在采用SLAAC
的方式分配地址(除了畅春新园正在测试DHCPv6,每个用户单一地址的那种),所以得修
改/etc/config/dhcp,在LAN和WAN之间relay RA和NDP(WAN是master),像下面这样:
config dhcp ‘lan’
option interface ‘lan’
……(省略)
option ndp ‘relay’
option ra ‘relay’

config dhcp ‘wan’
option interface ‘wan’
#option ignore ‘1’ (注释掉这行)
option ndp ‘relay’
option ra ‘relay’
option master ‘1’

但是改完之后ND proxy还有问题:odhcpd从wan口收到NS请求之后会在lan接口ping一下目
标地址(比如2001:da8:201:xxxx::yyyy),但如果路由表里lan接口到达不了这个地址,
lan就收不到NS以及这个echo request,NDP就不能工作。所以还需要给lan口增加你所在
网段的路由:
route -A inet6 add 2001:da8:201:xxxx::/64 dev br-lan
或者用iproute2:
ip -6 r a 2001:da8:201:xxxx::/64 dev br-lan
这样内网应该就能正常访问IPv6了。

不过可能不久以后就会推广DHCPv6,到时这个方法就没什么用了。
现在用OpenWrt/odhcpd relay DHCPv6似乎问题更多,大概有以下几点:
1. 校园网的DHCPv6服务器(目前)不支持relay-forward请求,所以不能relay
2. odhcpd在向上级DHCPv6服务器发送relay-forward的时候似乎用错了socket
3. 上面提到的那个lan接口没有路由的问题依然存在
4. 用DHCPv6以后,OpenWrt自己的路由表的默认路由绑定在自己的地址上的,例如
default from 2001:da8:201:xxxx::yyyy/128 via fe80::xxxx
所以还要手动增/改默认路由

【 在 Leedy (LeeDY) 的大作中提到: 】
: 1. 有人现在设置成功了吗?
: 2. 学校似乎不提供获取 IPv6 prefix 的功能,是不是意味着没法用 odhcpd 了?

※ 来源:·北大未名站 bdwm.net·[FROM: 162.105.220.29]