linux中ssh/scp连接远程ssh非22端口的服务器方法

来源:http://blog.51cto.com/lynnteng0/1066795


ssh 连接远程ssh非22端口的服务器方法
ssh -p 20086 tiaoban@远程ssh服务器ip
scp 远程拷贝ssh非22端口的服务器文件是使用方法
[来源]
OpenOpenSSH是openBSD项目组开发的,基于BSD协议。一般linux发行版自带Openssh。2008年7月出了5.1版。 openssh包含一套程序。scp替换rcp,sftp替换了ftp. 包含sshd和sftp server端。scp: 远程文件拷贝(scp指定了远端的非默认22端口):
scp -P 20022 src.tar.gz
scp -P 20022 .
scp -o port=60066 .
scp -P 60066 -r /home/zhouhh/src/.*
拷贝目录,-r是将目录下的目录递归拷贝。”.*”是将隐藏文件也拷贝过去。需要先在远端创建好相应的目录。
scp -P 60066 -r *
最 后一个命令存在一个问题,就是如果172.16.22.30不是默认22端口,无法指定端口。即-P 指定非缺省的ssh端口时,对远程的拷贝,无法指定两个不同的端口。这应该是scp的命令缺陷。如果谁知道怎么指定两个远端的非缺省22端口的语法,请告 诉我。联系地址ablozhou[at]gmail.com。
scp的优点是使用简单,缺点是无法列出远端目录和改变目录。复杂一点的用法是用sftp。
sftp:
sftp -o port=60066
其中-o port选项指定非缺省的ssh端口。
Connecting to 192.168.12.12…
password:
Changing to: /home/zhouhh
sftp> pwd
Remote working directory: /home/zhouhh
在命令行模式下可以执行一系列命令
ls,cd,pwd,mkdir,rmdir,rm 等远端文件操作
lls,lcd,lpwd等本地操作。
!command 执行本地shell命令
!进入本地shell,exit再进入sftp的命令提示。
可以用help或”?”来查询所有的sftp支持的命令。
get 从远端下载文件
put 将本地文件上传到远程。
sftp配置,需要在/etc/ssh/sshd_config
配置文件增加sftp子系统:
Subsystem sftp /usr/libexec/openssh/sftp-server
然后重启sshd:
service sshd restart

Customer Guidance for WannaCrypt attacks


https://blogs.technet.microsoft.com/msrc/2017/05/12/customer-guidance-for-wannacrypt-attacks/

Microsoft solution available to protect additional products

Today many of our customers around the world and the critical systems they depend on were victims of malicious “WannaCrypt” software. Seeing businesses and individuals affected by cyberattacks, such as the ones reported today, was painful. Microsoft worked throughout the day to ensure we understood the attack and were taking all possible actions to protect our customers. This blog spells out the steps every individual and business should take to stay protected. Additionally, we are taking the highly unusual step of providing a security update for all customers to protect Windows platforms that are in custom support only, including Windows XP, Windows 8, and Windows Server 2003. Customers running Windows 10 were not targeted by the attack today.

Details are below.

  • In March, we released a security update which addresses the vulnerability that these attacks are exploiting. Those who have Windows Update enabled are protected against attacks on this vulnerability. For those organizations who have not yet applied the security update, we suggest you immediately deploy Microsoft Security Bulletin MS17-010.
  • For customers using Windows Defender, we released an update earlier today which detects this threat as Ransom:Win32/WannaCrypt. As an additional “defense-in-depth” measure, keep up-to-date anti-malware software installed on your machines. Customers running anti-malware software from any number of security companies can confirm with their provider, that they are protected.
  • This attack type may evolve over time, so any additional defense-in-depth strategies will provide additional protections. (For example, to further protect against SMBv1 attacks, customers should consider blocking legacy protocols on their networks).

We also know that some of our customers are running versions of Windows that no longer receive mainstream support. That means those customers will not have received the above mentioned Security Update released in March. Given the potential impact to customers and their businesses, we made the decision to make the Security Update for platforms in custom support only, Windows XP, Windows 8, and Windows Server 2003, broadly available for download (see links below).

Customers who are running supported versions of the operating system (Windows Vista, Windows Server 2008, Windows 7, Windows Server 2008 R2, Windows 8.1, Windows Server 2012, Windows 10, Windows Server 2012 R2, Windows Server 2016) will have received the security update MS17-010 in March. If customers have automatic updates enabled or have installed the update, they are protected. For other customers, we encourage them to install the update as soon as possible.

This decision was made based on an assessment of this situation, with the principle of protecting our customer ecosystem overall, firmly in mind.

Some of the observed attacks use common phishing tactics including malicious attachments. Customers should use vigilance when opening documents from untrusted or unknown sources. For Office 365 customers we are continually monitoring and updating to protect against these kinds of threats including Ransom:Win32/WannaCrypt. More information on the malware itself is available from the Microsoft Malware Protection Center on the Windows Security blog. For those new to the Microsoft Malware Protection Center, this is a technical discussion focused on providing the IT Security Professional with information to help further protect systems.

We are working with customers to provide additional assistance as this situation evolves, and will update this blog with details as appropriate.

Update 5/22/2017: Today, we released an update to the Microsoft Malicious Software Removal Tool (MSRT) to detect and remove WannaCrypt malware. For customers that run Windows Update, the tool will detect and remove WannaCrypt and other prevalent malware infections. Customers can also manually download and run the tool by following the guidance here. The MSRT tool runs on all supported Windows machines where automatic updates are enabled, including those that aren’t running other Microsoft security products.

Phillip Misner, Principal Security Group Manager  Microsoft Security Response Center

Further resources:

General information on ransomware

Protecting your PC from ransomware

MS17-010 security update

How to verify that MS17-010 is installed

Download English language security updates: Windows Server 2003 SP2 x64Windows Server 2003 SP2 x86, Windows XP SP2 x64Windows XP SP3 x86Windows XP Embedded SP3 x86Windows 8 x86, Windows 8 x64

Download localized language security updates: Windows Server 2003 SP2 x64Windows Server 2003 SP2 x86Windows XP SP2 x64Windows XP SP3 x86Windows XP Embedded SP3 x86Windows 8 x86Windows 8 x64

How to enable and disable SMB in Windows and Windows Server & GPO deployment

Guidance for Azure customers

Applying MS17-010 using Microsoft Intune

ConfigMgr SQL queries for reporting on KBs related to MS17-010

Guidance for Operations Management Suite customers

科学上网技巧

来源:https://g2ex.github.io/2016/05/20/Tips-on-Chinternet/

尽管也称互联网,但在国内,如若有以下一个或多个需求,你就不得不学习一下科学上网了:

  1. 访问的网站或服务被(GFW)墙;
  2. 网络提供商(ISP)劫持了网络流量;
  3. 需要匿名(隐藏真实 IP)的情况,如渗透测试;
  4. 躲避网络监控;
  5. 其他情况。

这里分享一下我的科学上网技巧,使用到的工具软件可能有 ShadowsocksLanternPrivoxyTor。根据不同的目的选择不同的工具。

一、绕过 GFW 和 ISP 劫持

最简单和不折腾的方法是购买 VPN,次之是购买一台海外 VPS,自己安装 VPN 或 Shadowsocks 服务端。VPN 的优点是可以全局翻墙,Shadowsocks 虽然可以设置全局模式,但是对于不支持代理的本地应用是没有办法的,当然这种情况下可以试试 ProxifierPE 强制所有连接通过代理上网。

使用 Shadowsocks 可能遇到的另一个问题是,因为 Shadowsocks 使用的是 SOCKS5 类型的代理,当本地应用只支持 HTTP/HTTPS 类型代理时,就需要自己解决 HTTP 转换为 SOCKS5 的问题。当然,这个问题使用 Privoxy 就能很好地解决。

本节主要介绍如何组合使用 Shadowsocks 和 Privoxy,并假设你已经安装并配置好了 Shadowsocks(Linux 中可以安装 shadowsocks-qt5 或 命令行版本的 Shadowsocks)。

Shadowsocks 与 Privoxy 组合使用的示意图如下所示:

Shadowsocks Privoxy 组合使用示意图

假设你已经配置好了 Shadowsocks,接下来配置 Privoxy。
Windows 系统中右键点击 Privoxy 托盘图标,依次点击 Edit – Main Configuration 打开配置文件;Linux 系统中 Privoxy 的配置文件位于/etc/privoxy/config
配置文件修改为:

1
2
3
4
5
6
# 把 HTTP 流量转发到本机 127.0.0.1:1080 的 Shadowsocks
forward-socks5 / 127.0.0.1:1080 .

# 可选,默认只监听本地连接 127.0.0.1:8118
# 可以允许局域网中的连接
listen-address 0.0.0.0:8118

启动 Shadowsocks 和 Privoxy 后,把本地应用的代理设置为 HTTP/HTTPS 类型的 127.0.0.1:8118,就可以绕过 GFW 和 ISP 了。如果局域网中的其他 PC 或手机也希望使用该电脑上网(假设该电脑 IP 地址为 192.168.1.10),把它们的代理设置为 19.168.1.10:8118 即可。

Tips

目前,有一个讨巧的的办法替代这两者的组合:使用 Lantern —— 一款开源的安全上网工具。它使用的是 HTTP 类型代理,本地端口为 8787,也就是说,把本地应用的代理设置为 127.0.0.1:8787 就可以使用 HTTP 类型的代理了。而且使用它,也无需自己购买 VPS。

Lantern 默认非全局代理,可以在设置中改为全局模式。

另一方面,Lantern 只监听本机 127.0.0.1:8787 的连接,如果局域网中的电脑或手机也想通过这台电脑翻墙(假设该电脑 IP 地址为 192.168.1.10),那么也需要配合 Privoxy 使用。这时,Privoxy 的配置应该如下:

1
2
3
# 监听局域网中连接到本地 8118 端口的连接,转发给 8787 端口的 Lantern
forward / 127.0.0.1:8787
listen-address 127.0.0.1:8118    # 可改为 0.0.0.0:8118 允许局域网的连接

二、匿名上网

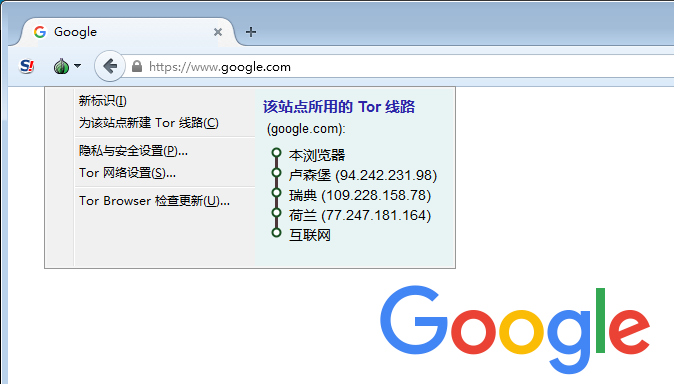
网络中保持匿名的办法是使用 Tor,匿名的意思是隐藏你当前的 IP 地址。Internet 上有很多志愿者运行着 Tor 中继节点,Tor 能保证从出发点的流量至少经过三个不同的中继节点到达目的地址,而且这三个不同的中继不会每次都相同。

形象地说,你想把一封匿名信交给小明,在大街上随便找了一陌生人 A 让 A 帮忙转交,A 走了一段路程后随便找了一个陌生人 B 让 B 帮忙转交,B 走了一段路程后随便找了一个陌生人 C 让 C 帮忙转交,最终 C 按照信封上的地址找到了小明并把信交给了他。小明只知道是 C 转交了这封信,至于是谁写的这封信,他就无从得知了。A、B、C 分别对应着 Tor 网络的中继节点,这种投递匿名信的方式就起到了隐藏 IP 地址的效果。

如下图所示,使用 Tor 从本机经过三跳访问了 Google。

Tor Browser

Tor 浏览器

为了方便使用 Tor,Tor 开发者把 Tor 集成到了定制版的 Firefox 中,简单设置一下就能正常使用。

Tor 浏览器专为大陆等网络环境加入了流量混淆的选项。首次打开浏览器时会弹出 Tor 状态检查,点击设置配置 Tor 网桥,勾选互联网提供商(ISP)是否对 Tor 网络连接进行了封锁或审查中的,把下一步中的网桥类型选择meek-amazonmeek-azure。这两者在大陆没被完全封锁,因此可以用来做跳板网桥。

不过随着网络环境的恶化,Tor 提供的网桥类型都不可用时,就需要使用自己的 Shadowsocks 或 Lantern 代理了。

首次打开 Tor 浏览器,在 Tor 设置中勾选互联网提供商(ISP)是否对 Tor 网络连接进行了封锁或审查中的,在下一步是否需要本地代理访问互联网?中选择,下一步中设置你的代理:

  • 使用 Shadowsocks 则设置为 SOCKS5 类型的 127.0.0.1:1080
  • 使用 Lantern 则设置为 HTTP/HTTPS 类型的 127.0.0.1:8787

如果通过局域网中其他计算机的配置联网,把 127.0.0.1 改为那台计算机的 IP 地址。

使用了代理的 Tor 浏览器原理示意图如下(以 Tor + Shadowsocks 组合为例):

Tor 浏览器 + Shadowsocks 组合使用示意图

Tor Expert Bundle

Tor 浏览器适用于使用浏览器匿名上网的场景,如果打算让本地应用(如其他浏览器、Linux 中的 Terminal 等)也使用 Tor 隐藏 IP 地址,那么就需要自己手动配置 Tor 了。从 Tor 官网下载 操作系统对应的 Expert Bundle,它只包含 Tor 工具,不含浏览器。

假设你已经配置好了 Shadowsocks,接下来,为 Tor 配置 Shadowsocks 代理。

Windows 系统中,打开 %AppData%/tor 目录(如果不存在则创建该目录),新建 torrc 文件,内容如下:

1
2
3
4
5
6
7
8
## 通过 SOCKS5 代理
SOCKS5Proxy 127.0.0.1:1080
## 如果使用 HTTP/HTTPS 代理
# HTTPSProxy 127.0.0.1:8118

## 如果只允许特定端口的网络连接,如 80 和 443
ReachableAddresses *:80,*:443
ReachableAddresses reject *:*

Linux 系统中,Tor 的配置文件位于 /etc/tor/torrc,配置内容同上。

启动 Shadowsocks 和 Tor,因为 Tor 监听的是 SOCKS5 类型的本地 9050 端口,把需要匿名的本地应用代理设置为 SOCKS5 类型,代理地址设置为 127.0.0.1:9050,实现匿名上网。

还是老问题,如果本地应用只支持 HTTP/HTTPS 代理类型,那么仍需要使用 Privoxy,修改其配置文件为:

1
2
forward-socks5 / 127.0.0.1:9050 .
listen-address 127.0.0.1:8118    # 可改为 0.0.0.0:8118 允许局域网的连接

这样一来,本地应用的代理设置为 HTTP/HTTPS 类型的 127.0.0.1:8118 就可以实现匿名上网了。

Privoxy + Tor + Shadowsocks 组合使用示意图如下所示:

Privoxy + Tor + Shadowsocks 组合使用示意图

One More Tip

使用 Tor 匿名访问网络除了应用于渗透测试,另一个应用场景是编写爬虫变换 IP 地址爬取站点,减小被网站屏蔽的可能性。

在 Linux Terminal 中,使用 export 命令设置代理,可以只在当前 Terminal 中生效,

1
2
export http_proxy=http://127.0.0.1:8118
export https_proxy=https://127.0.0.1:8118

三、总结

接下来简要归纳上述内容,给出每种组合的配置内容。

Privoxy + Shadowsocks 组合 —— 翻墙

配置 Privoxy,Linux 系统中位于 /etc/privoxy/config

1
2
forward-socks5 / 127.0.0.1:1080 .
listen-address 127.0.0.1:8118    # 可改为 0.0.0.0:8118 允许局域网的连接

本地代理需设置为 HTTP/HTTPS 类型的 127.0.0.1:8118
如果不使用 Privoxy,本地代理需设置为 SOCKS5 类型的 127.0.0.1:1080

Privoxy + Tor + Shadowsocks 组合 —— 匿名上网

配置 Privoxy,Linux 系统中位于 /etc/privoxy/config

1
2
forward-socks5 / 127.0.0.1:9050 .
listen-address 127.0.0.1:8118    # 可改为 0.0.0.0:8118 允许局域网的连接

配置 Tor,Windows 系统中位于 %AppData%/tor/torrc,Linux 系统中位于 /etc/tor/torrc

1
2
3
SOCKS5Proxy 127.0.0.1:1080    # Shadowsocks 代理地址
ReachableAddresses *:80,*:443
ReachableAddresses reject *:*

本地代理需设置为 HTTP/HTTPS 类型的 127.0.0.1:8118
如果不使用 Privoxy,本地代理需设置为 SOCKS5 类型的 127.0.0.1:9050

Privoxy + Tor + Lantern 组合 —— 匿名上网

配置 Privoxy,Linux 系统中位于 /etc/privoxy/config

1
2
forward-socks5 / 127.0.0.1:9050 .
listen-address 127.0.0.1:8118    # 可改为 0.0.0.0:8118 允许局域网的连接

配置 Tor,Windows 系统中位于 %AppData%/tor/torrc,Linux 系统中位于 /etc/tor/torrc

1
2
3
HTTPSProxy 127.0.0.1:8787    # Lantern 代理地址
ReachableAddresses *:80,*:443
ReachableAddresses reject *:*

本地代理需设置为 HTTP/HTTPS 类型的 127.0.0.1:8118
如果不使用 Privoxy,本地代理需设置为 SOCKS5 类型的 127.0.0.1:9050


tip:Could not bind to 127.0.0.1:9050: Address already in use. Is Tor already running

netstat will tell you what’s listening on that port. Open a terminal (press Ctrl+Alt+T), and run:

sudo netstat -plnt | fgrep 9050

It will tell you which program is using that port. For example, on my system, it shows:

tcp       0     0 127.0.0.1:9050         0.0.0.0:*              LISTEN     1198/tor

At the end, it says that the program listening on that port is tor.

OpenWrt/LEDE 搭建 KMS 服务器

https://www.mivm.cn/openwrt-kms/


如果你经常重装系统,或者是经常安装 Windows 虚拟机,最头疼的可能就是每次安装后的系统激活。

一般激活 Windows 或者 Office 最多的就是激活工具,厉害一点的小伙伴会使用密钥激活。但是激活工具五花八门,而且一般找不到激活工具的官网或者是官方下载地址,下载来源没有保证,虽然一般不会中毒,但是有些流氓会恶意锁定浏览器主页或者是安装一些软件,这让小白很苦恼。

不过如果你有一台运行 OpenWrt 的路由器,就可以把它变成 KMS 服务器,只要连接至路由器,就可以轻轻松松激活 Windows 和 Office。

今天教大家在 OpenWrt 搭建 KMS 服务器,以及如何激活 Windows 和 Office。

搭建 KMS 服务器

OpenWrt 搭建 KMS 服务器非常简单,但是又稍微比较麻烦,因为 OpenWrt 官方源没有 vlmcsd,所以就需要编译。

如果你使用的是 PandoraBox (潘多拉)可以直接搜索并安装:luci-app-vlmcsd

编译的方法请看《OpenWrt SDK 编译软件包(基础篇)》的例子,不过我们在编译前需要改一点东西,这个 Luci 界面有点问题。

打开 package/luci-app-vlmcsd/Makefile,20 行DEPENDS:=+vlmcsd +PACKAGE_dnsmasq:dnsmasq +PACKAGE_dnsmasq-dhcpv6:dnsmasq-dhcpv6 +PACKAGE_dnsmasq-full:dnsmasq-full,改为 DEPENDS:=+vlmcsd,然后重新编译,编译完成后上传至路由器安装。

安装完成后,访问路由器管理界面,[服务] → [KMS服务器] → 勾选 [开始] 和 [使用配置文件] → [保存&应用],[自动激活] 我没试过,想尝试的小伙伴可以试一试。

至此,KMS 服务器就搭建完成了,下面就可以激活 Windows 和 Office 了。

激活 Windows 和 Office

注意:仅 Windows Vista 及以上系统可以使用 KMS 激活,且 Windows7 旗舰版 不支持 KMS 激活。

这里以 Windows 10 专业版和 Office 2016 为例演示如何激活。

KMS 激活也需要密钥,且每个系统版本的密钥不同,不过只有 1 个密钥,比如 Windows 10 专业版的密钥:W269N-WFGWX-YVC9B-4J6C9-T83GX

Windows KMS 密钥:https://technet.microsoft.com/en-us/library/jj612867(v=ws.11).aspx

Office KMS 密钥:https://technet.microsoft.com/en-us/library/dn385360(v=office.16).aspx

激活 Windows 10 专业版

右键开始菜单,点击 [命令提示符 (管理员)] 或 [Windows PowerShell (管理员)]

输入 slmgr /upk 卸载原有密钥,如果是刚装好的系统,这一步可以省略。

输入 slmgr /skms 192.168.1.1 设置 KMS 服务器地址,如果你的路由器 IP 不是 192.168.1.1,记得改一下。

输入 slmgr /ipk W269N-WFGWX-YVC9B-4J6C9-T83GX 安装 KMS 密钥

输入 slmgr /ato 查看激活状态,如果显示 “成功地激活了产品”,表示激活成功,

每隔 180 天会自动续订,不需要担心激活过期。

激活 Office 2016

Office 激活稍微麻烦点

右键开始菜单,点击 [命令提示符 (管理员)] 或 [Windows PowerShell (管理员)]

输入 cd "C:\Program Files (x86)\Microsoft Office\Office16" 这个是 Office 激活脚本所在位置,不同的 Office 版本不一样,比如 Office 2013 是 cd "C:\Program Files (x86)\Microsoft Office\Office15"

PowerShell 输入 foreach ($x in Get-ChildItem ..\root\Licenses16\*_KMS*.xrm-ms -name) {cscript ospp.vbs /inslic:"..\root\Licenses16\$x"} 安装 KMS 许可证

命令提示符 输入 for /f %x in ('dir /b ..\root\Licenses16\*_KMS*.xrm-ms') do cscript ospp.vbs /inslic:"..\root\Licenses16\%x" 安装 KMS 许可证

Office 2013 好像不需要安装许可证(VOL版)

输入 cscript ospp.vbs /sethst:192.168.1.1 设置 KMS 服务器地址,如果你的路由器 IP 不是 192.168.1.1,记得要改一下。

输入 cscript ospp.vbs /inpkey:XQNVK-8JYDB-WJ9W3-YJ8YR-WFG99 安装 KMS 密钥

输入cscript ospp.vbs /act 激活已安装的 Office 密钥

输入 slmgr /ato SKUID 查看激活状态,SKUID 在上面那个命令输出结果里面。

我测试的过程中发生了点小意外,所以截图我就不发了。(我才不会告诉你们是因为我懒)

如果你的路由器有公网 IP 或可以外网访问,可以把 KMS 服务器端口(1688)转发做远程 KMS 服务器给他人使用。


这下就不怕重装系统激活失效了,也不用担心激活工具附带病毒木马,有任何问题在下方给我留言。


OpenWrt SDK 编译软件包(基础篇)

https://www.mivm.cn/openwrt-sdk-package-foundation/

OpenWrt 是个非常好用且强大的 Linux 发行版,常用于路由器等嵌入式设备。之前我也写了不少关于 OpenWrt 的教程。

OpenWrt 和其他 Linux 发行版一样,都可以通过软件包源码编译适合自己设备运行的软件包,不过由于 OpenWrt 大部分运行于路由器,存储空间不充裕,并没有像其他 Linux 发行版那样附带 GCC 可以及时编译,不过 OpenWrt 提供了 SDK,可以使用其他 Linux 发行版来为 OpenWrt 编译软件包。

这篇教程就教大家如何使用 OpenWrt SDK 来为自己路由器的 OpenWrt 编译软件包,这样大家就可以自己编译一些开源项目或者是《OpenWrt 安装及配置 Aria2 教程》里面提到的完整版 Aria2 这种的。当然,同样适用于 LEDE 和 PandoraBox。

准备工作

首先需要一个 Linux 系统,不要使用 Windows10 的 Linux 子系统,要使用完整的 Linux 系统。

推荐使用 Deepin (深度 Linux),由国人团队开发,附带安装器,只需轻点几下鼠标,就可以完成双系统的安装。系统附带了 Chrome、QQ、网易云音乐等常用软件,不用担心不会使用 Linux 的尴尬。

系统安装后,打开终端 Ctrl + Alt + T ,依次输入:sudo apt-get update # 更新软件源sudo apt-get upgrade -y # 更新软件包sudo apt-get install subversion g++ zlib1g-dev build-essential git python rsync man-db libncurses5-dev gawk gettext unzip file libssl-dev wget -y # 安装所需软件包,然后重启系统。

如果你使用 PandoraBox SDK 进行编译,推荐使用 Ubuntu 14.04 系统,或者使用我写的脚本来安装所需依赖库。wget https:https://cdn.mivm.cn/www.mivm.cn/archives/openwrt-sdk-package-foundation/PandoraBoxSDK_lib.tar.gz && tar zxf PandoraBoxSDK_lib.tar.gz && cd PandoraBoxSDK_lib && sudo ./install.sh

然后下载适合你路由器的 OpenWrt SDK,根据 CPU 架构和系统版本,比如 K3,CPU 架构是 bcm53xx,系统是 LEDE Snapshots,下载 bcm53xx 的 LEDE Snapshots SDK。

将下载好的 SDK 解压,就可以开始编译软件包了。

编译软件包

打开 SDK 文件夹 → 右键空白处 → [在终端打开] → 依次输入 ./scripts/feeds update -a # 更新软件列表 、 ./scripts/feeds install -a # 安装软件列表make defconfig # 生成配置文件

PandoraBox SDK 默认没有软件列表配置文件,下载 https://cdn.mivm.cn/Hill-Blog/article/openwrt-sdk-package-foundation/feeds.conf.default 复制至 PandoraBox SDK 目录,执行更新和安装命令和 ./scripts/feeds uninstall base-files busybox freeswitch # 卸载不兼容的软件包

输入 make menuconfig 进入配置界面

界面操作

↑ ↓:目录选择

← →:功能选择

回车键:执行功能

Y: 选中

N:取消选中

Esc:返回

斜杠键:搜索

功能选项

Select (选择):这个选项下按回车才可以进入目录。

Exit (退出):和 ESC 键作用相同,返回上一级或退出。

Help (帮助):显示帮助信息。

Save (保存):保存当前配置信息变更,每次退出前记得保存一下。

Load (加载):加载其他配置文件,一般用不到。

目录后面有箭头都可以进入,前面有方括号的都可以选中。

接下来编译个自带软件列表的软件包,以完整版 Aria2 为例。

打开配置界面

依次进入 [Network] → [File Transfer]

按 Y 选中 Aira2

进入 [Aria2 Configuration]

有几个没有被启用的选项(功能),依次按 Y 选中启用

保存 → 退出

输入 make package/aria2/compile V=s 开始编译,耐心等待编译完成。如需编译其他软件包,把 aria2 改为对应的软件包名即可,前提是软件列表有对应软件包。

注:V=s的作用是输出详细信息

推荐使用代理加速软件包源码下载

如果你的 CPU 有多个线程,可以加上 -j线程数 来使用多线程编译,例如:make package/aria2/compile V=s -j4 # 启用4个线程

编译好的 ipk 文件可以在 bin/packages/arm_cortex-a9/packages 找到。当然,不同的软件包和 CPU 架构路径不一样,不过都在 bin/packages

有时候我们需要编译第三方软件包怎么办?接下来以 vlmcsd (KMS服务器) 为例,教大家编译第三方软件包。

输入 cd package # 进入 package 目录

git clone https://github.com/openwrt-develop/openwrt-vlmcsd.git # 获取 vlmcsd 源码 和 git clone https://github.com/openwrt-develop/luci-app-vlmcsd.git # 获取 vlmcsd Luci 界面源码

cd .. # 返回上级(SDK)目录

make menuconfig

不知道软件包在那个分类怎么办?可以使用搜索功能,按斜杠键后输入关键字,然后找到我们需要的软件包,Location 就是软件包所在位置。

vlmcsd 在 Network → 找到软件包并选中

保存 → 退出

输入 make package/openwrt-vlmcsd/compile V=s # 编译 vlmcsd 和 make package/luci-app-vlmcsd/compile V=s # 编译 Luci 界面。有小伙伴可能要问了,软件包名不是 vlmcsd 吗,为什么命令是 openwrt-vlmcsd ?

那个是源码文件夹名称,源码文件夹名称是 openwrt-vlmcsd,也可以把文件夹名称改下。

第三方软件包编译的 ipk 一般是在 bin/packages/arm_cortex-a9/base

适用于 OpenWrt SDK 编译第三方软件包可以在 GitHub 找到,你可以在搜索软件名称后面加上 openwrt,比如:”vlmcsd openwrt”。

常见问题

问:为什么我make menuconfig之后没有软件包?

答:需要更新 feed 列表源,./scripts/feeds update -a # 更新软件源 、 ./scripts/feeds install -a # 安装软件源

问:为什么我编译会报错?

答:详细查看输出信息,找出错误信息部分,并尝试解决,你也可以将错误信息截图至QQ群并@小山。

问:软件源没我需要的软件包怎么办?

答:可以参考上面编译 KMS 服务器的方法,去 GitHub 寻找对应的软件包,也可以点击网站底部的 GitHub 图标到小山的仓库里寻找。注意!我重点说一下,并不是随便一个程序的源码复制/克隆到 SDK 目录就可以进行编译的。首先,确保你准备编译的源码支持configuremake,然后,这份源码不是直接放在 SDK 目录的,而是要再写一个 Makefile 用于 SDK,告诉 SDK,你这个源码的下载地址、软件包名称、版本号、依赖项等等,然后软件包才可以显示在软件包列表里,才可以用上面的方法编译。关于怎么写这个 Makefile,可以参考http://wiki.openwrt.org/doc/devel/packages,相信稍微有点编程基础的人都看得懂。当然,也有不用写 Makefile 的方法,直接用工具链编译,不过这个也有点麻烦,暂且不讨论。

问:PandoraBox SDK 编译某些软件包报错怎么办?

答:PandoraBox SDK 编译某些软件包确实会报错,至于报错的原因,我还没搞懂,有搞懂的小伙伴欢迎留言给我。

如果你还有什么不懂的地方,欢迎在下方留言。