FFmpeg实用命令

原文:http://davidaq.com/tutorial/2014/11/20/ffmpeg-commands.html


FFmpeg是一个开源免费跨平台的视频和音频流方案,属于自由软件。 别看这东西只有几十Mb,但却是个能格式转换、剪辑、播放几乎无所不能的命令行软件。 就如格式工厂,其核心也是FFmpeg。 在专业领域常被部署在服务端,用以做云端视频相关服务。 如七牛云存储就是利用FFmpeg来完成各种格式转换的。 其官方网址为:FFmpeg.org。 在那里可以下载到各种主流电脑平台的FFmpeg程序。

FFmpeg主要包含四个程序:

  • ffmpeg 主要用于对媒体文件的内容进行操作,如格式转换等,是最主要的部件
  • ffplay 简易播放器,虽然没有什么UI,但是能播放各种格式的视频
  • ffprobe 用于探查媒体文件的属性,如meta标签等,可以选择输出JSON或XML格式
  • ffserver 流媒体服务器,不可多得的免费流媒体服务器软件,可用于架设视频直播

FFmpeg除了提供可运行程序,还提供一套libav多媒体处理C库,可集成到别的软件当中提供多媒体文件解码、编码等功能。

对于一些比较专业的命令,本文也不会过多叙述,因为那需要更多的多媒体文件基础知识才能理解。 另外注意,这里讲的是正统的FFmpeg,而不是Debian搞出来的分支LibAV,里面那个ffmpeg(Ubuntu内置的)。

视频篇

以下命令主要针对视频文件操作

格式转换

ffmpeg最常用功能就是格式转换,在这里要特别提的是,音、视频文件格式有两个容器格式(如mov、flv)与编码格式(如H.264)。 很多人知道前者,却不知道后者,二者的关系与异同可在别处查到,不在此赘述。 简单的格式转换如下:

ffmpeg -i input.flv output.mp4

上面的命令就把一个flv文件转换成了一个mp4文件,其中-i xxx.xxx指定的输入文件,单独写的文件名指定输出文件路径。

一般FFmpeg会根据文件格式选择最合适的容器格式与编码格式,也可以手动指定。 常见的用例是需要一个保留alpha通道的视频,通常会使用mov容器格式,png编码格式,但是FFmpeg会默认使用H.264编码格式(不支持透明)。 如此命令如下:

ffmpeg -i input.flv -c:v png output.mov

想要知道自己的FFmpeg都支持哪些容器格式,使用命令ffmpeg -formats。 看都支持哪些编码格式,使用命令ffmpeg -codecs

特别强调,如果处理文件不是图片,不要让输入与输出文件相同

使用vaapi硬件编解码转码

1.默认方式

ffmpeg -vaapi_device /dev/dri/renderD128 -i input.mp4 -vf 'format=nv12,hwupload' -c:v h264_vaapi output.mp4

2.输入输出均支持vaapi硬件编解码

ffmpeg -hwaccel vaapi -hwaccel_output_format vaapi -hwaccel_device /dev/dri/renderD128 -i input.mp4 -c:v h264_vaapi output.mp4

3.输入文件不支持vaapi解码,使用vaapi编码

ffmpeg -init_hw_device vaapi=foo:/dev/dri/renderD128 -hwaccel vaapi -hwaccel_output_format vaapi -hwaccel_device foo -i input.mp4 -filter_hw_device foo -vf 'format=nv12|vaapi,hwupload' -c:v h264_vaapi output.mp4

尺寸变换

想把大而高清的视频,变成尺寸较小,文件大小也更小的视频也是个普遍用例。 下面这个命令就可以完成改变尺寸的任务,对图片文件也有效。

ffmpeg -i input.mp4 -s 640x360 output.mp4

上面的命令由-s 640x360定义了输出视频的画面尺寸会是640×360。

使用vaapi硬件resize

vf 'format=nv12,hwupload,scale_vaapi=w=1920:h=1080'

剪切

只想取视频的某一部分也有很方便的命令:

ffmpeg -i input.mp4 -ss 5 -t 10 output.mp4

上面的命令-ss 5指定从输入视频第5秒开始截取,-t 10指明最多截取10秒。 但是上面的命令可能会比较慢,更好的命令如下:

ffmpeg -ss 5 -i input.mp4 -t 10 -c:v copy -c:a copy output.mp4

上面的命令把-ss 5放到-i前面,与原来的区别是,这样会先跳转到第5秒在开始解码输入视频,而原来的会从开始解码,只是丢弃掉前5秒的结果。 而-c:v copy -c:a copy标示视频与音频的编码不发生改变,而是直接复制,这样会大大提升速度,因为这样就不需要完全解码视频(视频剪切也不需要完全解码)。


换一条例子

-ss:截取开始时间点, -t:要截取的视频长度(15秒)

ffmpeg -i yourvideoname.mp4 -ss 00:00:00 -codec copy -t 15 outputclip.mp4

图片序列与视频的互相转换

ffmpeg可以把一组图片转换成一个视频(可以把gif动画也当成一种视频格式),反之亦可。命令如下

ffmpeg -i %04d.jpg output.mp4
ffmpeg -i input.mp4 %04d.jpg

第一行命令是把0001.jpg、0002.jpg、0003.jpg等编码成output.mp4,第二行则是相反把input.mp4变成0001.jpg……。 %04d.jpg表示从1开始用0补全的4位整数为文件名的jpg文件序列。 如果想要序列文件名为hello_00001.png等等的话,就是hello_%05d.png

如果编码视频的时候还想加入声音,则如下这般添加一个输入文件:

ffmpeg -i input.mp3 -i %04d.jpg output.mp4

改变视频FPS

FFmpeg可以用于降低或提高视频的帧率,因为信息丢失不可逆法则,提高帧率只会简单地让某些帧的画面多重复一次或多次,所以提高帧率不会提高画质。

ffmpeg -i input.mp4 -r 30 output.mp4

上面的命令,不论原始视频帧率是多少,输出视频都会是30帧每秒。这种情况之下视频的时间轴不会变化,不会有慢动作或快动作的效果。

ffmpeg -r 30 -i input.mp4 output.mp4

上面这种条换顺序之后的写法比较有意思,-r 30放在输入文件之前表示影响的时输入文件,而非输出文件。 这样的命令表达的是,把输入文件当做30帧每秒,而忽略它的原始帧率。这样如果原来的视频FPS是25,被视作30之后,输出的视频会有快进的效果。 这个命令没有指定输出视频的FPS,默认会与输入文件保持一样,可以与本节第一个命令和在一起,写两个-r参数,第一个指定输入FPS,第二个指定 输出FPS即可既控制播放速度,又控制输出帧率。
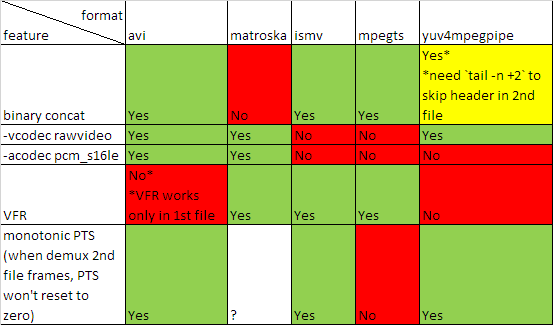
H264视频首尾拼接

如果确定输入文件都是H264编码,且尺寸、帧率等都相同,先把源视频转换成用于直播的ts格式。 然后直接对多个ts文件进行文件级的拼接,然后在转换回到目标格式。这个过程中,不会发生格式转换,所以非常迅速。

ffmpeg -i q.mp4 -c copy -bsf h264_mp4toannexb q.ts
ffmpeg -i r.mp4 -c copy -bsf h264_mp4toannexb r.ts
ffmpeg -i "concat:q.ts|r.ts" -c copy -bsf aac_adtstoasc qr.mp4

音频篇

以下命令主要用于音频操作。有许多上面已经给出的视频操作,比如格式转换,剪切等也可适用于音频。大部分视频也都包含音频,所以下面的命令 往往可以与视频命令混合适用。

提取音乐中的封面图片

有些音乐文件包含专辑封面图片在里面,可以用如下命令简单取出。命令从字面意义来讲,就是把MP3格式转换成JPEG格式了。

ffmpeg -i input.mp3 cover.jpg

音乐有损压缩

在某些场合下,比如在给网站做背景音乐,或音乐网站提供预览版音乐时,会选择以牺牲音频质量为代价降低文件大小,让网络播放更顺畅。 一个典型的压缩命令如下:

ffmpeg -i input.mp3 -ac 1 -ar 32k -bit_rate:a 128k output.mp3

上面命令做了三件事情:

  • -ac 1 指定只保留一个声道,所有声道都融合成一个(这里有个FFmpeg的bug,输出音量会变小)。
  • -ar 32k 表示采样率改为32000,通常的高保真音频都是48K左右,这个数值变小,会裁剪掉高音部分,32K会裁掉不少高音,不过普通人如果没个对比,听不出什么问题。 如果音频文件不是音乐,而是人声内容(比如广播),则可以打手一挥设置成22k或16k(电话是16k)
  • -bit_rate:a 128k设置的时音频比特率,如果是-bit_rate:v就成了视频比特率,128K表示,输出文件大概每秒钟的内容会有16KB左右的文件大小,需要至少128kbps的网络才能流畅播放 128K算是比较理想的比特率,文件小,音频质量损失又不是特别明显(对于普通人)

苹果系统的问题

经过FFmpeg处理的音频文件,在苹果的系统(包括OSX、iOS)以及苹果的播放器(iTunes、QuickTime)上往往会显示错误的长度时间。 这是个FFmpeg潜在的Bug,不过可以通过添加参数规避:

ffmpeg -i input.mp3 -write_xing 0 .... output.mp3

这样输出的文件在苹果产品上就会表现正常。原先不正常的文件,亦可以使用这个参数再经过一次ffmpeg处理来解决长度问题。

ffplay

ffplay是FFmpeg家族中的一个媒体文件播放器,可以播放许多种格式,不过与其说它是个完整的播放器,不如说这是个DEMO程序, 用来演示如何使用FFmpeg提供的解码接口来做播放器。它的命令很简单,通常播放一个正常的媒体文件只需要如下

ffplay target.mp4

ffplay可以接受参数,相当于ffmpeg程序里-i之前的参数,用来改变输入文件的输入方式,比如通过改变FPS造成快进或慢镜头的效果。

ffprobe

ffprobe可以非常方便地用于检测媒体文件的一些隐藏信息,通常只有更深层次的专业人员才会用到。一个典型的命令如下:

ffprobe target.mp4 -show_format -show_streams -print_format json -loglevel fatal


Use -safe 0 and -protocol_whitelist file,http,https,tcp,tls arguments. Full example at very bottom.


I was trying to use FFmpeg’s concat demuxer like so:

# inputs.txt
file 'http://www.example1.com/video1.mp4'  
file 'https://www.example2.com/video2.mp4'  
ffmpeg -f "concat" -i "./inputs.txt" -codec "copy" "./concated.mp4"  

First I got the error:

[concat @ 0x00] Unsafe file name 'http://www.example1.com/video1.mp4'
./inputs.txt: Operation not permitted

This was solved by adding the -safe 0 argument. Then I got the error:

[http @ 0x00] Protocol not on whitelist 'file,crypto'!
[concat @ 0x00] Impossible to open 'http://www.example1.com/video1.mp4'
./inputs.txt: Invalid argument

I thought I would be able to solve this by simple adding -protocol_whitelist file,http,https but then the error became:

[tcp @ 0x00] Protocol not on whitelist 'file,http,https'!
[concat @ 0x00] Impossible to open 'http://www.example1.com/video1.mp4'
./inputs.txt: Invalid argument

I did not understand why my HTTP protocol input was still being rejected. http was clearly in the protocol whitelist. Then I noticed the small diference between the previous two errors. Look at the very first word in those errors. http vs tcp. I realized that the first word in brackets before the error was the protocol that was being rejected.

The solution is to also add tcp to the protocol whitelist as well (also tls if you want to support HTTPS). Here was my final command:

ffmpeg -f "concat" -safe "0" -protocol_whitelist "file,http,https,tcp,tls" -i "./inputs.txt" -codec "copy" "./concated.mp4"  


Using VAAPI’s hardware accelerated video encoding on Linux with Intel’s hardware on FFmpeg and libav

https://gist.github.com/Brainiarc7/95c9338a737aa36d9bb2931bed379219

Hello, brethren 🙂

As it turns out, the current version of FFmpeg (version 3.1 released earlier today) and libav (master branch) supports full H.264 and HEVC encode in VAAPI on supported hardware that works reliably well to be termed “production-ready”.

Assumptions:

Before taking on this manual, the author assumes that:

  1. The end-user can comfortably install and configure their Linux distribution of choice.
  2. The end user can install, upgrade, downgrade and resolve both conflicts and dependency resolution of packages on his/her distribution’s package manager.
  3. That the user is comfortable with the Linux terminal, and can navigate through it.
  4. Basic competence on the shell, such as reading man files, using a text editor of choice, manipulating file operations on the same, etc is assumed.

And as an indemnity clause, I, the author, will not be liable for any damage, implied or otherwise, to your files, hardware or the stability of your machine as a consequence to using these instructions to achieve a similar feat as described in this gist.

Implications:

It means that when you’re encoding content for use with your blogs or some fancy youtube download, you can do it much, much faster on hardware with lower processor utilization (so you can multi-task) , lesser heat output and, as a plus, is significantly faster (As tested on my end, ~8.7x for 1080p and ~4.2x for 4k encodes with reference media) compared to a pure, software-based approach as offered by libx264 and similar implementations, albeit at an acceptable quality compromise.

Here goes:

First, you will need to build ffmpeg (and libav,as per your preferences) with appropriate arguments. –enable-vaapi switch should be enough, though.

Here are my build options (Note that I load ffmpeg and libav via the module system):

FFmpeg’s module files are here, and as more versions are compiled, more modules will be added. Libav’s module files are here, and as more versions are compiled, more modules will be added.

FFmpeg‘s configuration switches used:

./configure --enable-nonfree --enable-gpl --enable-version3
--enable-libass --enable-libbluray --enable-libmp3lame
--enable-libopencv --enable-libopenjpeg --enable-libopus
--enable-libfaac --enable-libfdk-aac --enable-libtheora
--enable-libvpx --enable-libwebp --enable-opencl --enable-x11grab
--enable-opengl --cpu=native --enable-nvenc --enable-vaapi
--enable-vdpau  --enable-ladspa --enable-libass  --enable-libgsm
--enable-libschroedinger --enable-libsmbclient --enable-libsoxr
--enable-libspeex --enable-libssh --enable-libwavpack --enable-libxvid
--enable-libx264 --enable-libx265 --enable-netcdf  --enable-openal
--enable-openssl --enable-cuda --prefix=/apps/ffmpeg/git --enable-omx

Libav‘s configuration switches used:

./configure --prefix=/apps/libav/11.7 --enable-gpl --enable-version3
--enable-nonfree --enable-runtime-cpudetect --enable-gray
--enable-vaapi --enable-vdpau --enable-vda --enable-libmp3lame
--enable-libopenjpeg --enable-libopus --enable-libfaac
--enable-libfdk-aac --enable-libtheora --enable-libvpx
--enable-libwebp  --enable-x11grab  --cpu=native  --enable-vaapi
--enable-vdpau  --enable-libgsm --enable-libschroedinger
--enable-libspeex --enable-libwavpack --enable-libxvid
--enable-libx264 --enable-libx265 --enable-openssl --enable-nvenc
--enable-cuda --enable-omx

Then run make and make install to build and install the toolkits respectively.

Warning: These options are for reference only, a useful FFmpeg build will require you to install appropriate dependencies for some build options as suited to your environment and platform. Modify as needed. Also see the indemnity clause at the top of this document.

Here are the dependencies I had to install on my end (without acounting for the OpenMAX IL bellagio back-end):

sudo apt-get install yasm ladspa-sdk ladspa-foo-plugins ladspalist libass5 libass-dev libbluray-bdj libbluray-bin libbluray-dev libbluray-doc libbluray1 libmp3lame-dev \ libmp3lame-ocaml libmp3lame-ocaml-dev libmp3lame0 libsox-fmt-mp3 libopencv-* opencv-* python-cv-bridge python-image-geometry python-opencv python-opencv-apps gstreamer1.0-vaapi gstreamer1.0-vaapi-doc libopenjp2-* libopenjp2-7-dev libopenjp2-7-dbg libopenjp3d7 libopenjpeg-dev libopenjpeg-java libopenjpeg5 libopenjpeg5-dbg libopenjpip7 openjpeg-tools libopus-dbg libopus-dev libopus-doc libopus0 libtag1-dev libtag1-doc libtag1v5 libtagc0 libtagc0-dev libopus-ocaml libopus-ocaml-dev libopusfile-dev libopusfile-doc libopusfile0 libvorbis-java opus-tools opus-tools-dbg libfaac-dev libfaac0 fdkaac  libfdk-aac0 libfdk-aac0-dbg libfdk-aac-dev libtheora-dbg libtheora-dev libtheora-doc libtheora0 libtheora-bin libtheora-ocaml libtheora-ocaml-dev libvpx-dev libvpx-doc libvpx3 libvpx3-dbg libwebp-dev libwebp5 libwebpdemux1 libwebpmux1 opencl-headers mesa-vdpau-drivers libvdpau-va-gl1 vdpauinfo vdpau-va-driver libvdpau-doc libvdpau-dev libvdpau1 libvdpau1-dbg libgsm-tools libgsm0710-0 libgsm0710-dev libgsm0710mux3 libgsm1 libgsm1-dbg libgsm1-dev sox libsox-dev libsox-fmt-all libsox-fmt-alsa libsox-fmt-ao libsox-fmt-base libsox-fmt-mp3 libsox-fmt-oss libsox-fmt-pulse libsox2 libsoxr-dev libsoxr-lsr0 libschroedinger-dev libschroedinger-doc libschroedinger-ocaml libschroedinger-ocaml-dev libschroedinger-1.0-0 libsmbclient libsmbclient-dev  smbclient  libspeex-dev libspeex1 libspeexdsp-dev libspeexdsp1 libspeex-ocaml libspeex-ocaml-dev libspeex-dbg libssh-4 libssh-dev libssh-dbg libssh-doc  libssh-gcrypt-4 libssh2-1 libssh2-1-dev libwavpack-dev libwavpack1 libxvidcore-dev libxvidcore4  libx265-dev libx265-79 libx265-doc libx264-148 libx264-dev libnetcdf-* netcdf-* libopenal-* openal-info  openssl 

When done, you may then create and load the appropriate environment modules for both ffmpeg and libav as your choices go. Don’t load both at the same time, though 🙂 (Mark them as module conflicts to ensure that if this is set up on a cluster, library conflicts do not occur when users inadvertently load both of them by accident in the same session).

Now, we get to the interesting bits:

Encoding with VAAPI

You’ll notice that we pass several arguments to ffmpeg as indicated below:

ffmpeg -loglevel debug -hwaccel vaapi -vaapi_device /dev/dri/renderD128 -i "input
file" -vf 'format=nv12,hwupload' -map 0:0 -map 0:1 -threads 8 -aspect
16:9 -y -f matroska -acodec copy -b:v 12500k -vcodec h264_vaapi
"output file"

Let’s break down these arguments to their meaning:

(a) .-loglevel tells ffmpeg to log ffmpeg events as debug output. This will be very verbose, and is completely optional. You can disregard this.

(b). -vaapi_device: This is important. You must select a valid VAAPI H/W context device to which you will upload textures to via hwupload, formatted in the NV12 colorspace. This points to a /dev/dri/render*_ file on your Linux system.

(c). -vf : This is an inbuilt ffmpeg option that allows you to specify codec options/arguments to be passed to our encoder, in this case, h264_vaapi (Remember, we built this when we passed –enable-vaapi at the configuration stage). Here, we tell ffmpeg to convert all textures to one colorspace, NV12 (As it’s the one accepted by Intel’s QuickSync hardware encoder) and to also use hwupload, an ffmpeg intrinsic, that tells the program to asynchronously copy the converted pixel data to VAAPI’s surfaces.

(d). – threads : Specifies the number of threads that FFmpeg should use. By default, use the number of logical processors available on your processor here. On Intel processors that support Hyperthreading, multiply the number of cores your processor has by 2.

(e). -f : Specifies the container format specification you can use. This can be Matroska, webm, mp4, etc. Take your pick (as per your container constraints).

(f). -acodec: Specifies the audio codec to use when transcoding the video’s audio stream. In the example given above, we use ffmpeg’s muxers to copy the audio stream as is, untouched.

(g). -vcodec: Selects the video encoder to use. In this case, we selected h264_vaapi, our key point of interest here.

(h).-hwaccel vaapi: This instructs ffmpeg to use VAAPI based hardware accelerated decode (for supported codecs, see platform limits), and it can drastically lower the processor load during the process. Note that you should only use this option if your hardware supports hardware-accelerated decoding via VAAPI for the source fornat being encoded.

(i). Using the vaapi_scaler in the video filters: It is possible to use Intel’s QuickSync hardware via VAAPI for resize and scaling (when up-or downscaling the input source to a higher or lower resolution), using a filter snippet such as the one shown below:

vf 'format=nv12,hwupload,scale_vaapi=w=1920:h=1080'

You may specify a different resolution by changing the dimensions in =w= and :h= to suit your needs.

See an example of this filter snippet used above in the two-pass example in FFmpeg below.

(j). -hwaccel_output_format : This option should be used every time you declare the -hwaccel method as vaapi , so that the decode stage takes place entirely in hardware. This option generates decode output directly on VAAPI hardware surfaces, speeding up decode performance significantly.

You may confirm supported decode formats on your setup by running vainfo:

vainfo

Sample output on a Haswell testbed:

libva info: VA-API version 0.39.0
libva info: va_getDriverName() returns 0
libva info: Trying to open /usr/lib/x86_64-linux-gnu/dri/i965_drv_video.so
libva info: Found init function __vaDriverInit_0_39
libva info: va_openDriver() returns 0
vainfo: VA-API version: 0.39 (libva 1.7.0)
vainfo: Driver version: Intel i965 driver for Intel(R) Haswell Mobile - 1.7.0
vainfo: Supported profile and entrypoints
      VAProfileMPEG2Simple            :	VAEntrypointVLD
      VAProfileMPEG2Simple            :	VAEntrypointEncSlice
      VAProfileMPEG2Main              :	VAEntrypointVLD
      VAProfileMPEG2Main              :	VAEntrypointEncSlice
      VAProfileH264ConstrainedBaseline:	VAEntrypointVLD
      VAProfileH264ConstrainedBaseline:	VAEntrypointEncSlice
      VAProfileH264Main               :	VAEntrypointVLD
      VAProfileH264Main               :	VAEntrypointEncSlice
      VAProfileH264High               :	VAEntrypointVLD
      VAProfileH264High               :	VAEntrypointEncSlice
      VAProfileH264MultiviewHigh      :	VAEntrypointVLD
      VAProfileH264MultiviewHigh      :	VAEntrypointEncSlice
      VAProfileH264StereoHigh         :	VAEntrypointVLD
      VAProfileH264StereoHigh         :	VAEntrypointEncSlice
      VAProfileVC1Simple              :	VAEntrypointVLD
      VAProfileVC1Main                :	VAEntrypointVLD
      VAProfileVC1Advanced            :	VAEntrypointVLD
      VAProfileNone                   :	VAEntrypointVideoProc
      VAProfileJPEGBaseline           :	VAEntrypointVLD

Supported encode formats are appended with the VAEntrypointEncSlice fields, and all decode formats(s) for your SKU will be listed under the VAEntryPointVLD and VAEntrypointVideoProc fields.

To interpret the output above, we can learn that the Haswell SKU above supports VAAPI – based hardware-accelerated decode for H.264 Simple, Main and Stereo High profiles (I’d assume that the Stereo High profile infers to H.264’s Multi-view coding encode mode, useful for encoding 3D Blurays and similar media, implying feature parity with Windows-based implementations where MVC encodes and decodes are supported by Intel QuickSync. Need to test that sometime).

The other arguments are pretty standard to FFmpeg and need no introduction 🙂

You may also use extra options such as QP mode (for constant-rate quality encoding) with this codec in ffmpeg as shown:

ffmpeg -loglevel debug -vaapi_device /dev/dri/renderD128 -i "input file" -vf 'format=nv12,hwupload' -map 0:0 -map 0:1 -threads 8 -aspect 16:9 -y -f matroska -acodec copy -vcodec h264_vaapi -qp 19 -bf 2 "output file"

Here, you’ll notice that we’ve added a few extra options to the arguments passed to the selected video encoder, h264_vaapi, and they are as follows:

(a). -qp: This option selects Fixed QP of P frames, and is ignored if bit-rate is set instead. Particularly useful for CRF-based encodes where a constant quality is required without bit-rate constraints. For a standard reference, a QP value of ~18 gives an approximate visual quality value similar to lossless compression, and going higher (~51) will give you way worse visual quality.

(b). -bf: This option toggles the maximum number of B-frames (bi-directional) between P-(progressive) frames. You may pump this higher than the default (2) if your selected encoder profile is High or better. Recommended: Leave this at the default (2).

In my tests, it’s also possible to do two-pass encoding with this encoder (h264_vaapi) in ffmpeg, as illustrated in the example below:

ffmpeg -loglevel debug -hwaccel vaapi -hwaccel_output_format vaapi -i "input-file" -vaapi_device /dev/dri/renderD129  -vf 'format=nv12,hwupload,scale_vaapi=w=1920:h=1080' -pass 1 -qp:v 19 -b:v 10.5M -c:v h264_vaapi -bf 4 -threads 4 -aspect 16:9 -an -y -f mp4 "/dev/null" && ffmpeg -loglevel debug -hwaccel vaapi -hwaccel_output_format vaapi -i "phfx4k.mkv" -vaapi_device /dev/dri/renderD129 -vf 'format=nv12,hwupload,scale_vaapi=w=1920:h=1080' -pass 2 -acodec copy -c:v h264_vaapi -bf 4 -qp:v 19 -b:v 10.5M -threads 4 -aspect 16:9 -y -f mp4 "output.mp4"

Let’s break that down:

With ffmpeg (and libav also), you must specify both passes sequentially (-pass 1 and -pass 2) because ffmpeg does not reiterate over input files for multiple passes. Secondly, this allows the user to tune the two-pass encoding as he/she sees fit, for example, by skipping audio processing in the first pass (-an) and only copying/muxing the audio stream from the input file’s container specification into the output file’s container (-acodec copy), as illustrated in the examples above.

And now we move on to libav’s options for a similar encode:

avconv -v 55 -y -vaapi_device /dev/dri/renderD128 -hwaccel vaapi -hwaccel_output_format vaapi -i input.mkv \
-c:a copy -vf 'format=nv12|vaapi,hwupload' -c:v h264_vaapi -bf 2 -b 12500k output.mkv

Let’s break down these arguments to their meaning:

(a) .-v : This defines avconv’s verbosity level. This one is completely optional, though its’ regarded as good practice to leave it enabled and set to a reasonable verbosity level as desired for troubleshooting and diagnostics purposes.

(b). -vaapi_device: This is important. You must select a valid VAAPI H/W context device to which you will upload textures to via hwupload, formatted in the NV12 colorspace. This points to a /dev/dri/render*_ file on your Linux system.

(c). -hwaccel: This option allows you to select the hardware – based accelerated decoding to use for the encode session. In our case above, we are picking vaapi as this has a positive impact on encoder performance. A nice freebie.

(d). -hwaccel_output_format : This option should be used every time you declare the -hwaccel method as vaapi , so that the decode stage takes place entirely in hardware. This option generates decode output directly on VAAPI hardware surfaces, speeding up decode performance significantly.

(e). -vf : This is an inbuilt libav option that allows you to specify video filter options to be passed to our encoder, in this case, h264_vaapi (Remember, we built this when we passed –enable-vaapi at the configuration stage). Here, we tell libav to convert all textures to one colorspace, NV12 (As it’s the one accepted by Intel’s QuickSync hardware encoder) and to also use hwupload, a libav intrinsic, that tells the program to asynchronously copy the converted pixel data to VAAPI’s surfaces. This argument also includes the hardware accelerated decode output format we requested earlier, raw VAAPI hardware surfaces.

(f). -bf : Specifies the bframe setting to use. Sane values for Intel ‘s Quick Sync encode hardware should be between 2 and 4. Test and report back.

(g). -c:a: Specifies the audio codec to use when transcoding the video’s audio stream. In the example given above, we use libav’s muxers to copy the audio stream as is, untouched.

(h). -c:v: Selects the video encoder to use. In this case, we selected h264_vaapi, our key point of interest here. (i). -b: Selects the video stream’s bitrate passed to the encoder, h264_vaapi.

You may see the original documentation on Libav’s website here on build instructions, using the alternate hevc_vaapi on supported hardware, encoder limitations, caveats, etc.

If all well according to plan, your video file should be encoded to H.264, muxed into the selected container and be done with.

See the screen-shot library here.

Extra information:

You can always view the build configuration of your Ffmpeg pipeline at any times by running:

For FFmpeg:

lin@mjanja:~$ ffmpeg -buildconf
ffmpeg version N-80785-g0fd76d7 Copyright (c) 2000-2016 the FFmpeg developers
  built with gcc 5.3.1 (Ubuntu 5.3.1-14ubuntu2.1) 20160413
  configuration: --enable-nonfree --enable-gpl --enable-version3 --enable-libass --enable-libbluray --enable-libmp3lame --enable-libopencv --enable-libopenjpeg --enable-libopus --enable-libfaac --enable-libfdk-aac --enable-libtheora --enable-libvpx --enable-libwebp --enable-opencl --enable-x11grab --enable-opengl --cpu=native --enable-nvenc --enable-vaapi --enable-vdpau --enable-ladspa --enable-libass --enable-libgsm --enable-libschroedinger --enable-libsmbclient --enable-libsoxr --enable-libspeex --enable-libssh --enable-libwavpack --enable-libxvid --enable-libx264 --enable-libx265 --enable-netcdf --enable-openal --enable-openssl --prefix=/apps/ffmpeg/git --enable-omx
  libavutil      55. 27.100 / 55. 27.100
  libavcodec     57. 48.101 / 57. 48.101
  libavformat    57. 40.101 / 57. 40.101
  libavdevice    57.  0.102 / 57.  0.102
  libavfilter     6. 46.102 /  6. 46.102
  libswscale      4.  1.100 /  4.  1.100
  libswresample   2.  1.100 /  2.  1.100
  libpostproc    54.  0.100 / 54.  0.100

  configuration:
    --enable-nonfree
    --enable-gpl
    --enable-version3
    --enable-libass
    --enable-libbluray
    --enable-libmp3lame
    --enable-libopencv
    --enable-libopenjpeg
    --enable-libopus
    --enable-libfaac
    --enable-libfdk-aac
    --enable-libtheora
    --enable-libvpx
    --enable-libwebp
    --enable-opencl
    --enable-x11grab
    --enable-opengl
    --cpu=native
    --enable-nvenc
    --enable-vaapi
    --enable-vdpau
    --enable-ladspa
    --enable-libass
    --enable-libgsm
    --enable-libschroedinger
    --enable-libsmbclient
    --enable-libsoxr
    --enable-libspeex
    --enable-libssh
    --enable-libwavpack
    --enable-libxvid
    --enable-libx264
    --enable-libx265
    --enable-netcdf
    --enable-openal
    --enable-openssl
    --prefix=/apps/ffmpeg/git
    --enable-omx

On help and documentation:

List all formats:

ffmpeg -formats

Display options specific to, and information about, a particular muxer:

ffmpeg -h muxer=matroska

Display options specific to, and information about, a particular demuxer:

ffmpeg -h demuxer=gif

Codecs (encoders and decoders):

List all codecs:

ffmpeg -codecs

List all encoders:

ffmpeg -encoders

List all decoders:

ffmpeg -decoders

Display options specific to, and information about, a particular encoder:

ffmpeg -h encoder=mpeg4

Display options specific to, and information about, a particular decoder:

ffmpeg -h decoder=aac

Reading the results

There is a key near the top of the output that describes each letter that precedes the name of the format, encoder, decoder, or codec:

$ ffmpeg -encoders
[…]
Encoders:
 V..... = Video
 A..... = Audio
 S..... = Subtitle
 .F.... = Frame-level multithreading
 ..S... = Slice-level multithreading
 ...X.. = Codec is experimental
 ....B. = Supports draw_horiz_band
 .....D = Supports direct rendering method 1
 ------
[…]
 V.S... mpeg4                MPEG-4 part 2

In this example V.S… indicates that the encoder mpeg4 is a Video encoder and supports Slice-level multithreading.

Extra notes for AMD hardware supporting VCE:

If you have a supported GCN+ AMD GPU running on Linux with the mesa driver stack, you may be able to use the AMD VCE Block via VAAPI with an example such as the one shown below:

DRI_PRIME=1 LIBVA_DRIVER_NAME=radeonsi ffmpeg -hwaccel vaapi -vaapi_device /dev/dri/renderD128 -hwaccel_output_format vaapi \
-framerate 30 -video_size 1920x1200 -f x11grab -i :0.0 -f pulse -ac 2 -i 1 \
-vf 'format=nv12,hwupload' -threads 8 \
-vcodec h264_vaapi -bf 0 -acodec pcm_s16le output.mkv

Where we capture from the screen via x11grab and the audio from a pulseaudio device.

You must set the LIBVA_DRIVER_NAME and the DRI_PRIME=1 environment variables to radeonsi prior to using VAAPI on VCE, and ensure that the -vaapi_device points to the correct renderer.

Note that with AMD hardware, we generally disable B-Frame support as newer SKUs such as the RX 460/470/480 and their rebrands (Polaris-based) do not support B-Frames in H.264 encoding. See this issue on Github for more details.


Create a thumbnail image every X seconds of the video

https://trac.ffmpeg.org/wiki/Create%20a%20thumbnail%20image%20every%20X%20seconds%20of%20the%20video

-frames option

Output a single frame from the video into an image file:

ffmpeg -ss 00:00:14.435 -to 00:00:16 -i input.flv  -frames:v *** out03%d.png

This example will seek to the position of 0h:0m:14sec:435msec end to 00:00:16 and output each frame (-frames:v *** (***为释放数量,根据时间和帧率计算)) from that position into PNG file.


fps video filter

Output one image every second, named out1.pngout2.pngout3.png, etc.

ffmpeg -i input.flv -vf fps=1 out%d.png

指定片段指定帧率(20/s)释放

ffmpeg -i -seek 01:12:03.25 -to 01:15:12.36 input.flv -vf fps=20 out%d.png


Output one image every minute, named img001.jpgimg002.jpgimg003.jpg, etc. The %03d dictates that the ordinal number of each output image will be formatted using 3 digits.

ffmpeg -i myvideo.avi -vf fps=1/60 img%03d.jpg

Output one image every ten minutes:

ffmpeg -i test.flv -vf fps=1/600 thumb%04d.bmp

select video filter

Output one image for every I-frame:

ffmpeg -i input.flv -vf "select='eq(pict_type,PICT_TYPE_I)'" -vsync vfr thumb%04d.png


WordPress 2017主题自定义宽度 Change content and sidebars width

原文:https://wordpress.org/support/topic/change-content-and-sidebars-width/

Follow below steps:

1. Login as admin and go on theme customizer Dashboard >> Apperance >> Customize or Click on Custimze link on top bar from front-end.

2. Then navigate Additional CSS and put below css into textarea then click on Save & Publish button.


.wrap { max-width: 1366px; }

Hope this helps you


Hello szilnet,

Yes you can modify the percent of the sidebar and content. Check below css code.


.wrap { max-width: 1366px; }


/*For Content*/
.has-sidebar:not(.error404) #primary {
width: 60%
}


/*For Sidebar*/
.has-sidebar #secondary {
width: 30%
}


/*Responsive*/
@media(max-width:768px) {
/*For Content*/
.has-sidebar:not(.error404) #primary {
width: 100%
}


/*For Sidebar*/
.has-sidebar #secondary {
width: 100%
}
}


Hope this will helps you.

ubuntu linux 通过NetworkManager使用Ikev2 VPN


a. 安装strongswan
安装开发包,
apt-get install libssl-dev network-manager-dev libnm-util-dev libnm-glib-dev libgnomeui-dev gnome-common
如果安装过程中提示缺包就自己安装。
安装

# get the strongSwan tarball
wget http://download.strongswan.org/strongswan-5.x.x.tar.bz2
tar xjf strongswan-5.x.x.tar.bz2
cd strongswan-5.x.x

# build charon with OpenSSL/NM Plugin
./configure –sysconfdir=/etc –prefix=/usr –libexecdir=/usr/lib \
–disable-aes –disable-des –disable-md5 –disable-sha1 –disable-sha2 \
–disable-fips-prf –disable-gmp –enable-openssl –enable-nm –enable-agent \
–enable-eap-gtc –enable-eap-md5 –enable-eap-mschapv2 –enable-eap-identity –enable-charon –enable-cmd

make
make install

# get the NetworkManager strongsSwan plugin as a tarball
wget http://download.strongswan.org/N … gswan-1.x.x.tar.bz2
tar xjf NetworkManager-strongswan-1.x.x.tar.bz2
cd NetworkManager-strongswan-1.x.x

# build the NetworkManager strongsSwan plugin
./configure –sysconfdir=/etc –prefix=/usr –libexecdir=/usr/lib/NetworkManager –with-charon=/usr/lib/ipsec/charon-nm
make
make install

Hacklog Remote Image Autosave

Description

This plugin can save remote images in the posts to local server automatically and
add it as an attachment to the post.

  • capabile with Hacklog Remote Attachment plugin and Watermark Reloaded plugin
  • admin_icon.png was modified from runescapeautotyper.com ‘s donwload icon

此插件的作用是自动保存日志中的远程图片到本地服务器并将保存后的文件作为日志的附件。

  • 与Hacklog Remote Attachment 插件兼容性良好
  • 与Watermark Reloaded 插件兼容性良好

@TODO
自定义img标签图片提取正则(情景描述:有些网页的 img 的图片地址不是用src属性标注的,比如微信网页版用 data-src 来标注图片地址。)
感谢 @守心斋 提出建议。

@待测试
1.随机数参数url形如http://xxxx.jpg?123。导致插件不能正常下载图片 (@walkskyer)
2.前台HTTP,HTTPS后台出现问题。无法正常显示插件页面。 (@Jakes)

@待定功能
1.自定义img标签图片提取正则 (@守心斋)
2.兼容SAE版WORDPRESS (@苏洋 )
3.自定义路径 (@mapleaf)

  • 2.1.0
    修复:下载类似于http://mmbiz.qpic.cn/mmbiz/xxxxxx/640?wx_fmt=jpeg&tp=webp&wxfrom=5&wx_lazy=1
    这种url的图片的时候,当文章中有多个图片,底部(后下载的)的图片会将前面的图片覆盖的bug.
  • 2.0.9
  • 修复:远程图片url没有文件名后缀时,自动添加后缀。这样在WP文章里单独点击图片文件链接时,可避免某些服务器把没有后缀的图片文件当二进制文件下载的问题。
  • 修复:Error:SyntaxError: Unexpected token {. Check your HTTP Server error log or PHP error log to see what happend. (thanks to @守心斋)
  • 修复: 远程服务器图片有空格到本地 LAMP 服务器显示不出来的问题 (thanks to @再袭面包屋)
  • 修复: Notice: Undefined offset: 1 in /PATH-TO-WP-ROOT-DIR/wp-includes/vars.php on line 31 (thanks to @YYK)
  • 2.0.0 版完全重写。相比于原来1.0.2版的插件,有非常大的改进。
  • 原来的插件是在文章更新时自动下载远程图片,如果图片非常多的话,这样容易导致执行超时或只有部分图片被下载了。
  • 这次的新版采用的是ajax异步请求的方式让多个文件同时下载。效率和易用性都得到很大改善。


grub2基础教程

原文:http://forum.ubuntu.org.cn/viewtopic.php?t=290405

原标题: grub2基础教程-修订版

作者: SmallApple

备份的地址:https://docs.google.com/Doc?docid=0AeVQ5PqmbeaoZGc0czgyOWtfMjRjbWo0ODVoYw&hl=en

郑重声明: 本文为本论坛会员SmallApple原创,由于Link1给出的第一个地址经常无法访问故把其搬回论坛方便大家查阅,除此之外毫无其他动机请勿误解.
Link1: http://forum.ubuntu.org.cn/viewtopic.php?f=139&t=229387

致谢: http://forum.ubuntu.org.cn/memberlist.php?mode=email&u=159334

==============================================================================================================================================================================================

grub2基础教程-修订版

smallapple

目录

一、grub2新特性

二、grub2安装与启动

三、grub2配置文件详解

四、脚本修改

五、使用grub2常见错误及修复方法

一、grub2新特性

1、grub2和grub有很多不同的地方:
a)图形接口
b)使用了模块机制,通过动态加载需要的模块来扩展功能
c)支持脚本语言,例如条件判断,循环、变量和函数
d)支持rescue模式,可用于系统无法引导的情况
e)国际化语言。包括支持非ASCII的字符集和类似gettext的消息分类,字体,图形控制台等等
f)有一个灵活的命令行接口。如果没有配置文件存在,GRUB会自动进入命令模式
g)针对文件系统、文件、设备、驱动、终端、命令、分区表、os loder的模块化、层次化、基于对象的框架
h)支持多种文件系统格式
i)可访问已经安装的设备上的数据
j)支持自动解压

2、设备的命名
grub2同样以fd表示软盘,hd表示硬盘(包含IDE和SCSI硬盘)。设备是从0开始编号,分区则是从1开始,主分区从1-4,逻辑分区从5开始,而grub分区编号是从0开始的。下面给出几个例子 :
(fd0):表示整个软盘
(hd0,1):表示BIOS中的第一个硬盘的第1个分区
(hd0,5)/boot/vmlinuz:表示BIOS中的第一个硬盘的第一个逻辑分区下的boot目录下的vmlinuz文件

==========================================================================================================================================================================================

二、grub2安装与启动

1、安装ubuntu9.10时,grub默认安装在第一硬盘(hd0)的mbr,其实就是把引导文件boot.img写入硬盘的mbr,当然,用户也可以选择不写入硬盘mbr而是写入linux分区的引导扇区。
启动时根据mbr所提供信息找到启动分区后,加载分区内的grub核心文件core.img和配置文件grub.cfg,进入选择菜单画面,在菜单画面,按上下箭号选择需要系统菜单项,按Enter进入选项。

附件:

GRUB1.png [ 6.2 KiB | 被浏览 8732 次 ]

按e进入己选择菜单的编辑状态,在编辑状态下,由上下左右箭号来移动光标,enter键换行,ctrl+x以编辑的内容启动,ctrl+c进命令行状态,按Esc退出,回到菜单项。

在需要使用额外的内核参数启动时,比如要加上acpi=off时,把光标移动到linux这一行最后,在splash后加上一空格再输入acpi=off,然后按ctrl+x启动。

附件:

GRUB2.png [ 6.79 KiB | 被浏览 8732 次 ]

按c进入命令行状态,按Tab键可查看所有可用的命令。

附件:

GRUB3.png [ 3.79 KiB | 被浏览 8732 次 ]

在命令行状态,可以根据需要加载或移除相应模块,也可用来启动在菜单没有显现的的系统。

比如,在第一硬盘的第一分区上装有windows xp系统,但在菜单上没显示出来,我们可以命令行状态下输入命令启动:

grub>set root=(hd0,1)

grub>chainloader +1

grub>boot

又比如启动第二硬盘第一逻辑分区上的ubuntu系统:

grub>set root=(hd1,5)

grub>linux /boot/vmlinuz-xxx-xxx root=/dev/sdb5

grub>initrd /boot/initrd.img-xxx-xxx

grub>boot

其中内核vmlinuz和initrd.img的版本号可用按Tab键自动查看。

2、下面介绍下在grub2中一些常用的命令

1)help
查看命令用法,如
help search:查看search命令详细用法

2)set

设置变量值,如

set default=0
set timeout=5

set root=(hd0,3)等等

需要调用变量AA的值时,使用${AA},如set root=(hd1,1),则${root}=(hd1,1)

3)default

定义默认引导的操作系统。0 表示第一个操作系统,1表示第2个,依此类推

4)timeout

定义在时间内用户没有按下键盘上的某个按键,自动引导default指定的操作系统。

5)root

指定用于启动系统的分区。

6)insmod和rmmod

加载或移除某模块,如

insmod jpeg

insmod png

insmod ntfs

rmmod png

7)drivemap
drivemap兼容grub的map,主要用于只能从第一硬盘(hd0)引导启动的系统如 win2000 xp 2003,比如要添加第二硬盘第一分区上的xp系统:
menuentry “Windows XP” {
set root=(hd1,1)
drivemap -s (hd0) ${root}
chainloader +1
}

8)ls
列出当前的所有设备。如(hd0),(hd0,1),(hd0,5),(hd1),(hd1,1),(hd1,2)等

ls -l
详细列出当前的所有设备。对于分区,会显示其label及uuid。
ls /
列出当前设为root的分区下的文件
ls (hd1,1)/
列出(hd1,1)分区根目录的文件

9)search
search -f /ntldr
列出根目录里包含ntldr文件的分区,返回为分区号
search -l LINUX
搜索label是LINUX的分区。
search –set -f /ntldr
搜索根目录包含ntldr文件的分区并设为root,注意如果多个分区含有ntldr文件,

set失去作用。

10)loopback
loopback命令可用于建立回放设备,如
loopback lo0 (hd1,1)/abc.iso
可以使用lo0设备来访问abc.iso里的内容,比如说,可以从abc.iso里的软盘映像中启动
loopback lo0 (hd1,1)/aa.iso
linux (lo0)/memdisk
initrd (lo0)/abc.img
要删除某一回放设备,可以使用-d参数:
loopback -d lo0

11)pager
分页显示。
set pager=1
显示满一页时暂停,按space继续
set pager=0
取消分页显示

12)linux
用linux命令取代grub中的kernel命令

13)chainloader

调用另一个启动器,如

chainloader (hd0,1)+1

调用第一硬盘第一分区引导扇区内的启动器,可以是windows或linux的启动器

14) grub2挂载软盘镜像

menuentry “Boot from DOS IMG” {

linux16 /memdisk

initrd16 /win98.img

}

对非标准的1.4M和2.8M的其他镜像挂载方法,需要指定 CHS参数:

menuentry “Boot from IMG” {

linux16 /memdisk c=* h=* s=* floppy

initrd16 /xxx.img

}

15) grub2挂载ubuntu-desktop的镜像启动进入 livecd

内存够大时(大于iso镜像)可以用 loopback,把iso文件放在某一分区根目录下:

menuentry “Ubuntu 10.01 LiveCD” {

search -f -s /ubuntu-desktop-i386.iso

loopback loop /ubuntu-desktop-i386.iso

linux (loop)/casper/vmlinuz boot=casper iso-scan/filename=/ubuntu-desktop-i386.iso

initrd (loop)/casper/initrd.lz

}

iso 按实际文件名修改

内存不够时,把 iso 内 casper 目录下的 vmlinuz和initrd.lz 复制出来和 iso 文件放在同一分区根目录下:

menuentry “Ubuntu 10.01 LiveCD” {

search -f -s /ubuntu-desktop-i386.iso

linux /vmlinuz boot=casper iso-scan/filename=/ubuntu-desktop-i386.iso

initrd /initrd.lz

}

=======================================================================================================================================================================================

三、grub2配置文件详解

grub2改用grub.cfg为配置文件,配置文件包含以下基本内容:(红色为解释部分)

### BEGIN /etc/grub.d/00_header ###
load_env

#加载变量,如果在grubenv保存变量,则启动时装载
set default=”0″

#设置默认引导项,默认值为0
insmod ext2

#插入文件系统支持的模块,除了用作启动的分区外,其他分区格式可在menuentry底下再添加
set root=(hd0,8)

# 指定系统root分区,也就是 / 分区
search –no-floppy –fs-uuid –set 2d61e5f9-1d2a-4167-a6f1-b991ba00878b

#指定uuid=2d61e5f9-1d2a-4167-a6f1-b991ba00878b的分区为root分区,如果前面的分区号(hd0,8)的#uuid与这里的uuid一致,这两句作用一样,如果不一致,则指定uuid的起作用。

if loadfont /usr/share/grub/unicode.pf2 ; then

#设置终端字体,unicode.pf2支持中文字符显示
set gfxmode=640×480

#设置显示分辨率,默认为640×480,可用800×600,1024×768,建议跟你想设定的图片大小一致
insmod gfxterm

#插入终端模块gfxterm,支持中文字符显示和支持24位图像
insmod vbe

#插入vbe模块,GRUB2引入模块化机制,要使用它,需要在这里加入
if terminal_output gfxterm ; then true ; else
# For backward compatibility with versions of terminal.mod that don’t
# understand terminal_output
terminal gfxterm

#设定grub2终端为gfxterm
fi
fi

if [ ${recordfail} = 1 ]; then
set timeout=-1 # 若有启动失败的记录,则菜单项不再倒计时
else
set timeout=10 #倒计时10秒后进按默认启动项启动
fi

#设定默认启动前等待时间,默认为10秒
### END /etc/grub.d/00_header ###

### BEGIN /etc/grub.d/05_debian_theme ###
set menu_color_normal=white/black

#设定菜单字体及背景颜色
set menu_color_highlight=black/blue

#设定选择项字体及背景颜色

#如果使用默认,背景将完全被蓝色挡住了,需要修改blue为black,背景图片才能显示
### END /etc/grub.d/05_debian_theme ###

### BEGIN /etc/grub.d/10_linux ###

#10_linux为系统自动添加的当前root分区linux引导项

#每个菜单项要包括menuentry双引号” “和大括号{ }才完整,否则不显示菜单
menuentry “Ubuntu, Linux 2.6.31-10-generic” {
set quiet=1
insmod ext2
set root=(hd0,8)
search –no-floppy –fs-uuid –set 2d61e5f9-1d2a-4167-a6f1-b991ba00878b

#这句与set root=(hd0,8)效果一样,可删除其一,二者不一致以这句为准
linux /boot/vmlinuz-2.6.31-10-generic root=UUID=2d61e5f9-1d2a-4167-a6f1-b991ba00878b ro quiet splash

#不喜欢看到一长串的, roo=UUID=***可用root=/dev/sda8(/分区的分区号)代替
initrd /boot/initrd.img-2.6.31-10-generic
}


### END /etc/grub.d/10_linux ###

#20_memtest86+为系统自动添加的内存测试菜单项
### BEGIN /etc/grub.d/20_memtest86+ ###
menuentry “Memory test (memtest86+)” {
linux16 /boot/memtest86+.bin
}
menuentry “Memory test (memtest86+, serial console 115200)” {
linux16 /boot/memtest86+.bin console=ttyS0,115200n8
}
### END /etc/grub.d/20_memtest86+ ###
#30_os-prober或30_others为系统自动查找并添加其他系统菜单项,按windows,linux,macos顺序

#查找并添加,支持windows 7识别
### BEGIN /etc/grub.d/30_os-prober ###
### END /etc/grub.d/30_os-prober ###
### BEGIN /etc/grub.d/30_otheros ###
# This entry automatically added by the Debian installer for a non-linux OS
# on /dev/sda1
menuentry “Microsoft Windows XP Professional” {
set root=(hd0,1)
search –no-floppy –fs-uuid –set e852-230b
drivemap -s (hd0) $root

#对以ntldr引导的系统如win2000,xp,win2003,因其引导机制只能从第一硬盘启动,系统会自动添加#映射命令,对vista和win7就没有这句命令
chainloader +1
}
### END /etc/grub.d/30_otheros ###
#40_custom为自定义的启动项,如启动cdlinux
### BEGIN /etc/grub.d/40_custom ###

menuentry “CDLinux”{

set root=(hd0,8)

linux /CDlinux/bzImage root=/dev/ram0 vga=791 CDL_LANG=zh_CN.UTF-8

initrd /CDlinux/initrd

}
### END /etc/grub.d/40_custom ###

定制个性化的配置文件,可以加入背景图片,使用中文字符,让启动画面独具特色,而不是单调的黑、白、蓝三色。下面是一张经美化启动画面:

附件:

GRUB4.png [ 112.66 KiB | 被浏览 8732 次 ]

======================================================================================================================================================================================

四、脚本修改

该怎样定制个性化的配置文件呢?

系统安装完成后,用户就会发现/boot/grub/grub.cfg文件只有root权限可读,如果要直接修改grub.cfg文件,要先修改其权限。
好不容易把grub.cfg修改好了,系统内核或grub升级时,会自动执行update-grub,grub.cfg文件就会被打回原形,如何保证修改后的配置文件能一直保留下来呢?

其实不用修改grub.cfg,只要把个性化配置写入/etc/default/目录下的grub和/etc/gurb.d目录下的脚本文件,以后不管升级内核或者是升级grub所执行的update-grub,都会按要求创建个性化的grub.cfg。

1、首先看下 /etc/default/grub,先从应用程序-附件里打开终端,输入

sudo gedit /etc/default/grub

用户密码

附件:

GRUB5.png [ 9.76 KiB | 被浏览 8732 次 ]

看看打开的文件可作什么修改:

# If you change this file, run ‘update-grub’ afterwards to update
# /boot/grub/grub.cfg.

GRUB_DEFAULT=0 ——–>设置默认启动项,按menuentry顺序。比如要默认从第四个菜单项启动,数字改为3,若改为 saved,则默认为上次启动项。
GRUB_HIDDEN_TIMEOUT=0 默认为0,单系统时启动菜单自动隐藏,要取消自动隐藏菜单,改为大于0再sudo update-grub。
(注意:单系统下/etc/grub.d/30_os- prober 可能没引用这里的变量,如果修改这里不能显示菜单,还要修改 /etc/grub.d/30_os-prober,具体看下面修改部份)
GRUB_HIDDEN_TIMEOUT_QUIET=true
GRUB_TIMEOUT=”3″ ———–>设置进入默认启动项的等候时间,默认值10秒,按自己需要修改
GRUB_DISTRIBUTOR=`lsb_release -i -s 2> /dev/null || echo Debian`
GRUB_CMDLINE_LINUX_DEFAULT=”quiet splash” ———–>添加内核启动参数,这个为默认
GRUB_CMDLINE_LINUX=”noresume” ———>手动添加内核启动参数,比如 acpi=off noapic等可在这里添加,加 text 参数启动进入字符模式。

# Uncomment to disable graphical terminal (grub-pc only)
#GRUB_TERMINAL=console ———->设置是否使用图形介面。去除前面#,仅使用控制台终端,不使用图形介面

# The resolution used on graphical terminal
# note that you can use only modes which your graphic card supports via VBE
# you can see them in real GRUB with the command `vbeinfo’
#GRUB_GFXMODE=640×480 设定图形介面分辨率,如不使用默认,把前面#去掉,把分辨率改为800×600或1024×768

# Uncomment if you don’t want GRUB to pass “root=UUID=xxx” parameter to Linux
#GRUB_DISABLE_LINUX_UUID=true ———->设置grub命令是否使用UUID,去掉#,使用root=/dev/sdax而不用root=UUDI=xxx

# Uncomment to disable generation of recovery mode menu entrys
#GRUB_DISABLE_LINUX_RECOVERY=”true” ———–>设定是否创建修复模式菜单项

2、再看下/etc/grub.d目录下的脚本文件:

附件:

GRUB6.png [ 54.26 KiB | 被浏览 8732 次 ]

00_header,05_debian_theme,10_linux,20_memtest86+,30_os- prober,40_custom这五个脚本对应grub.cfg上的各个部分,有的版本的grub可能把30_os-prober分出另一部分为 30_os-others,这并不影响。
怎样修改这些脚本文件才能保证不会破坏update-grub的运行,又能让生成的grub.cfg合乎意愿呢? 其实很简单,只要在脚本文件中找到
cat << EOF
********
********
********
EOF
这类语句,EOF中间的文本会直接写入grub.cfg中相应位置,所以个性化的语句添加在这地方就可以了。

其他使用变量的语句不要随变做修改,除非你清楚修改后会有什么结果。

1)看看00_header,一样在终端中打开sudo gedit /etc/grub.d/00_header,找到这部分

cat << EOF
load_env ->加载由save_env保存在grubenv的变量
set default=”${GRUB_DEFAULT}” ———->使用/etc/default/grub中的设定值
if [ \${prev_saved_entry} ]; then
saved_entry=\${prev_saved_entry}
save_env saved_entry
prev_saved_entry= ————>变里设置的变量由下句保存到grubenv
save_env prev_saved_entry
fi ——–>这里回车添加新行后可插入需要添加的模块
insmod jpeg ——->添加背景图片格式支持,如jpeg,png,tga等。
insmod fat ——–>添加文件系统格式支持如fat,ntfs,也可在menuentry下添加
EOF

再看看最后这一段

cat << EOF
if [ \${recordfail} = 1 ]; then
set timeout=-1 ——–>设定为若有启动失败记录,不倒计时,不会进入默认启动,需手动选择才能启动选择项,若要设置为即使曾启动错误也进行默认启动,可把时间设为
合适的正值,如 set timeout=5
else
set timeout=${GRUB_TIMEOUT} ——>使用/etc/default/grub中的设定值
fi ——–>这行后添加行
background_image (hd0,7)/boot/images/002.jpg ——–>添加背景图片的绝对路径,可以按05_debian_theme修改图片路径。
EOF

2)05_debian_theme修改字体及背景颜色、添加背景图片

先打开文件 sudo gedit /etc/grub.d/05_debian_theme

看这里
cat << EOF
set menu_color_normal=white/black ——->设置菜单全局的字体和背景颜色
set menu_color_highlight=black/white ——->设置选择项的字体和背景颜色。
EOF

可供使用菜单颜色有:
black(当背景色时为透明),blue,green,cyan,red,magenta,brown,light-gray,dark-gray,light-blue,light-green,
light-cyan,light-red,light-magenta,yellow,white

附件:

GRUB7.png [ 9.02 KiB | 被浏览 8732 次 ]

添加背景图片,看这一段

source /usr/lib/grub/grub-mkconfig_lib

# this allows desktop-base to override our settings
f=/usr/share/desktop-base/grub_background.sh
if test -e ${f} ; then
source ${f}
else
WALLPAPER=”/usr/share/images/desktop-base/moreblue-orbit-grub.png”
COLOR_NORMAL=”black/black”
COLOR_HIGHLIGHT=”magenta/black”
fi

这里会自动搜索背景文件,把合适的背景图片更名为 moreblue-orbit-grub.png(moreblue-orbit-grub.tga或moreblue-orbit- grub.jpeg).
再放在/usr/share/images/desktop-base/目录 下,然后执行 sudo update-grub,会出现如下的
Generating grub.cfg …
Found background image: moreblue-orbit-grub.png
……

再重启,漂亮的背景图片就会出现了。

3)10_linux这部分是自动搜索当前系统,建立当前系统的启动菜单,包括系统头,内核等信息,不要随便修改,要使用个性菜单名,比如中文菜单,可适当添加:

先打开文件 sudo gedit /etc/grub.d/10_linux,找到

cat << EOF
menuentry “$1” { ——–>双引号内可添加个性化字符,$1变量也可改为定值,如改为menuentry “启动 Ubuntu Karmic” {
recordfail=1
save_env recordfail ——–>如不要保存启动失败记录的,这两句可删除
EOF

if [ “x$3” = “xquiet” ]; then
cat << EOF
set quiet=1
EOF ->启动画面不用splash,要用跳动字符的,这段可删除

个性化菜单项也可在这里修改,即上面的menuenrty “$1″不变,修改下面的数值:
linux_entry “${OS}, Linux ${version}” \ ——->可改为 linux_entry “启动 Ubuntu, Linux ${version}”\
“${GRUB_CMDLINE_LINUX} ${GRUB_CMDLINE_EXTRA} ${GRUB_CMDLINE_LINUX_DEFAULT}” \
quiet
if [ “x${GRUB_DISABLE_LINUX_RECOVERY}” != “xtrue” ]; then
linux_entry “${OS}, Linux ${version} (recovery mode)” \ ———>可改为 linux_entry “启动 Ubuntu, Linux ${version} (修复模式)”\
“single ${GRUB_CMDLINE_LINUX}”
fi

注意只修改引号内的字符,前面的menuentry,linux_entry和后面的\不要做修改。

4)20_memtest86+自动添加内存测试启动项

打开文件 sudo gedit /etc/grub.d/20_memtest86+,找到

cat << EOF
menuentry “Memory test (memtest86+)” { ——–>双引号内可添加个性字符如menuentry “启动 内存测试”
linux16 $MEMTESTPATH
}
menuentry “Memory test (memtest86+, serial console 115200)” {
linux16 $MEMTESTPATH console=ttyS0,115200n8
}
EOF
上面有两内存测试项,可删除其中一个。

5)30_os-prober查找其他分区中存在的系统并建立菜单项,依次为windows,linux,macos。

对于单系统,默认会隐藏菜单,可在这里去掉隐藏

先打开文件 sudo gedit /etc/grub.d/30_os-prober
单ubuntu系统会自动隐藏菜单,要取消隐藏菜单,可把这部份的三个timeout=0改为和/etc/default/grub中的timeout一致,比如timeout=10。
cat <<EOF
if [ \${timeout} != -1 ]; then
if keystatus; then
if keystatus –shift; then
set timeout=-1
else
set timeout=0
fi
else
if sleep$verbose –interruptible 3 ; then
set timeout=0
fi
fi
fi
EOF
else
cat << EOF
if [ \${timeout} != -1 ]; then
if sleep$verbose –interruptible ${GRUB_HIDDEN_TIMEOUT} ; then
set timeout=0
fi
fi
EOF

下面这段自动查找并添加windows、linux和macos启动项,可在menuentry内修改个性字符
windows启动项
for OS in ${OSPROBED} ; do
……
if [ -z “${LONGNAME}” ] ; then
LONGNAME=”${LABEL}”
fi
……
cat << EOF
menuentry “${LONGNAME} (on ${DEVICE})” { ——->比如改为menuentry “启动 Windows XP” {
EOF

linux启动项
linux)
LINUXPROBED=”`linux-boot-prober ${DEVICE} 2> /dev/null | tr ‘ ‘ ‘^’ | paste -s -d ‘ ‘`”
……
if [ -z “${LLABEL}” ] ; then
LLABEL=”${LONGNAME}”
fi
cat << EOF
menuentry “${LLABEL} (on ${DEVICE})” { ——–>比如改为menuentry “启动 Mandriva” {
EOF

macos启动项
macosx)
OSXUUID=”`grub-probe –target=fs_uuid –device ${DEVICE} 2> /dev/null`”
cat << EOF
menuentry “${LONGNAME} (on ${DEVICE})” { ——–>比如改为menuentry “启动 MacOS” {
EOF

6)40_custom 自定义启动项,按菜单标准格式在后面添加即可,如

#!/bin/sh
exec tail -n +3 $0
# This file provides an easy way to add custom menu entries. Simply type the
# menu entries you want to add after this comment. Be careful not to change
# the ‘exec tail’ line above.

menuentry “启动 Veket” {
set root=(hd0,8)
linux /veket/vmlinuz root=/dev/ram0 PMEDIA=hd
initrd /veket/initrd.gz
}
menuentry “启动 CDLinux” {
set root=(hd0,8)
linux /CDlinux/bzImage root=/dev/ram0 vga=791 CDL_LANG=zh_CN.UTF-8
initrd /CDlinux/initrd
}

3、把各项脚本修改保存后,在终端执行
sudo update-grub
再执行

sudo gedit /boot/grub/grub.cfg
看看配置文件是不是和你想要的一样了。
如果有不够满意的地方,重新修改下脚本文件,再执行sudo update-grub

4、ubuntu和windows双系统,怎样让系统默认为从windows启动

在 /etc/grub.d目录中的脚本文件的文件名都是以数字开头,这确定了在执行update-grub时各文件内容被执行的顺序,我们只要把 30_os-prober这个文件名的数字30改为05到10之间的数字即可
(没多少可选06、07、08、09),比如改为08_os-prober, 这样创建出来的grub.cfg内的菜单项,windows的排序就会自动在ubuntu之前。

=======================================================================================================================================================================

五、使用grub2常见错误及修复方法

1、双系统,重装windows引起没有ubuntu启动项

使用安装版的windows重装windows时会改写mbr,造成grub丢失,可以用grub4dos引导进入ubuntu后修复grub或用livecd启动后修复grub。
1)用grub4dos修复ubuntu

先下载最新版的grub4dos,下载地址http://nufans.net/grub4dos/ ,如果是xp系统,把grub4dos压缩包内的grldr复制到C盘根目录下,修改boot.ini,在最后加上一行 c:\grldr=”grub4dos”,

附件:

GRUB8.png [ 8.26 KiB | 被浏览 8732 次 ]

对 于vista/win7系统,把压缩包内的grldr.mbr和grldr复制到C盘根目录下,在C盘自己建立一个boot.ini文件,若有boot隐 藏分区的,先给boot分区分配盘符.
再把grldr,grldr.mbr和boot.ini放在boot分区下,boot.ini内容如下:

Win7使用软改激活的请不要使用此方法,否则会造成win7不能启动。

附件:

GRUB9.png [ 13.11 KiB | 被浏览 8732 次 ]

然后在根目录新建一个menu.lst,内容为

timeout 0
default 0

title grub2
find –set-root /boot/grub/core.img

kernel /boot/grub/core.img
boot

(有/boot分区的改为

find –set-root /grub/core.img

kernel /grub/core.img)

重启后选择Grub4Dos会自动转入grub2,从grub2菜单项选择ubuntu启动后,在终端执行

sudo grub-install /dev/sda

将grub装入第一硬盘的mbr,如要装入第二硬盘的mbr把sda改为sdb,第三硬盘为sdc,类推。
至于要把grub装到sda或sdb或sdc的mbr上,需根据自己情况确定,看看要设置哪一块硬盘为启动盘,就把grub装到那块硬盘的mbr上。

2)用livecd修复grub

用ubuntu9.10的livecd启动后,打开终端

假如你的ubuntu的 / 分区是sda7,又假如 /boot分区是 sda6,用livecd启动,在终端下输入
sudo -i
mount /dev/sda7 /mnt
mount /dev/sda6 /mnt/boot (如果没 /boot 单独分区这步跳过)
grub-install –root-directory=/mnt /dev/sda

和前面一样,要装入第二硬盘的把sda改为sdb。

如果grub.cfg己丢失,或grub.cfg出现错误,需要重建的继续执行下面操作:

mount –bind /proc /mnt/proc
mount –bind /dev /mnt/dev
mount –bind /sys /mnt/sys
chroot /mnt update-grub
umount /mnt/sys
umount /mnt/dev
umount /mnt/proc

exit

3)用带grub启动的光盘或U盘修复

如果手上有grub启动的工具盘,用工具盘启动,在grub菜单上按c进入命令行状态,

在grub>提示符下输入

grub>find /boot/grub/core.img (有/boot分区的用find /grub/core.img)

(hdx,y) (显示查找到的分区号)

grub>root (hdx,y)

grub>kernel /boot/grub/core.img (/boot分区的用 kernel /grub/core.img)

grub>boot

执行boot后能转入grub2菜单,启动ubuntu后,再在ubuntu终端下执行

sudo grub-install /dev/sda (或sdb,sdc等)修复grub。
如果ubuntu的启动分区使用ext4格式,要有支持ext4格式的grub才能修复。

4)没安装引导器的 grub4dos引导ubuntu的方法
按第一步的方法使用 boot.ini 建立grub4dos引导项,自己编写 menu.lst,内容如下

timeout 3
default 0

title Ubuntu 9.10
root (hdx,y) ——–> (hd0x,y) 为 /boot分区的分区号
kernel /vmlinuz-xxx-generic root=/dev/sdxy ——->/dev/sdxy 为 / 分区的分区号

initrd /initrd.img-xxx-generic

没 /boot 分区的用
timeout 3
default 0

title Ubuntu 9.10
root (hdx,y)
kernel /boot/vmlinuz-xxx-generic root=/dev/sdxy
initrd /boot/initrd.img-xxx-generic

2、安装时grub没装在mbr上而选择装在linux分区的pbr上,怎么引导ubuntu

1)按前面的方法一,以grub4dos引导转入grub2。

2)把ubuntu分区/boot/grub目录下的boot.img提取出来,放到C盘根目录下,然后修改boot.ini,在最后添加一行 C:\boot.img=”grub2″

对vista/7可在C盘新建一个boot.ini,内容为

[boot loader]

timeout=0

default=c:\boot.img

[operating systems]

c:\boot.img=”grub2″

重启后选择grub2就可进入grub2菜单。

此法兼容性较差,成功率低,仅供测试。

3、由于分区调整引起分区号或分区UUID改变造成的grub2不能正常启动

己安装好系统,对硬盘再次进行分区调整时可能会改变现有分区的分区号发生变化,或者某种原因改变启动分区的UUID,都会造成grub2不能正常启动,而启动进入修复模式(grub rescue),这时就要对grub进行修复。

1)用ubuntu9.10的livecd光盘启动,进入试用桌面系统后,再修复grub,操作方法如第一种情况的第二种方法—

2)在rescue模式下启动并修复

由于分区问题,启动时会自动进入rescue模式,只要grub核心文件还在分区内,就能由rescue模式转到normal模式,进而通过命令进入系统。下面这个就是rescue介面:

附件:

GRUB10.png [ 818 Bytes | 被浏览 8732 次 ]

由于在rescue模式下,只有少量的基本命令可用,必须通过一定的操作才能加载正常模块,然后进入正常模式。

rescue模式下可使用的命令有:set,ls,insmod,root,prefix(设置启动路径)

先假设grub2的核心文件在(hd0,8)分区,再来看看怎样从rescue模式进入从(hd0,8)启动的正常模式(normal)。

在rescue模式下search命令不能用,对不清楚grub2文件处于哪个分区的,可以用ls命令查看,比如

ls (hd0,8)/ 查看(hd0,8)分区根目录,看看有没有boot文件夹

ls (hd0,8)/boot/ 查看(hd0,8)分区的/boot目录下文件

ls (hd0,8)/boot/grub/ 查看(hd0,8)分区/boot/grub目录下文件

通过文件查看,可以确定grub2核心文件处于哪个分区,接下来就可以进行从rescue到normal的转变动作:

先 ls 看看分区,根据分区列表,猜下 / 分区的编号再 ls (hd0,x)/ 看分区目录下文件确定找到 / 分区,不对的话继续找。找到 / 分区的 (hd0,x) 继续
grub rescue>root=(hd0,x)
grub rescue>prefix=/boot/grub
grub rescue>set root=(hd0,x)
grub rescue>set prefix=(hd0,x)/boot/grub
grub rescue>insmod normal
rescue>normal ——–>若出现启动菜单,按c进入命令行模式
rescue>linux /boot/vmlinuz-xxx-xxx root=/dev/sdax
rescue>initrd /boot/initrd.img-xxx-xxx
rescue>boot

内 核版本号 -xxx-xxx可以按Tab键查看后再手动补全。

有 /boot分区的,要先找出 /boot 分区 (hd0,x),再找出 / 分区的 (hd0,y),同样用 ls (hd0,x)/ 和 ls (hd0,y)/ 的方式确定分区
grub rescue>root=(hd0,x)
grub rescue>prefix=/grub
grub rescue>set root=(hd0,x)
grub rescue>set prefix=(hd0,x)/grub
grub rescue>insmod normal
rescue>normal ——–>若出现启动菜单,按c进入命令行模式
rescue>linux /vmlinuz-xxx-xxx root=/dev/sday
rescue>initrd /initrd.img-xxx-xxx
rescue>boot

说明:

1)由于grub2版本的的不一致,有的可能在第9步insmod normal.mod加载正常模块后直接进入normal模式,即出现了normal grub>的提示符,这种情况就不能执行第10步,即可以跳过normal命令的输入。

2)虽然输入normal命令会出现菜单,但由于缺少加载内核的Linux命令,直接从菜单不能进入系统,需要按c在命令行继续操作。

3)使用/boot单独分区的,要正确修改路径,如

prefix=(hd0,8)/grub

insmod /grub/normal.mod

另外root=/dev/sda8也要修改根分区的分区号。
4)按boot启动系统后,再在系统下打开终端,执行命令修复grub

重建配置文件grub.cfg

sudo update-grub

重建grub到第一硬盘mbr

sudo grub-install /dev/sda

4、双硬盘双系统 Grub Loading时间过长的解决方案

grub2的boot.img设定root的uuid从第一分区开始搜索分区的/boot/grub下的模块并加载, 如果linux分区处于第二硬盘甚至第三硬盘,会导致搜索时间过长而,出现菜单时间会长达10多秒。
对双(多)硬盘的情况建议把grub安装在ubuntu所在硬盘的mbr上,/boot分区或 / 分区 尽量靠前,并设该硬盘为启动盘,会大大缩短启动时间。

5、重复一下,单linux系统或硬盘安装时iso放在C盘,umount /isodevice引起的误认为单系统不能出现菜单项的几种处理方法。
1. 开机自检后时按几下shift键,可调出菜单项
2. sudo update-grub
重建grub.cfg,会发现新的系统而改写grub.cfg,一般能出现菜单项。
3.如第二种方法不能解决,直接修改grub.cfg
把在### BEGIN /etc/grub.d/30_os-prober 中的这一段
if keystatus; then
if keystatus –shift; then
set timeout=-1
else
set timeout=0
fi
else
if sleep$verbose –interruptible 3 ; then
set timeout=0
fi
fi
整段删除或修改三处set timeout=<大于0>,再执行
sudo update-grub

6、安装 ubuntu 9.10 后出现 Error : No such device: xxx-xxx-xxx,不能启动的修复办法(未经实机测试)

由于grub2兼容性问题,少部分电脑安装完ubuntu9.10重启时会出现

Error:no such device:3c7c1d30-86c7-4ea3-ac16-30d6b0371b02
Failed to boot default entries.

Press any key to continue.
原因是电脑不支持 uuid的搜索, soier 的修复过程证实了这个问题,见 viewtopic.php?f=139&t=238346
原贴使用的是 live DVD进入修复系统模式,的shell 下change root 修复,livecd 没有修复系统模式,现的根据他的方法写个 livecd
(能支持ext4读写的其他版本的live Linux一可以)下的修复办法,希望有这个问题的朋友测试下看行不行(我电脑没这个问题,没办法测试 ):

1)、livecd 启动进入试用系统
2)、挂载 / 分区,比如 / 分区为 /dev/sda7
sudo mount /dev/sda7 /mnt
如果有 /boot 单独分区,则挂载 /boot 分区
3)、修改 grub.cfg
sudo chmod +w /mnt/boot/grub/grub.cfg
sudo chmod +w /mnt/grub/grub.cfg (/boot 单独分区的)
sudo gedit /mnt/boot/grub/grub.cfg
sudo gedit /mnt/grub/grub.cfg (/boot 单独分区的)
找到 grub.cfg 可所有的这句
search –no-floppy –fs-uuid –set 3c7c1d30-86c7-4ea3-ac16-30d6b0371b02
的前面加上 # 号注释掉
# search –no-floppy –fs-uuid –set 3c7c1d30-86c7-4ea3-ac16-30d6b0371b02
这句的grub.cfg中有好几处,后面的uuid不尽相同,要全部找到并注释掉
4)、重启试试能否进入系统,可这进系统再进行下个步
5)、sudo gedit /usr/lib/grub/grub-mkconfig_lib
找到173-175行
if fs_uuid=”`${grub_probe} –device ${device} –target=fs_uuid 2> /dev/null`” ; then
echo “search –no-floppy –fs-uuid –set ${fs_uuid}”
fi
前面全部加#注释掉,记住从 if 开始到 fi结束,以防止语法错误
# if fs_uuid=”`${grub_probe} –device ${device} –target=fs_uuid 2> /dev/null`” ; then
# echo “search –no-floppy –fs-uuid –set ${fs_uuid}”
# fi
然后
sudo update-grub
这样重建出来的 grub.cfg 就没有
search –no-floppy –fs-uuid –set 3c7c1d30-86c7-4ea3-ac16-30d6b0371b02
的语句

7、如何从grub2回到grub (wubi使用者勿试)

sudo apt-get purge grub-pc ——>清除grub2
sudo rm -fr /boot/grub/*
sudo apt-get install grub ——->安装 grub
sudo grub-install /dev/sda ——–>安装grub到第一硬盘mbr,第二硬盘为/dev/sdb,若安装到分区引导扇区则为分区号如 /dev/sda7等
sudo update-grub ——–>重建menu.lst

8、重装windows后出现 error: no such device
由于重装windows时会改变windows引导分区的uuid,原来的配置文件grub.cfg中的 search –no-floppy –fs-uuid –set xxx-xxx
在搜索分区时会按原来的uuid查找分区,找不到相应的uuid,就出现 error: no such device,在ubuntu下执行
sudo update-grub
重建grub.cfg,就能解决。此方法也适用于用convert命令把fat改为ntfs格式时出现的error。

参考论坛资料:http://bbs.znpc.net/forumdisplay.php?fid=57&page=1

Ubuntu 安装 Grub Customizer -Grub2的图形化自定义工具

Ubuntu 安装 Grub Customizer -Grub2的图形化自定义工具

原文:http://blog.topspeedsnail.com/archives/9905


Grub Customizer是自定义Grub 2/Burg的图形化管理工具,它可以添加、移除、重新排序Grub启动菜单;更改Grub的一些默认参数;更改背景图像、字体和颜色。Grub Customizer会改变boot.cfg文件,所以如果运行”sudo update-grub”,Grub Customizer作出的改变也不会被重置。

Ubuntu安装Grub Customizer

添加PPA安装:

Ubuntu 安装 Grub Customizer -Grub2的图形化自定义工具

How To Configure Periodic TRIM for SSD Storage on Linux Servers

jellingwood

Introduction

Due to the architecture of SSDs, or solid state drives, continuous use results in degraded performance if not accounted for and mitigated. The TRIM command is an operation that allows the operating system to propagate information down to the SSD about which blocks of data are no longer in use. This allows the SSD’s internal systems to better manage wear leveling and prepare the device for future writes. TRIM can have a major impact on the device’s performance over time and its overall longevity.

While it is possible to enable continuous TRIM in Linux, this can actually negatively affect performance because of the additional overhead on normal file operations. A gentler alternative is to configure periodic TRIM. This configures the operating system to TRIM the drive on a schedule instead of as a necessary component of regular file operations. In almost all cases it provides the same benefits of continuous TRIM without the performance hit.

In this guide, we will briefly discuss how SSDs and TRIM work and then demonstrate how to enable periodic TRIM on a variety of Linux distributions.

How Do SSDs Store Data?

To better understand the problems that TRIM solves, it helps to know a few things about how SSDs store and manage their data.

Data Units

Data on SSDs is written and read in units of a fixed size known as pages. Pages, in turn, are grouped together in larger units called blocks.

Read, Write, and Erase Limitations

SSDs can read and write to pages individually. However, they can only erase data at the block level. Another limitation is that writes can only be performed on pages that have been completely zeroed (all bits set to 0). This means that overwriting data directly is impossible.

To modify data, the SSD actually has to read the information from the old location, modify it in memory, and then write the modified data to new, zeroed pages. It then updates an internal table to map the logical location that the operating system is given to the new physical location of the data on the device. The old location is marked in a different internal table as stale: not in use, but not yet zeroed.

Reclaiming Stale Pages

To reclaim the stale pages, the SSD’s internal garbage collecting processes must read all of the valid pages from a block and write them to a new block. Again, the internal table mapping logical and physical locations is updated. The old block, which now contains no unique, still-in-use data can then be zeroed and marked as ready for future writes.

What Does TRIM Do?

The SSD’s internal garbage collecting processes are responsible for erasing blocks and managing wear leveling. However, filesystems typically “delete” data by just marking it in their own records as space that is available again. They do not actually erase the data from the underlying storage, but may overwrite the area previously occupied by that data on subsequent writes.

This means that the SSD will typically not know that a page is no longer needed until it receives instructions from the filesystem to write to the same logical location at a later time. It cannot perform its garbage collection routines because it is never informed when data is deleted, just when the space previously reserved for it should now be used for other data.

The TRIM command propagates information about which data is no longer being used from the filesystem down to the SSD. This allows the device to perform its regular garbage collecting duties when idle, in order to ensure that there are zeroed pages ready to handle new writes. The SSD can shuffle data ahead of time, clean up stale pages, and generally keep the device in good working condition.

Performing TRIM on every deletion can be costly however and can have a negative impact on the performance of the drive. Configuring periodic TRIM gives the device bulk information about unneeded pages on a regular schedule instead of with each operation.

Disabling Continuous TRIM

You may have already enabled continuous TRIM on your devices when they were mounted. Before we enable periodic TRIM, it makes sense to take a look at our current mount options.

Continuous TRIM is enabled by mounting a drive or partition with the discard option.

First, find the filesystems that are currently mounted with the discard option:

  • findmnt -O discard
Output
TARGET     SOURCE    FSTYPE OPTIONS
/mnt/data  /dev/sda1 ext4   rw,relatime,discard,data=ordered
/mnt/data2 /dev/sdb1 ext4   rw,relatime,discard,data=ordered

You can remount these filesystems in place, without the discard option, by including -o remount,nodiscard with mount:

  • sudo mount -o remount,nodiscard /mnt/data
  • sudo mount -o remount,nodiscard /mnt/data2

If you run the findmnt command again, you should receive no results:

  • findmnt -O discard

Next, open the /etc/fstab file to see the mount options currently defined for your filesystems. These determine how the filesystems are mounted each boot:

  • sudo nano /etc/fstab

Look for the discard option and remove it from lines that you find:

/etc/fstab
. . .
# /dev/sda1 /mnt/data ext4 defaults,nofail,discard 0 0
/dev/sda1 /mnt/data ext4 defaults,nofail 0 0
# /dev/sdb1 /mnt/data2 ext4 defaults,nofail,discard 0 0
/dev/sdb1 /mnt/data2 ext4 defaults,nofail 0 0

Save and close the file when you are finished. The filesystems will now be mounted without the discardoption, and will mount in this same way on subsequent boots. We can now set up periodic TRIM for all filesystems that support it.

Setting Up Periodic TRIM for systemd Distributions

Setting up periodic TRIM for modern distributions shipping with systemd tends to be rather straight forward.

Ubuntu 16.04

Ubuntu 16.04 ships with a script that is run weekly by cron. This means that enabling the systemd method described in the following section is unnecessary for Ubuntu 16.04.

If you wish to examine the script, you can see it by typing:

  • cat /etc/cron.weekly/fstrim
Output
#!/bin/sh
# trim all mounted file systems which support it
/sbin/fstrim --all || true

As you can see, this script needs a version of fstrim with the --all flag. Many versions fstrim shipped with earlier releases of Ubuntu do not contain this option.

Other systemd Distributions

For other systemd distributions, periodic TRIM can be enabled with the fstrim.timer file, which will run TRIM operations on all capable, mounted drives once a week. This also leverages the fstrim --all option.

At the time of this writing, this is the best method for the following distributions:

  • Debian 8
  • CentOS 7
  • Fedora 24
  • Fedora 23
  • CoreOS

For CentOS 7, Fedora 23, Fedora 24, and CoreOS, the fstrim.service and fstrim.timer units are available by default. To schedule a weekly TRIM of all attached capable drives, enable the .timer unit:

  • sudo systemctl enable fstrim.timer

Debian 8 has the fstrim.service and fstrim.timer available within the filesystem, but not loaded into systemd by default. You just need to copy the files over first:

  • sudo cp /usr/share/doc/util-linux/examples/fstrim.service /etc/systemd/system
  • sudo cp /usr/share/doc/util-linux/examples/fstrim.timer /etc/systemd/system

Now, you can enable the timer the same as with the other distributions:

  • sudo systemctl enable fstrim.timer

Your server should now TRIM all mounted filesystems that support the operation, once weekly.

Setting Up Periodic TRIM for Non-systemd Distributions

Coincidentally, most distribution releases that ship with non-systemd init systems also shipped with versions of the fstrim utility that did not have the --all flag. This makes safe, automatic TRIM operations much more difficult.

Using TRIM on drives that do not support it or on devices that incorrectly implement it can be dangerous and lead to data loss. The --all flag can handle these scenarios safely, but manually attempting to determine whether attached drives correctly support the operation can be dangerous.

In Ubuntu 14.04, a short script called fstrim-all is included, which attempts to do this. A weekly script run by cron executes this. However, the script does not always interpret the TRIM ability of attached drives correctly.

For this and other distributions with fstrim commands without the --all flag, the best workaround may be to compile a statically linked version of fstrim that does include the flag. This can be installed alongside the distribution-managed version and only called explicitly from the cron job.

This may be the best option for the following distributions:

  • Ubuntu 14.04
  • Ubuntu 12.04
  • Debian 7
  • CentOS 6

For Ubuntu 14.04, it’s probably best to disable the fstrim-all script from running, since it may not detect the status correctly:

  • sudo chmod a-x /etc/cron.weekly/fstrim
  • sudo mv /etc/cron.weekly/fstrim /etc/cron.weekly/fstrim.bak

For other distributions, you can jump right in.

Install the Software Compilation Tools

First, install the needed software building tools.

For Ubuntu and Debian systems, this can be done by typing:

  • sudo apt-get update
  • sudo apt-get install build-essential

For CentOS systems, you can install a similar set of tools by typing:

  • sudo yum groupinstall ‘Development Tools’

You now have the build dependencies needed to compile a recent version of fstrim.

Download and Extract the Source Files

The fstrim utility is released with other tools in a group called util-linux. You can find the source code, organized by release version, here.

Click on the most recent version of the package. At the moment, that is v2.28, but that may be different as development continues.

Within the next directory, find the most recent tarball for the software. This will start with util-linux- and end with .tar.gz. Currently, the most recent stable version is util-linux-2.28.1.tar.gz. Right-click on the appropriate link and copy it to your clipboard.

Back on your server, move to the /tmp directory. Use the curl or wget utility and paste in URL you copied to download the file:

  • cd /tmp
  • curl -LO https://www.kernel.org/pub/linux/utils/util-linux/v2.28/util-linux-2.28.1.tar.gz

Afterwards, extract the tarball to create the source directory structure:

  • tar xzvf util-linux*

Now that we have the source code and the build tools, we can build the software.

Configure and Compile a Statically Linked fstrim

Begin by enter the extracted directory structure:

  • cd /tmp/util-linux*

Next we need to configure the software. Since we are only installing an isolated fstrim binary, and do not want to overwrite the utilities and libraries managed by our package management system, we will compile a static binary.

To do this, we need to enable static linking and disable shared libraries. Configure the software with these properties by typing:

  • ./configure –enable-static –disable-shared

Once the software is configured, you can compile the fstrim utility by typing:

  • make fstrim

This will compile the utility, placing it in the top-level directory of the extracted archive.

Copy the binary to a directory that is not in your PATH. Since we’re only interested in calling this from the cron script, we should make sure that it does not compete with the system-installed fstrim for other uses.

We will make a directory called /cron-bin and place the binary in there:

  • sudo mkdir /cron-bin
  • sudo cp /tmp/util-linux*/fstrim /cron-bin

We now have access to a more functional fstrim utility.

Create a Weekly Cron Script to Run fstrim

Now, we can create a new script that will be run by cron weekly. This will be exactly the same script that’s included with Ubuntu 16.04, except that it will point to the location where we placed our statically compiled binary.

Create the file by typing:

  • sudo nano /etc/cron.weekly/fstrim

Inside, paste the following lines. This will run our new fstrim binary with the --all option:

/etc/cron.weekly/fstrim
#!/bin/sh
# trim all mounted file systems which support it
/cron-bin/fstrim --all || true

Save and close the file when you are finished.

Make the script executable by typing:

  • sudo chmod a+x /etc/cron.weekly/fstrim

The cron and anacron daemons will run this script once a week to TRIM the filesystems.

Conclusion

Your Linux server should now be configured to periodically TRIM all supported filesystems on a weekly basis. TRIM helps to maximize both the long term performance and lifespan of your SSDs.

Continuous TRIM operations may sound ideal, but they can add signifiant overhead to regular filesystem operations. Periodic TRIM offers a good middle ground by relaying key information needed to perform routine maintenance of the drive in a scheduled job instead of as a component of each file operation.

字体配置local.conf详解

原文:http://forum.ubuntu.org.cn/viewtopic.php?t=43761


说明:
本贴是小弟在BSD社区时所写,现在转用ubuntu,特转贴过来,希望对大家有帮助。

操作方法:
1)拷贝或安装字体,注意字体的权限:)不然会有方框。
2)把修改后的local.conf替换为language-selector.conf,去掉以前的链接,采用新的配置。

Win效果配置文件下载
AA效果配置文件下载

*******************************************************************

中文显示效果是一个老生常谈的问题了,论坛里相关的文章也特别多,不过详
细讲解local.conf配置的好像并不多见,在此小弟奉上自己的两款配置,包括
Windows细腻效果的和带AA适合阅读效果的,并附上详细注释和截图,希望对大
家有所帮助,能够腾出更多的时间去深入linux的其它部分。

在此,先感谢为中文字体效果而努力的大大们,有了你们,让linux中文也能如
此精彩。

两篇重要的参考文章
1.Fontconfig 2.3.2用户手册,感谢3n
2.Linux 字体微调 – windows 效果版,感谢quanliking

[说明:本人在FreeBSD下测试,目录均采用FreeBSD中的目录,使用不同发行
版的朋友,请调整好目录]

前提:字体准备(采用MS字体、华文字体、WenQuanYi,仅供参考,注重版权
的朋友,请慎用)
1)将Windows的几款英文字体拷到字体目录msfonts下
推荐的字体有Tahoma、Verdana、Arial、Times New Roman、Courier New
等,还有一种卡通字体Comic Sans MS,用来作窗口标题字体不错。

2)将Windows的几款中文字体拷到字体目录zhfonts下
推荐的字体有SimSun、SimHei、STxxx华文系列字体(装了office一般都有)

3)安装文泉驿字体最新版,或直接将文泉驿字体拷到wqyfonts目录下

4)如果已经配置有XFLD字体如SimSun和Tahoma,并做好了相应的fonts.dir,
那么可以建一个目录gtkfonts,将原来的字体和fonts.dir、fonts.scale拷过来,并
在xorg.conf的fontpath中加入gtkfonts,这样不会影响GTK1中英文显示。

第一部分:AA效果适合阅读型
(只需修改local.conf,不用修改fonts.conf,所有字体优先级等只用在
local.conf中修改即可)

1.头部

代码:
<?xml version=”1.0″?>
<!DOCTYPE fontconfig SYSTEM “fonts.dtd”>
<!– /etc/fonts/local.conf file to configure local fonts –>
<fontconfig>

注解:
local.conf配置头部,fontconfig是字体匹配设置的开始。

2.字体别名设置

代码:
<!–
fonts alias settings
–>
<match target=”pattern”>
<test name=”family”>
<string>宋体</string>
</test>
<edit name=”family” mode=”assign”>
<string>SimSun</string>
</edit>
</match>
<match target=”pattern”>
<test name=”family”>
<string>新宋体</string>
</test>
<edit name=”family” mode=”assign”>
<string>NSimSun</string>
</edit>
</match>

注解:
SimSun字体有两个别名,一个是SimSun,一个就宋体,在网页设计时,有些
采用的字体名是SimSun,有些是宋体,通常,这不会影响到字体的匹配,不管哪
种设置,浏览器总是可以找到SimSun来显示中文。

但是,SimSun的英文不好看,粗体英文更是破粹影响阅读,所以好多朋友也是
采用其它的英文来替换掉SimSun中的英文,要么修改SimSun字体中的英文部分,
要么使用Substitution。我也采用Substitution,在后面也是把SimSun的英文部分
替换成Tahoma,在替换时,用来判断SimSun的标准是通过英文字体名SimSun为
依据的,fontconfig在匹配过程中,如果发现要显示SimSun字体,则把Tahoma强
加在SimSun之前,这样可以保证大部分网页用Tahoma来显示SimSun的英文。但
是,如果网页指定的字体名是宋体,那么匹配就会失败,结果还是使用原来
SimSun中的英文,所以,这里把中文字体名改为英文字体名,适应这些网页的英
文显示,典型例子是www.FreeBSDChina.org的论坛。

那么上段代码的意思是:碰到要匹配宋体或新宋体,就强制把要请求的字体名
改为SimSun和NSimSun。

3.字体族与字体名设置

代码:
<!–
Mark common families with their generics so we’ll get
something reasonable
–>
<!–
Sans-serif faces
–>
<alias>
<family>Tahoma</family>
<family>Verdana</family>
<family>Arial</family>
<family>Trebuchet MS</family>
<family>Comic Sans MS</family>
<family>SimSun</family>
<family>SimHei</family>

<family>STHupo</family>
<family>STXinwei</family>
<family>FZYaoTi</family>
<family>FZShuTi</family>
<family>Arial Unicode MS</family>
<default><family>sans-serif</family></default>
</alias>
<!–
Serif faces
–>
<alias>
<family>Georgia</family>
<family>Times New Roman</family>
<family>WenQuanYi Bitmap Song</family>
<default><family>serif</family></default>
</alias>
<!–
Monospace faces
–>
<alias>
<family>Courier New</family>
<family>Andale Mono</family>
<family>NSimSun</family>
<default><family>monospace</family></default>
</alias>

注解:
这一部分是针对各个字体族中的字体设置字体名称,好像没什么可讲的,大家
平常修改时最常见到,可以把你喜欢的字体按照自己喜好的顺序列在这里,当然
也可以省去这一段不写,最重要是下面的prefer一段。

4.字体匹配顺序

代码:
<!–
Provide required aliases for standard names
–>
<alias>
<family>sans-serif</family>
<prefer>
<family>Tahoma</family>
<family>Verdana</family>
<family>Arial</family>
<family>Trebuchet MS</family>
<family>Comic Sans MS</family>
<family>SimSun</family>
<family>SimHei</family>

<family>STHupo</family>
<family>STXinwei</family>
<family>FZYaoTi</family>
<family>FZShuTi</family>
<family>Arial Unicode MS</family>
</prefer>
</alias>
<alias>
<family>serif</family>
<prefer>
<family>Georgia</family>
<family>Times New Roman</family>
<family>WenQuanYi Bitmap Song</family>
</prefer>
</alias>
<alias>
<family>monospace</family>
<prefer>
<family>Courier New</family>
<family>Andale Mono</family>
<family>NSimSun</family>
</prefer>
</alias>

注解:
同上面一段字体名称设置,不同的是这里设定了字体的优先顺序,fontconfig
会参照这里的优先顺序来进行字体匹配,因此这一段比较重要。

说明:
在fonts.conf中也有一段字体匹配优先顺序的设定,个人感觉fontconfig整体的
优先顺序会参照local.conf和fonts.conf,由于local.conf包含在fonts.conf中prefer
那一段之前,所以优先顺序应该是local.conf中的优先字体列表,再加上fonts.conf
中的优先字体列表,由于man中没有说明,这点只是个人理解。

[注意]:
这里把WenQuanYi字体加在Serif族中,原因如下:
1)有些支持xft的程序,不支持字体替换,即只支持一种字体,当它匹配到这种
字体后,不管中文还是英文,都用这一种字体来显示,典型的是fvwm、mrxvt、
fcitx等。

2)本来中文用SimSun普通和粗体显示效果都非常好,但在对SimSun中的英文
作了替换之后,导致的结果是:fontconfig匹配SimSun时,把Tahoma强加在
SimSun之前,这样,上述的一类程序得到了字体就是Tahoma,而非SimSun,它
们也不会再去匹配合适的字体来显示中文,因此,这类程序如果设置字体为Sans
或SimSun的话,中文会显示成方框或乱码。

3)由于大部分的中文字体都设置在Sans-Serif中了,NSimSun也被替换过了,因
此,解决这类问题就可以用WenQuanYi来代替,WenQuanYi虽然只支持点阵,但
它的中英文显示都还不错,粗体也非常好,不用作替换,所以这里把WenQuanYi
加在Serif中,而这类有问题的程序就设置中文字体为Serif,可以很好的解决。

4)该问题还有一种解决方法,就是把SimSun用fontforge改掉字体名,成为一
种新字体,之后把这类程序的字体名设置为TSimSun(假定),就可以很好的解决
了,因为它没有定义替换动作。

5.SimSun英文部分替换动作

代码:
<!–
SimSun english portion substitutionsubstitution
–>
<match target=”pattern”>
<test name=”family” >
<string>SimSun</string>
</test>
<edit name=”family” mode=”prepend” binding=”strong”>
<string>Tahoma</string>
</edit>
</match>

注解:
上面已经讲到,SimSun英文不好看,粗体英文会破粹,因此,这一段代码就强
制把Tahoma加在SimSun之前,fontconfig匹配得到的字体列表就是Tahoma、
SimSun、…此时,网页上的英文部分就会很好的显示,不管它设置中文字体是
SimSun还是宋体,因为宋体在最开始已经被替换名称为SimSun了。

所谓的替换,实际上是在匹配到的字体列表中,把要替换的英文字体加在目标
字体之前,即动态改变字体的优先顺序。

6.同上,替换NSimSun的英文部分

代码:
<!–
NSimSun english portion substitutionsubstitution
–>
<match target=”pattern”>
<test name=”family” >
<string>NSimSun</string>
</test>
<edit name=”family” mode=”prepend” binding=”strong”>
<string>Courier New</string>
</edit>
</match>

注解:
NSimSun的粗体英文跟SimSun一样会破粹,具体体现在firefox的源码查看、
Gedit默认字体中。所以,这里把NSimSun的英文替换为Courier New,它在终端
中有很好的表现,在很多论坛的[ code ]代码段也显示的很好。

7.Courier字体的替换

代码:
<!–
Courier substitution
–>
<match target=”pattern”>
<test name=”family” >
<string>Courier</string>
</test>
<edit name=”family” mode=”prepend” binding=”strong”>
<string>Courier New</string>
</edit>
</match>

注解:
Courier New字体显示较courier好看,虽然上面Courier New加在Monospace最
前,但是如果有的程序直接指定字体名Courier,还是会以Courier字体来显示,这
里强制替换成好看的Courier New字体。

8.Tahoma/Verdana粗体替换

代码:
<!–
Bold Tahoma/Verdana substitution:
when its size more than 20px,substitution with Bold Arial
–>
<match target=”pattern”>
<test name=”family” >
<string>Tahoma</string>
<string>Verdana</string>
</test>
<test name=”weight” compare=”more_eq”>
<int>180</int>
</test>
<test name=”pixelsize” compare=”more_eq” >
<double>20</double>
</test>
<edit name=”family” mode=”prepend” binding=”strong”>
<string>Arial</string>
</edit>
</match>

注解:
Tahoma和Verdana字体显示还是不错的,但是大号粗体英文表现的好像过粗,
如果不喜欢的话,可以用相对较细一点的Arial来替换,看个人喜好了。

9.设置字体显示的DPI

代码:
<!–
Target dots per inch, change dpi to 96
–>
<match target=”pattern” >
<edit name=”dpi” mode=”assign” >
<double>96</double>
</edit>
</match>

注解:
有朋友如果喜欢用FVWM的话,之后切换到Gnome或KDE,则会发现以前设置
好的字体大小,都发生了变化,好像都变大了一样。这是因为Xorg默认dpi是75,
FVWM不会修改这个值,当然也是75,而Gnome和KDE的DPI都是96,所以两者会
有不一样。

这里就不多说了,详见上面的链接[linux字体微调–Windows效果].

10.子像素渲染

代码:
<!–
Enable sub-pixel rendering.
If you are using CRT, set rgb -> none
–>
<match target=”font”>
<edit name=”rgba” mode=”assign”>
<const>none</const>
</edit>
</match>

注解:
man中和不少文章也说,LCD建议使用rgb渲染效果,但在我的本本上rgb还是
会泛蓝或泛绿,设置为none就好了,看来还是要根据自己的实际情况来测试。

11.最小字体号设置

代码:
<!–
Font size settings:
set the apposite font size,so it’s easy to be read
–>
<match target=”pattern” >
<test name=”pixelsize” compare=”more_eq” >
<double>8</double>
</test>
<test name=”pixelsize” compare=”less_eq” >
<double>12</double>
</test>
<edit name=”pixelsize” mode=”assign” >
<double>12</double>
</edit>
</match>

注解:
这里设置了最小的字体号,基于两点:
1)小字体显示的效果一般都不好。当然也有用别的字体中的点阵来替换,如华
文细黑就提供了10px、11px的点阵,在SimSun过小时,可以用华文细黑来代替。

2)小字体读起来累,本文是AA适合阅读型,当然不能太累眼,所以自己设置一
个合适的最小字体大小。

这里所有字体统一处理了,当然如果希望中英文最小字体大小不一样的话,可
以另外设置。

12.支持伪粗体

代码:
<!–
Artificial oblique for fonts without an italic or oblique version
–>
<match target=”font”>
<!– check to see if the font is roman –>
<test name=”slant”>
<const>roman</const>
</test>
<!– check to see if the pattern requested non-roman –>
<test target=”pattern” name=”slant” compare=”not_eq”>
<const>roman</const>
</test>
<!– multiply the matrix to slant the font –>
<edit name=”matrix” mode=”assign”>
<times>
<name>matrix</name>
<matrix>
<double>1</double><double>0.2</double>
<double>0</double><double>1</double>
</matrix>
</times>
</edit>
<!– pretend the font is oblique now –>
<edit name=”slant” mode=”assign”>
<const>oblique</const>
</edit>
</match>

注解:
这一段是从fonts.conf中粘过来的,考虑到别的发行版中可能会没有,因此还
是加到local.conf中来了。

具体意思是:
如果当前字体不是斜体,而要求匹配的字体是斜体的话,则修改模拟斜体所需
要的值来产生斜体,并且设置斜体属性。这一段一般不会修改,有这一段就能支
持算法模拟斜体,效果不错。

13.支持伪粗体

代码:
<!–
Synthetic emboldening for fonts that do not have bold face available
–>
<match target=”font”>
<!– check to see if the font is just regular –>
<test name=”weight” compare=”less_eq”>
<int>100</int>
</test>
<!– check to see if the pattern requests bold –>
<test target=”pattern” name=”weight” compare=”more_eq”>
<int>180</int>
</test>
<!– set the embolden flag –>
<edit name=”embolden” mode=”assign”>
<bool>true</bool>
</edit>
</match>

注解:
同上,拷自fonts.conf,通过算法支持粗体显示。

具体意思是:
如果当前字重不超过100,且请求的字号超过180,那么设置模拟粗体属性。

14.默认AA,Auto,Hinting设置

代码:
<!–
Default Fonts setting
here autohint = ture / hinting = false is for free fonts in your system
we will use autohint = false / hinting = true for MS core fonts
–>
<match target=”font” >
<edit name=”antialias” mode=”assign” >
<bool>true</bool>
</edit>
<edit name=”autohint” mode=”assign” >
<bool>true</bool>
</edit>
<edit name=”hinting” mode=”assign” >
<bool>false</bool>
</edit>
<edit name=”hintstyle” mode=”assign” >
<const>hintfull</const>
</edit>
</match>

注解:
设置基本的抗锯齿、自动微调、微调、微调样式。

一般规则:
一般字体在显示时,都会由原字体缩放后再画在屏幕上,那么就会产生一定程
度的走样。当然,点阵字体则是以位图的形式直接画的,因此本身效果就很好,
如SimSun。为了防止走样好难看,大部分专业字体公司都会为这些字体做
hinting,即微调,MS大部分字体均是如此,所以MS的字体打开hinting效果就很
好,不打开就比较难看。

而linux下的自由字体,由于商业的原因,这些字体的hinting都不好或是没有,
因此linux下就采用算法来自动hinting,称为autohint,也能适当的改善效果。

因此,这里的设置是打开AA,和autohint,关掉hinting,样式采用完全微调。
中文是没有hinting的,因为汉字众多且复杂,而英文较好,所以有hint。一般
说来,autohint和hinting不是一起开的,要么开彼,要么开此。

15.解决中英文间距过宽的问题

代码:
<!–
The dual-width Asian fonts (spacing=dual) are not rendered correctly,
apparently FreeType forces all widths to match. Trying to disable the
width forcing code by setting globaladvance=false alone doesn’t  help.
As a brute force workaround, also set spacing=proportional, i.e. handle
them as proportional fonts:
–>
<match target=”font”>
<test name=”lang” compare=”contains” >
<string>zh</string>
<string>ja</string>
<string>ko</string>
</test>
<edit name=”spacing” mode=”assign” >
<const>proportional</const>
</edit>
<edit name=”globaladvance” mode=”assign” >
<bool>false</bool>
</edit>
</match>

注解:
这一段改善中英文间距过大的问题,具体小弟也不太理解,只知道用,望大大
告知:)

16.CJK字体AA设置

代码:
<!–
CJK antialias settings:
when font size (in pixel) between 8 and 20px
–>
<match target=”font” >
<test name=”lang” compare=”contains” >
<string>zh</string>
<string>ja</string>
<string>ko</string>
</test>
<test name=”pixelsize” compare=”more_eq” >
<double>8</double>
</test>
<test name=”pixelsize” compare=”less_eq” >
<double>20</double>
</test>
<edit name=”antialias” mode=”assign” >
<bool>false</bool>
</edit>
<edit name=”autohint” mode=”assign” >
<bool>false</bool>
</edit>
<edit name=”hinting” mode=”assign” >
<bool>false</bool>
</edit>
</match>

注解:
这里设置中文8px-20px显示时,不打开AA,不需要微调。此时,多半是点阵
显示,当超过16px时才用TrueType,这个临界值可以按自己喜好设置。

17.CJK字体AA设置

代码:
<!–
CJK antialias settings:
when font size (in pixel) more than 20px, enable AA.
–>
<match target=”font” >
<test name=”lang” compare=”contains” >
<string>zh</string>
<string>ja</string>
<string>ko</string>
</test>
<test name=”pixelsize” compare=”more_eq” >
<double>20</double>
</test>
<edit name=”antialias” mode=”assign” >
<bool>true</bool>
</edit>
<edit name=”autohint” mode=”assign” >
<bool>true</bool>
</edit>
<edit name=”hinting” mode=”assign” >
<bool>true</bool>
</edit>
</match>

注解:
当中文字体超过20px时,就打开AA,效果非常好。不过我这里把Autohint和
hinting都打开了,一般来说这两个只开其一,不过我发现都打开时的效果比前者
要好,所以都开了,样式还是选择完全微调。

18.CJK斜体字AA设置

代码:
<!–
Italic CJK fonts,enable AA
–>
<match target=”font”>
<test name=”lang” compare=”contains” >
<string>zh</string>
<string>ja</string>
<string>ko</string>
</test>
<test name=”slant” compare=”not_eq”>
<const>roman</const>
</test>
<edit name=”antialias” mode=”assign” >
<bool>true</bool>
</edit>
<edit name=”autohint” mode=”assign” >
<bool>true</bool>
</edit>
<edit name=”hinting” mode=”assign” >
<bool>true</bool>
</edit>
</match>

注解:
我不太喜欢系统模拟出来的中文斜体,笔画有点破粹,因此这里打开AA,设置
微调,来改善斜体显示效果。

19.MS字体AA设置

代码:
<!–
Microsoft fonts settings
–>
<!–
default : smoothed and hinted
–>
<match target=”font” >
<test name=”foundry” >
<string>monotype</string>
<string>microsoft</string>
</test>
<edit name=”antialias” mode=”assign” >
<bool>true</bool>
</edit>
<edit name=”autohint” mode=”assign” >
<bool>false</bool>
</edit>
<edit name=”hinting” mode=”assign” >
<bool>true</bool>
</edit>
<edit name=”hintstyle” mode=”assign” >
<const>hintfull</const>
</edit>
</match>

注解:
对于MS字体,要打开hinting、关闭autohint,因此这里的设置也比较好理解。

20.MS YAHEI 字体AA设置

代码:
<!–
Microsoft YaHei Enable AA
–>
<match target=”font” >
<test name=”family” compare=”eq” >
<string>Microsoft YaHei</string>
</test>
<edit name=”antialias” mode=”assign” >
<bool>true</bool>
</edit>
<edit name=”autohint” mode=”assign” >
<bool>false</bool>
</edit>
<edit name=”hinting” mode=”assign” >
<bool>true</bool>
</edit>
<edit name=”hintstyle” mode=”assign” >
<const>hintfull</const>
</edit>
</match>

注解:
上面已经针对字体公司做了AA设置,这一段多余了。

21.Courier New 字体AA设置

代码:
<!–
Courier New:
both enable autohint and hinting looks very well.
–>
<match target=”font” >
<test name=”family” >
<string>Courier</string>
<string>Courier New</string>
</test>
<edit name=”antialias” mode=”assign” >
<bool>true</bool>
</edit>
<edit name=”autohint” mode=”assign” >
<bool>true</bool>
</edit>
<edit name=”hinting” mode=”assign” >
<bool>true</bool>
</edit>
<edit name=”hintstyle” mode=”assign” >
<const>hintfull</const>
</edit>
</match>

注解:
对于Courier New字体,有点奇怪,跟其它的MS字体不一样,它在把autohint
和hinting都打开后,效果非常的好,笔画清晰,又有AA效果,我比较喜欢,所以
这里都开了。好像MS字体中这个比较例外。

22.Courier New 字体大小设置

代码:
<!–
Courier New font size
–>
<match target=”font” >
<test name=”family” >
<string>Courier New</string>
</test>
<test name=”pixelsize” compare=”less_eq” >
<double>14.7</double>
</test>
<edit name=”pixelsize” mode=”assign” >
<double>14.7</double>
</edit>
</match>

注解:
这里设置了Courier New最小字体。理由是:
1)对此字体,我把autohint 和 hinting都开了,这样效果很好,但是有个问题,
当字体小于14.7px(即11pt)时,‘#’显示的不太好看,而14.7px(11pt)就OK了,所
以我设置最小为这个值。

2)很多网页上显示 [ code ]段时,字体都用的Courier New,但是字体设置的
过小,读起来不太舒服,因此,这里强制修改一下Courier New的最小值,在论坛
中查看代码时,效果非常好。

23.结束

代码:
</fontconfig>

总结:
以上代码设置比较简单,但是由于开了AA,对不同字体做了调整,使得阅读起
来非常舒服。不过对MS字体和CJK字体的大小,AA效果等,有一刀切之闲,不过
这样效果也非常的不错,供大家参考一下。

当然也有设置的比较精细的,quanliking大大就对MS每款字体作了不同的设
置,具体请参见上面的贴子。

使用ffmpeg合并(连接)文件

Pipe friendly formats

原文:

https://www.nmm-hd.org/newbbs/viewtopic.php?t=1533

https://superuser.com/questions/277642/how-to-merge-audio-and-video-file-in-ffmpeg

https://trac.ffmpeg.org/wiki/Concatenate

关键词:concatenate;append;合并;连接
使用ffmpeg连接文件分两类,连接编码完全相同的文件;连接编码不同的文件

连接编码完全相同的文件
有两种方式,使用concat “分离器(demuxer)”和concat “协议(protocol)。demuxer比较自由,编码相同、但是多媒体文件容器不同也能连接。因此demuxer能处理各种容器,而protocol只能处理区区几种容器。老版本的ffmpeg只能用protocol,最近demuxer在ffmpeg中出现。

concat demuxer是FFmpeg 1.1添加进来的,文档见此
使用方法
创建一个 mylist.txt 文件,每行写一个想要连接的文件的路径,格式如下:

代码: 全选

#该行为注释
file '/path/to/file1'
file '/path/to/file2'
file '/path/to/file3'

可以用绝对路径,也可以用相对路径。然后使用stream copy或重编码:

代码: 全选

ffmpeg -f concat -safe 0 -i mylist.txt -c copy output


demuxer在“流”层面工作,与之不同的 是protocol在文件层面工作,因此只有特定格式的文件能连接(像mpg或mpeg transport stream文件,也可能有其他的),类似于UNIX类系统里的cat和windows系统里的copy。

代码: 全选

ffmpeg -i "concat:input1.mpg|input2.mpg|input3.mpg" -c copy output.mpg

如果不是mpg格式的文件呢?可以先用ffmpeg转成mpeg transport stream,再连接。举个例子,h264视频和aac音频的mp4:

代码: 全选

ffmpeg -i input1.mp4 -c copy -bsf:v h264_mp4toannexb -f mpegts intermediate1.ts
ffmpeg -i input2.mp4 -c copy -bsf:v h264_mp4toannexb -f mpegts intermediate2.ts
ffmpeg -i "concat:intermediate1.ts|intermediate2.ts" -c copy -bsf:a aac_adtstoasc output.mp4

这种方法会产生不少临时文件,如果你会用named pipe,原帖有方法可以一行解决。
所有mpeg编码的格式(H.264, MPEG4/divx/xvid, MPEG2; MP2, MP3, AAC)都可以转成mpeg transport stream,不过有时需要加一些额外的命令(具体的-bsf命令)。

连接不同编码的多媒体文件
concat滤镜
最近新版本的ffmpeg里有concat滤镜。更多信息参考concat滤镜文档。
使用方法用例子说明

代码: 全选

ffmpeg -i input1.mp4 -i input2.webm \
-filter_complex '[0:0] [0:1] [1:0] [1:1] concat=n=2:v=1:a=1 [v] [a]' \
-map '[v]' -map '[a]' <encoding options> output.mkv

-filter_complex这行的 ‘[0:0] [0:1] [1:0] [1:1] 是告诉ffmpeg将哪些码流送到concat滤镜里。这里,代表输入文件0(例子中的input1.mp4)的0号流和1号流、输入文件1(栗子中的input2.webm)的0号流和1号流。

concat=n=2:v=1:a=1 [v] [a]’ 就是调用concat滤镜。n=2告诉滤镜有两个输入文件;v=1告诉滤镜有1个视频流,a=1告诉滤镜有1个音频流。 [v]和[a]定义输出流的名称,ffmpeg的其他部分就知道concat的输出了。
需要注意的是,整个滤镜需要用单引号包围。

代码: 全选

-map '[v]' -map '[a]'

告诉ffmpeg用concat滤镜的输出流,而不是用原来文件的流。
注意:此滤镜和重新封装(流复制stream copying)不兼容,不能用-c copy。另外,不知道这种方式支不支持软字幕。
这个例子还告诉我们,输入文件格式不同concat也是支持的。ffmpeg能够解码的任何格式都可以操作,但是分辨率和一些其他的属性需要匹配。

Merging video and audio, with audio re-encoding

See this example, taken from this blog entry but updated for newer syntax. It should be something to the effect of:

ffmpeg -i video.mp4 -i audio.wav \
-c:v copy -c:a aac -strict experimental output.mp4

Here, we assume that the video file does not contain any audio stream yet, and that you want to have the same output format (here, MP4) as the input format.

The above command transcodes the audio, since MP4s cannot carry PCM audio streams. You can use any other desired audio codec if you want. See the AAC Encoding Guide for more info.

If your audio or video stream is longer, you can add the -shortest option so that ffmpeg will stop encoding once one file ends.

Copying the audio without re-encoding

If your output container can handle (almost) any codec – like MKV – then you can simply copy both audio and video streams:

ffmpeg -i video.mp4 -i audio.wav -c copy output.mkv

Replacing audio stream

If your input video already contains audio, and you want to replace it, you need to tell ffmpeg which audio stream to take:

ffmpeg -i video.mp4 -i audio.wav \
-c:v copy -c:a aac -strict experimental \
-map 0:v:0 -map 1:a:0 output.mp4

The map option makes ffmpeg only use the first video stream from the first input and the first audio stream from the second input for the output file.


Concatenating media files

If you have media files with exactly the same codec and codec parameters you can concatenate them as described in “Concatenation of files with same codecs“. If you have media with different codecs you can concatenate them as described in “Concatenation of files with different codecs” below.

Concatenation of files with same codecs

There are two methods within ffmpeg that can be used to concatenate files of the same type: the concat ”demuxer” and the concat ”protocol”. The demuxer is more flexible – it requires the same codecs, but different container formats can be used; and it can be used with any container formats, while the protocol only works with a select few containers. However, the concat protocol is available in older versions of ffmpeg, where the demuxer isn’t. The demuxer also requires that the inputs have a consistent bitrate setting, the concat protocol is more flexible in this regard.

Concat demuxer

The concat demuxer was added to FFmpeg 1.1. You can read about it in the documentation.

Instructions

Create a file mylist.txt with all the files you want to have concatenated in the following form (lines starting with a # are ignored):

# this is a comment
file '/path/to/file1'
file '/path/to/file2'
file '/path/to/file3'

Note that these can be either relative or absolute paths. Then you can stream copy or re-encode your files:

ffmpeg -f concat -safe 0 -i mylist.txt -c copy output

The -safe 0 above is not required if the paths are relative.

It is possible to generate this list file with a bash for loop, or using printf. Either of the following would generate a list file containing every *.wav in the working directory:

# with a bash for loop
for f in ./*.wav; do echo "file '$f'" >> mylist.txt; done
# or with printf
printf "file '%s'\n" ./*.wav > mylist.txt

On Windows Command-line:

(for %i in (*.wav) do @echo file '%i') > mylist.txt

If your shell supports process substitution (like Bash and Zsh), you can avoid explicitly creating a list file and do the whole thing in a single line. This would be impossible with the concat protocol (see below). Make sure to generate absolute paths here, since ffmpeg will resolve paths relative to the list file your shell may create in a directory such as “/proc/self/fd/”.

ffmpeg -f concat -safe 0 -i <(for f in ./*.wav; do echo "file '$PWD/$f'"; done) -c copy output.wav
ffmpeg -f concat -safe 0 -i <(printf "file '$PWD/%s'\n" ./*.wav) -c copy output.wav
ffmpeg -f concat -safe 0 -i <(find . -name '*.wav' -printf "file '$PWD/%p'\n") -c copy output.wav

You can also loop a video. This example will loop input.mkv 10 times:

for i in {1..10}; do printf "file '%s'\n" input.mkv >> mylist.txt; done
ffmpeg -f concat -i mylist.txt -c copy output.mkv

Concatenation becomes troublesome, if next clip for concatenation does not exist at the moment, because decoding won’t start until the whole list is read. However, it is possible to refer another list at the end of the current list:

#!/bin/bash

fn_concat_init() {
    echo "fn_concat_init"
    concat_pls=`mktemp -u -p . concat.XXXXXXXXXX.txt`
    concat_pls="${concat_pls#./}"
    echo "concat_pls=${concat_pls:?}"
    mkfifo "${concat_pls:?}"
    echo
}

fn_concat_feed() {
    echo "fn_concat_feed ${1:?}"
    {
        >&2 echo "removing ${concat_pls:?}"
        rm "${concat_pls:?}"
        concat_pls=
        >&2 fn_concat_init
        echo 'ffconcat version 1.0'
        echo "file '${1:?}'"
        echo "file '${concat_pls:?}'"
    } >"${concat_pls:?}"
    echo
}

fn_concat_end() {
    echo "fn_concat_end"
    {
        >&2 echo "removing ${concat_pls:?}"
        rm "${concat_pls:?}"
        # not writing header.
    } >"${concat_pls:?}"
    echo
}

fn_concat_init

echo "launching ffmpeg ... all.mkv"
timeout 60s ffmpeg -y -re -loglevel warning -i "${concat_pls:?}" -pix_fmt yuv422p all.mkv &

ffplaypid=$!


echo "generating some test data..."
i=0; for c in red yellow green blue; do
    ffmpeg -loglevel warning -y -f lavfi -i testsrc=s=720x576:r=12:d=4 -pix_fmt yuv422p -vf "drawbox=w=50:h=w:t=w:c=${c:?}" test$i.mkv
    fn_concat_feed test$i.mkv
    ((i++));
    echo
done
echo "done"

fn_concat_end

wait "${ffplaypid:?}"

echo "done encoding all.mkv"

Concat protocol

While the demuxer works at the stream level, the concat protocol works at the file level. Certain files (mpg and mpeg transport streams, possibly others) can be concatenated. This is analogous to using cat on UNIX-like systems or copy on Windows.

Instructions

ffmpeg -i "concat:input1.mpg|input2.mpg|input3.mpg" -c copy output.mpg

If you have MP4 files, these could be losslessly concatenated by first transcoding them to mpeg transport streams. With h.264 video and AAC audio, the following can be used:

ffmpeg -i input1.mp4 -c copy -bsf:v h264_mp4toannexb -f mpegts intermediate1.ts
ffmpeg -i input2.mp4 -c copy -bsf:v h264_mp4toannexb -f mpegts intermediate2.ts
ffmpeg -i "concat:intermediate1.ts|intermediate2.ts" -c copy -bsf:a aac_adtstoasc output.mp4

If you’re using a system that supports named pipes, you can use those to avoid creating intermediate files – this sends stderr (which ffmpeg sends all the written data to) to /dev/null, to avoid cluttering up the command-line:

mkfifo temp1 temp2
ffmpeg -i input1.mp4 -c copy -bsf:v h264_mp4toannexb -f mpegts temp1 2> /dev/null & \
ffmpeg -i input2.mp4 -c copy -bsf:v h264_mp4toannexb -f mpegts temp2 2> /dev/null & \
ffmpeg -f mpegts -i "concat:temp1|temp2" -c copy -bsf:a aac_adtstoasc output.mp4

All MPEG codecs (H.264, MPEG4/divx/xvid, MPEG2; MP2, MP3, AAC) are supported in the mpegts container format, though the commands above would require some alteration (the -bsf bitstream filters will have to be changed).

Concatenation of files with different codecs

Concat filter

The concat filter is available in recent versions of ffmpeg. See the concat filter documentation for more info.

Instructions

This is easiest to explain using an example:

ffmpeg -i input1.mp4 -i input2.webm \
-filter_complex "[0:v:0] [0:a:0] [1:v:0] [1:a:0] concat=n=2:v=1:a=1 [v] [a]" \
-map "[v]" -map "[a]" <encoding options> output.mkv

On the -filter_complex line, the following:

[0:v:0] [0:a:0] [1:v:0] [1:a:0]

tells ffmpeg what streams to send to the concat filter; in this case, video stream 0 [0:v:0] and audio stream 0 [0:a:0] from input 0 (input1.mp4 in this example), and video stream 0 [1:v:0] and audio stream 0 [1:v:0] from input 1 (input2.webm).

concat=n=2:v=1:a=1 [v] [a]'

This is the concat filter itself. n=2 is telling the filter that there are two input files; v=1 is telling it that there will be one video stream; a=1 is telling it that there will be one audio stream. [v] and [a] are names for the output streams to allow the rest of the ffmpeg line to use the output of the concat filter.

Note that the single quotes around the whole filter section are required.

-map '[v]' -map '[a]'

This tells ffmpeg to use the results of the concat filter rather than the streams directly from the input files.

Note that filters are incompatible with stream copying; you can’t use -c copy with this method. Also, I’m not sure whether softsubs are supported.

As you can infer from this example, multiple types of input are supported, and anything readable by ffmpeg should work. The inputs have to be of the same frame size, and a handful of other attributes have to match.

Using an external script

With any vaguely-modern version of ffmpeg, the following script is made redundant by the advent the concat filter, which achieves the same result in a way that works across platforms. It is a clever workaround of ffmpeg’s then-limitations, but most people (i.e. anyone not stuck using an ancient version of ffmpeg for whatever reason) should probably use one of the methods listed above.

The following script can be used to concatenate multiple input media files (containing audio/video streams) into one output file (just like as if all the inputs were played in a playlist, one after another). It is based on this FAQ item: How can I join video files, which also contains other useful information.

If you find any bugs, feel free to correct the script, add yourself to the list of contributors and change the version string to reflect your change(s) or email the author with your patch, whatever you find more convenient.

Instructions

Save the script in a file named mmcat (or some other name), make it executable (chmod +x mmcat) and run it, using the syntax:

./mmcat <input1> <input2> <input3> ... <output>

If you get an error like this:

#/tmp/mcs_v_all: Operation not permitted

that could mean that you don’t have correct permissions set on /tmp directory (or whatever you set in TMP variable) or that decoding of your input media has failed for some reason. In this case it would be the best to turn on the logging (as described in the script’s comments)

Script

#!/bin/bash

################################################################################
#
# Script name: MultiMedia Concat Script (mmcat)
# Author: burek ([email protected])
# License: GNU/GPL, see http://www.gnu.org/copyleft/gpl.html
# Date: 2012-07-14
#
# This script concatenates (joins, merges) several audio/video inputs into one
# final output (just like as if all the inputs were played in a playlist, one
# after another).
#
# All input files must have at least one audio and at least one video stream.
# If not, you can easily add audio silence, using FFmpeg. Just search the
# internet for "ffmpeg add silence".
#
# The script makes use of FFmpeg tool (www.ffmpeg.org) and is free for use under
# the GPL license. The inspiration for this script came from this FAQ item:
# http://ffmpeg.org/faq.html#How-can-I-join-video-files_003f
#
# If you find any bugs, please send me an e-mail so I can fix it.
#
################################################################################
#
# General syntax: mmcat <input1> <input2> <input3> ... <output>
#
# For example: mmcat file1.flv file2.flv output.flv
# would create "output.flv" out of "file1.flv" and "file2.flv".
#
################################################################################

# change this to what you need !!!
EXTRA_OPTIONS='-vcodec libx264 -crf 23 -preset medium -acodec aac -strict experimental -ac 2 -ar 44100 -ab 128k'

################################################################################
#
# NO NEED TO TOUCH ANYTHING AFTER THIS LINE!
#
################################################################################

# the version of the script
VERSION=1.3

# location of temp folder
TMP=/tmp

################################################################################

echo "MultiMedia Concat Script v$VERSION (mmcat) - A script to concatenate multiple multimedia files."
echo "Based on FFmpeg - www.ffmpeg.org"
echo "Don't forget to edit this script and change EXTRA_OPTIONS"
echo ""

################################################################################
# syntax check (has to have at least 3 params: infile1, infile2, outfile
################################################################################
if [ -z $3 ]; then
	echo "Syntax: $0 <input1> <input2> <input3> ... <output>"
	exit 1
fi

################################################################################
# get all the command line parameters, except for the last one, which is output
################################################################################
# $first  - first parameter
# $last   - last parameter (output file)
# $inputs - all the inputs, except the first input, because 1st input is
#           handled separately
################################################################################
first=${@:1:1}
last=${@:$#:1}
len=$(($#-2))
inputs=${@:2:$len}

# remove all previous tmp fifos (if exist)
rm -f $TMP/mcs_*

################################################################################
# decode first input differently, because the video header does not have to be
# kept for each video input, only the header from the first video is needed
################################################################################
mkfifo $TMP/mcs_a1 $TMP/mcs_v1

ffmpeg -y -i $first -vn -f u16le -acodec pcm_s16le -ac 2 -ar 44100 $TMP/mcs_a1 2>/dev/null </dev/null &
ffmpeg -y -i $first -an -f yuv4mpegpipe -vcodec rawvideo $TMP/mcs_v1 2>/dev/null </dev/null &

# if you need to log the output of decoding processes (usually not necessary)
# then replace the "2>/dev/null" in 2 lines above with your log file names, like this:
#ffmpeg -y -i $first -vn -f u16le -acodec pcm_s16le -ac 2 -ar 44100 $TMP/mcs_a1 2>$TMP/log.a.1 </dev/null &
#ffmpeg -y -i $first -an -f yuv4mpegpipe -vcodec rawvideo $TMP/mcs_v1 2>$TMP/log.v.1 </dev/null &

################################################################################
# decode all the other inputs, remove first line of video (header) with tail
# $all_a and $all_v are lists of all a/v fifos, to be used by "cat" later on
################################################################################
all_a=$TMP/mcs_a1
all_v=$TMP/mcs_v1
i=2
for f in $inputs
do
	mkfifo $TMP/mcs_a$i $TMP/mcs_v$i

	ffmpeg -y -i $f -vn -f u16le -acodec pcm_s16le -ac 2 -ar 44100 $TMP/mcs_a$i 2>/dev/null </dev/null &
	{ ffmpeg -y -i $f -an -f yuv4mpegpipe -vcodec rawvideo - 2>/dev/null </dev/null | tail -n +2 > $TMP/mcs_v$i ; } &

	# if you need to log the output of decoding processes (usually not necessary)
	# then replace the "2>/dev/null" in 2 lines above with your log file names, like this:
	#ffmpeg -y -i $f -vn -f u16le -acodec pcm_s16le -ac 2 -ar 44100 $TMP/mcs_a$i 2>$TMP/log.a.$i </dev/null &
	#{ ffmpeg -y -i $f -an -f yuv4mpegpipe -vcodec rawvideo - 2>$TMP/log.v.$i </dev/null | tail -n +2 > $TMP/mcs_v$i ; } &

	all_a="$all_a $TMP/mcs_a$i"
	all_v="$all_v $TMP/mcs_v$i"
	let i++
done

################################################################################
# concatenate all raw audio/video inputs into one audio/video
################################################################################
mkfifo $TMP/mcs_a_all
mkfifo $TMP/mcs_v_all
cat $all_a > $TMP/mcs_a_all &
cat $all_v > $TMP/mcs_v_all &

################################################################################
# finally, encode the raw concatenated audio/video into something useful
################################################################################
ffmpeg -f u16le -acodec pcm_s16le -ac 2 -ar 44100 -i $TMP/mcs_a_all \
       -f yuv4mpegpipe -vcodec rawvideo -i $TMP/mcs_v_all \
	$EXTRA_OPTIONS \
	$last

################################################################################
# remove all fifos
################################################################################
rm -f $TMP/mcs_*

The script above can be modified to use the ‘-f avi’ insted of ‘-f yuv4mpegpipe’. Benefits:

  • unlike yuv4mpegpipe, just one pipe for both video and audio
  • unlike yuv4mpegpipe, matroska and flv, no need to skip header in second file using tail, because avi demuxer will skip it automatically
  • unlike mpegts, avi supports rawvideo and pcm

Pipe-friendly formats

Pipe friendly formats