Windows系统镜像


ref:

https://www.cnblogs.com/damairener/p/9279025.html

https://luckyfuy.top/2019/08/27/Windows/


MS-DOS 6.22 (Simplified Chinese) 

文件名:SC_MSDOS622sc.exe
SHA1:DD3C5CAD0FF837C38D5EB14B0D59E9A670792DCC
文件大小:9.56MB

ed2k://|file|SC_MSDOS622sc.exe|10020288|0B2B0878B8BBD2233D23022EE5339637|/


Windows 3.1 (Simplified Chinese)

文件名:SC_Windows31.exe
SHA1:65BC761CEFFD6280DA3F7677D6F3DDA2BAEC1E19
文件大小:8.08MB

ed2k://|file|SC_Windows31.exe|8472384|84037137FFF3932707F286EC852F2ABC|/

Windows 3.11 (English)

文件名:EN_WIN311.exe
SHA1:E6CE405E2CBBEB187AD5E6DE532078A7D669F12D
文件大小:5.47MB

ed2k://|file|EN_WIN311.exe|5732376|B52E23B9929BEB81D24E365C4048A958|/

Windows 3.2.12 (Simplified Chinese)

文件名:SC_Windows32_12.exe
SHA1:1D91AC9EB3CBC1F9C409CF891415BB71E8F594F7
文件大小:12.24MB

ed2k://|file|SC_Windows32_12.exe|12832984|A76EB68E35CD62F8B40ECD3E6F5E213F|/

Windows 3.2.144 (Simplified Chinese)

文件名:SC_Windows32_144.exe
SHA1:363C2A9B8CAA2CC6798DAA80CC9217EF237FDD10
文件大小:12.24MB

ed2k://|file|SC_Windows32_144.exe|12835440|782F5AF8A1405D518C181F057FCC4287|/


Windows 98 Second Edition (Simplified Chinese) 

文件名:SC_WIN98SE.exe
SHA1:9014AC7B67FC7697DEA597846F980DB9B3C43CD4
文件大小:265.64MB

ed2k://|file|SC_WIN98SE.exe|278540368|939909E688963174901F822123E55F7E|/


Windows Millennium Edition (Simplified Chinese) 

文件名:SC_WINME.exe
SHA1:2CED2F517DA3F56C8E55737C9C3F627A71CCBFB8
文件大小:166.03MB

ed2k://|file|SC_WINME.exe|174098008|EEBAABADCD0162DA9F66F68E91B1B92A|/


Windows NT Server 4.0 (Simplified Chinese) 

文件名:sc_winnt_4.0_svr.iso
SHA1:BAA6612A833BC364077048497A95B8456CD9CC81
文件大小:645.21MB

ed2k://|file|sc_winnt_4.0_svr.iso|676548608|3BCB905EB3A6ED9AB685B5701BF94A29|/


Windows 2000 Professional with SP4 – SEL (Simplified Chinese) 

文件名:ZRMPSEL_CN.iso
SHA1:82EB2EB7F145EBD0A23BC7E2767788BA88B91E69
文件大小:384.04MB

ed2k://|file|ZRMPSEL_CN.iso|402690048|00D1BDA0F057EDB8DA0B29CF5E188788|/


Windows Server 2003 Service Pack 2 (x86) – CD (Chinese-Simplified) 

文件名:cn_windows_server_2003_sp2_x86_cd.iso
SHA1:64572B06732AAB408FBC561C685450EF34390C9E
文件大小:372.06MB

ed2k://|file|cn_windows_server_2003_sp2_x86_cd.iso|390135808|4C38E53EF100F80683810CAC1044CA70|/


Windows XP Home Edition (Simplified Chinese) ISO CD Image

文件名:CN_WINXP_HOME_ISO.im

SHA1:BACE4A06BDB82C3B0EDE14730CE031CF53BA8B95

文件大小:489.73MB

ed2k://|file|CN_WINXP_HOME_ISO.img|513515520|58373CA20ABB0438AF5858AEBF22E983|/

Windows XP Home Edition with Service Pack 2 (Simplified Chinese)

文件名:sc_winxp_home_with_sp2.iso
SHA1:F31B766CDBBB84826C09216A4B8CC7DFB1428493
文件大小:583.04MB

ed2k://|file|sc_winxp_home_with_sp2.iso|611358720|B80F4CCF312420015FFD5740057085B0|/

Windows XP Home with Service Pack 3 (x86) – CD (Chinese-Simplified)

文件名:zh-hans_windows_xp_home_with_service_pack_3_x86_cd_x14-92408.iso
SHA1:F15EF466B1D87B1FFDADC246B8CE82287BD15ED5
文件大小:583.45MB

ed2k://|file|zh-hans_windows_xp_home_with_service_pack_3_x86_cd_x14-92408.iso|611794944|81DC0766DFB4082E18F1985D535C14D6|/

Windows XP Professional (Simplified Chinese)

文件名:CN_WINXP_PRO_ISO.img
SHA1:73800FE8959F40361BAE3A6553CC66D27D78722E
文件大小:505.63MB

ed2k://|file|CN_WINXP_PRO_ISO.img|530186240|7855069CE4216615D761654E2B75A4F7|/

Windows XP Professional with Service Pack 2 (Simplified Chinese)

文件名:sc_winxp_pro_with_sp2.iso
SHA1:92934976213BB9201057281A200F84127BE0050D
文件大小:600.08MB

ed2k://|file|sc_winxp_pro_with_sp2.iso|629227520|505B810E128351482AF8B83AC4D04FD2|/

Windows XP Professional with Service Pack 2- VL (Simplified Chinese)

文件名:sc_win_xp_pro_with_sp2_vl.iso
SHA1:C0ADDD927B5D1F93DCE9C455FD6B26EAC7391BE9
文件大小:592.56MB

ed2k://|file|sc_win_xp_pro_with_sp2_vl.iso|621346816|6F27DB53806D79FE37A0EDEC04AA9B05|/

Windows XP Professional with Service Pack 3 (x86) – CD (Chinese-Simplified)

文件名:zh-hans_windows_xp_professional_with_service_pack_3_x86_cd_x14-80404.iso
SHA1:69DBF131116760932DCF132ADE111D6B45778098
文件大小:601.04MB


ed2k://|file|zh-hans_windows_xp_professional_with_service_pack_3_x86_cd_x14-80404.iso|630239232|CD0900AFA058ACB6345761969CBCBFF4|/

Windows XP Professional with Service Pack 3 (x86) – CD VL (Chinese-Simplified)

文件名:zh-hans_windows_xp_professional_with_service_pack_3_x86_cd_vl_x14-74070.iso
SHA1:D142469D0C3953D8E4A6A490A58052EF52837F0F
文件大小:601.04MB


ed2k://|file|zh-hans_windows_xp_professional_with_service_pack_3_x86_cd_vl_x14-74070.iso|630237184|EC51916C9D9B8B931195EE0D6EE9B40E|/

Windows XP Service Pack 1a (Simplified Chinese)

文件名:sc_winxp_sp1.iso
SHA1:E8127BA8975CAA34384E4D573F73B2EFD20CD572
文件大小:298.49MB


ed2k://|file|sc_winxp_sp1.iso|312993792|2711C1C07563C6F4782271ECA771FC90|/

Windows XP Service Pack 3 (x86) – CD (Chinese-Simplified)

文件名:zh-hans_windows_xp_service_pack_3_x86_cd_x14-60563.iso
SHA1:5566D7949E45C453964708831E16BCD73547F73B
文件大小:398.33MB


ed2k://|file|zh-hans_windows_xp_service_pack_3_x86_cd_x14-60563.iso|417675264|2AAB7F0CD4BE378D9113557B1D24D8D0|/


Windows Vista (x64) – DVD (Simplified Chinese) 

文件名:cn_windows_vista_x64_dvd_X12-63216.iso
SHA1:4B7ED66850BB34C818EB282DCFB60C622B411C10
文件大小:3.29GB
发布时间:2006-11-30

ed2k://|file|cn_windows_vista_x64_dvd_X12-63216.iso|3536730112|73EF8E235F3AD1A359546C89EDE7E4FC|/

Windows Vista (x86) – DVD (Simplified Chinese) 

文件名:cn_windows_vista_x86_dvd_X12-59648.iso
SHA1:4AC79C50B11BCB2F4FA6A5660084ED748BCA7254
文件大小:2.43GB
发布时间:2006-11-30

ed2k://|file|cn_windows_vista_x86_dvd_X12-59648.iso|2613229568|DBC16B06681EE44AA2DA0A8F95192C8F|/

Windows Vista Enterprise with Service Pack 1 (x64) – DVD (Chinese-Simplified) 

文件名:zh-hans_windows_vista_enterprise_with_service_pack_1_x64_dvd_x14-55848.iso
SHA1:CFE6ADA55C88F8A6552174C02618D5CE12F8C033
文件大小:2.77GB
发布时间:2008-04-14

ed2k://|file|zh-hans_windows_vista_enterprise_with_service_pack_1_x64_dvd_x14-55848.iso|2969976832|B4F450ED55F14D48EBA1A76129903A9A|/

Windows Vista Enterprise with Service Pack 1 (x86) – DVD (Chinese-Simplified) 

文件名:zh-hans_windows_vista_enterprise_with_service_pack_1_x86_dvd_x14-55727.iso
SHA1:3AD7F4B7ECFEB905FD779142EA7500C8394DB5CB
文件大小:2.1GB
发布时间:2008-04-14

ed2k://|file|zh-hans_windows_vista_enterprise_with_service_pack_1_x86_dvd_x14-55727.iso|2255577088|C7EB8C68B6D9D72988DE7F57670B2EC1|/

Windows Vista Enterprise with Service Pack 2 (x64) – DVD (Chinese-Simplified) 

文件名:cn_windows_vista_enterprise_with_sp2_x64_dvd_x15-40402.iso
SHA1:46E06E24D549FA42A2392C8553470BF9845C9C06
文件大小:2.89GB
发布时间:2009-06-16

ed2k://|file|cn_windows_vista_enterprise_with_sp2_x64_dvd_x15-40402.iso|3104415744|D0CF708192BF9596CC603DF53ABDB76D|/

Windows Vista Enterprise with Service Pack 2 (x86) – DVD (Chinese-Simplified) 

文件名:cn_windows_vista_enterprise_with_sp2_x86_dvd_x15-40257.iso
SHA1:15472EBF0509ED56F46F6F5848D869C320C0B8D5
文件大小:2.19GB
发布时间:2009-06-16

ed2k://|file|cn_windows_vista_enterprise_with_sp2_x86_dvd_x15-40257.iso|2348410880|A567A6C970038233C0B2B7F130ADEF23|/

Windows Vista with Service Pack 1 (x64) – DVD (Chinese-Simplified) 

文件名:zh-hans_windows_vista_with_service_pack_1_x64_dvd_x14-30733.iso
SHA1:65A9AB26AD5A82E5C2F52E0EA976F033E386EBE2
文件大小:3.66GB
发布时间:2008-04-14

ed2k://|file|zh-hans_windows_vista_with_service_pack_1_x64_dvd_x14-30733.iso|3926849536|67C15BF7CCF3130B31F49223D3F485FD|/

Windows Vista with Service Pack 1 (x86) – DVD (Chinese-Simplified) 

文件名:zh-hans_windows_vista_with_service_pack_1_x86_dvd_x14-30732.iso
SHA1:E2898C28A31D38D064C999CE5C92156C6A4DAE05
文件大小:2.75GB
发布时间:2008-04-14

ed2k://|file|zh-hans_windows_vista_with_service_pack_1_x86_dvd_x14-30732.iso|2948851712|78927112D52EA2B1D4357583F041A20E|/

Windows Vista with Service Pack 2 (x64) – DVD (Chinese-Simplified) 

文件名:cn_windows_vista_with_sp2_x64_dvd_x15-36322.iso
SHA1:A1689C254FB3BD67807EE493EE7D4896BCA39887
文件大小:3.56GB
发布时间:2009-06-16

ed2k://|file|cn_windows_vista_with_sp2_x64_dvd_x15-36322.iso|3817512960|3719CEC49ECC2D73FCF7AF152A42049A|/

Windows Vista with Service Pack 2 (x86) – DVD (Chinese-Simplified) 

文件名:cn_windows_vista_with_sp2_x86_dvd_x15-36285.iso
SHA1:DA7F7BDC841DDFFABFF7DDAB6B1158873BF1246D
文件大小:2.87GB
发布时间:2009-06-16

ed2k://|file|cn_windows_vista_with_sp2_x86_dvd_x15-36285.iso|3078893568|F50709974F03C63BB41B5CA0D406160D|/


Windows 11

Windows 11系统仅支持64位。
批量授权版(Business Editions)含教育版(Education)、企业版(Enterprise)、专业版(Professional)、专业教育版(Professional Education)、专业工作站版(Professional Workstations);
零售版(Consumer Editions)含家庭版(Home)、专业版(Professional)、教育版(Education)、专业教育版(Professional Education)、专业工作站版(Professional Workstations)。

  • Windows 11 22H2 Updated June 2023 批量授权版
    • 文件名:
      zh-cn_windows_11_business_editions_version_22h2_updated_june_2023_x64_dvd_8e846a1e.iso
    • MD5:7A68C203F1F9AEC3C744EFB580CBB966
    • SHA1:BE97A92C5DB3C276322C6510BD61175707B1CDF1
    • SHA256:16EA95E1818C91FDE6C5B8B0C8C34BEBC06FEE572DB2B3FC5090CADBD7FA7BE0
    • 文件大小:5.44GB
    • 发布时间:2023-06-20
    • 下载链接:
      • ed2k://|file|zh-cn_windows_11_business_editions_version_22h2_updated_june_2023_x64_dvd_8e846a1e.iso|5844441088|046754967F18A825E855C644D57E19D8|/
      • magnet:?xt=urn:btih:3a87bac211fd5cd49b81c33eca69919c4a5a74fd&dn=zh-cn_windows_11_business_editions_version_22h2_updated_june_2023_x64_dvd_8e846a1e.iso&xl=5844441088
  • Windows 11 22H2 Updated June 2023 零售版
    • 文件名:
      zh-cn_windows_11_consumer_editions_version_22h2_updated_june_2023_x64_dvd_b8d8228f.iso
    • MD5:3C129ABBA83DABB29A567883271BFEF4
    • SHA1:B71B084B3216A40C271B738C41A59B8E5BD7ED59
    • SHA256:2A57EA78F022297C2D0AC2F36BD8ED8C4138380FCBB2CF8374F871E789C1AFE4
    • 文件大小:5.54GB
    • 发布时间:2023-06-20
    • 下载链接:
      • ed2k://|file|zh-cn_windows_11_consumer_editions_version_22h2_updated_june_2023_x64_dvd_b8d8228f.iso|5945438208|70AA7C5196F057F23E05820BC0DF3FDE|/
      • magnet:?xt=urn:btih:63eafbe29ccf076d06ed96b8c777e525cb1cf93c&dn=zh-cn_windows_11_consumer_editions_version_22h2_updated_june_2023_x64_dvd_b8d8228f.iso&xl=5945438208

Windows 10

批量授权版(Business Editions)含教育版(Education)、企业版(Enterprise)、专业版(Professional)、专业教育版(Professional Education)、专业工作站版(Professional Workstations);
零售版(Consumer Editions)含家庭版(Home)、专业版(Professional)、教育版(Education)、专业教育版(Professional Education)、专业工作站版(Professional Workstations)。
企业版LTSC(Long Time Service Channel,长期服务通道),与企业版类似,但不能接受功能性更新以及无法使用某些功能。

  • Windows 10 22H2 Updated June 2023 批量授权版 64位
    • 文件名:
      zh-cn_windows_10_business_editions_version_22h2_updated_june_2023_x64_dvd_e1795b9e.iso
    • MD5:9EFB23DC3F85C1E0E9A13FE6FA6709F7
    • SHA1:2832E11F8D31C7678F4AB9CEA9777F6D6769B595
    • SHA256:4A4DD5847765920BB503FA7FFAABD45A79ACC2C8AAFA4347DEE633BFA65835B9
    • 文件大小:5.58GB
    • 发布时间:2023-06-20
    • 下载链接:
      • ed2k://|file|zh-cn_windows_10_business_editions_version_22h2_updated_june_2023_x64_dvd_e1795b9e.iso|5992957952|86DCCEF3A18B8C8B6F3588F6D4CBEFC8|/
      • magnet:?xt=urn:btih:9337ebb8755b7753a38c286c9ab5072d64cff7ae&dn=zh-cn_windows_10_business_editions_version_22h2_updated_june_2023_x64_dvd_e1795b9e.iso&xl=5992957952
  • Windows 10 22H2 Updated June 2023 零售版 64位
    • 文件名:
      zh-cn_windows_10_consumer_editions_version_22h2_updated_june_2023_x64_dvd_4ed7dac5.iso
    • MD5:E7F959BBA9139AAD1438CC89E11C1841
    • SHA1:753DD1E72B7ACC1608582D067E11F89BE82A6631
    • SHA256:CDC355AC70BD13445E82CE0C5EFFB75F627DCDBD6C3C596C185C1DA8DD08A53E
    • 文件大小:5.7GB
    • 发布时间:2023-06-20
    • 下载链接:
      • ed2k://|file|zh-cn_windows_10_consumer_editions_version_22h2_updated_june_2023_x64_dvd_4ed7dac5.iso|6119788544|B88D92E5F6C0DD70C4A7D37D70C1D4D0|/
      • magnet:?xt=urn:btih:c12026fe5fe5eca8b7f22a44e6b62361cb46d64c&dn=zh-cn_windows_10_consumer_editions_version_22h2_updated_june_2023_x64_dvd_4ed7dac5.iso&xl=6119788544
  • Windows 10 企业版 LTSC 2021 64位
    • 文件名:
      SW_DVD9_WIN_ENT_LTSC_2021_64BIT_ChnSimp_MLF_X22-84402.ISO
    • MD5:2579B3865C0591EAD3A2B45AF3CABEEE
    • SHA1:C19D7DAFBAFEB26C36E31D97C465E87C7A6E8A4C
    • SHA256:C117C5DDBC51F315C739F9321D4907FA50090BA7B48E7E9A2D173D49EF2F73A3
    • 文件大小:4.7GB
    • 发布时间:2021-11-17
    • 下载链接:
      • ed2k://|file|SW_DVD9_WIN_ENT_LTSC_2021_64BIT_ChnSimp_MLF_X22-84402.ISO|5044211712|1555B7DCA052B5958EE68DB58A42408D|/
      • magnet:?xt=urn:btih:366ADAA52FB3639B17D73718DD5F9E3EE9477B40&dn=SW_DVD9_WIN_ENT_LTSC_2021_64BIT_ChnSimp_MLF_X22-84402.ISO&xl=5044211712
  • Windows 10 企业版 LTSC 2021 32位
    • 文件名:
      SW_DVD9_WIN_ENT_LTSC_2021_32BIT_ChnSimp_MLF_X22-84401.ISO
    • MD5:A4F6F8F67D9A59AD462FF51506C5CD3A
    • SHA1:50ED6860535FDDF9D0418EFD99EF7F40DAA696F5
    • SHA256:9F855FCC4CB44C119F9CE73DABE569FCB7F4F4D85F922206BF2E108116A34F25
    • 文件大小:3.37GB
    • 发布时间:2021-11-17
    • 下载链接:
      • ed2k://|file|SW_DVD9_WIN_ENT_LTSC_2021_32BIT_ChnSimp_MLF_X22-84401.ISO|3621132288|F67BB339ADFEFCF6ED22400EAACBD068|/
      • magnet:?xt=urn:btih:F8EC74BA352633CECF7A0D0AF1E98A7345C3C2FC&dn=SW_DVD9_WIN_ENT_LTSC_2021_32BIT_ChnSimp_MLF_X22-84401.ISO&xl=3621132288

Windows 8.1

  • Windows 8.1 Update 64位
    • 文件名:
      cn_windows_8.1_with_update_x64_dvd_6051473.iso
    • SHA1:9A85EAC2D20446E3E086BF57A7DFC8832FB3BA56
    • 文件大小:4.2GB
    • 发布时间:2014-12-15
    • 下载链接:
      ed2k://|file|cn_windows_8.1_with_update_x64_dvd_6051473.iso|4504475648|D66BEF759548656EDA981D902A957545|/
  • Windows 8.1 Update 32位
    • 文件名:
      cn_windows_8.1_with_update_x86_dvd_6051523.iso
    • SHA1:ABBF814846C425C88910B011BC9D3D3C77932056
    • 文件大小:3.12GB
    • 发布时间:2014-12-15
    • 下载链接:
      ed2k://|file|cn_windows_8.1_with_update_x86_dvd_6051523.iso|3349960704|C1B8A61BD8F1300825BF03C4D31B35A0|/

Windows 8

Windows 8系统镜像仅提供专业版(Pro)。
VL即VOL(Volume Licensing for Organizations,团体批量许可证),根据许可,企业或者政府需要大量购买时可以获得优惠,功能与零售版无区别,但不需要激活。

  • Windows 8 64位 VOL
    • 文件名:
      cn_windows_8_pro_vl_x64_dvd_917773.iso
    • SHA1:9C4EC9FC4FB561F841E22256BC9DEA6D9D6611FF
    • 文件大小:3.31GB
    • 发布时间:2012-08-15
    • 下载链接:
      ed2k://|file|cn_windows_8_pro_vl_x64_dvd_917773.iso|3558014976|7956620A80428F37D4F2989CB5CF3B5A|/
  • Windows 8 32位 VOL
    • 文件名:
      cn_windows_8_pro_vl_x86_dvd_917720.iso
    • SHA1:EEEF3C3F6F05115C7F7C9C1D19D6A6A6418B5059
    • 文件大小:2.42GB
    • 发布时间:2012-08-15
    • 下载链接:
      ed2k://|file|cn_windows_8_pro_vl_x86_dvd_917720.iso|2595137536|E87CEF7B8B4EFB12B0A7397795209301|/

Windows 7

Windows 7系统镜像仅提供旗舰版(Ultimate)。
Service Pack为升级包,建议安装。Windows 7最新Service Pack为Service Pack 1(SP1)。
7601.24214版本集成了IE11、.net Framework 4.7.2以及截至2018年11月的所有更新,仅提供英文版。

  • Windows 7 旗舰版 64位
    • 文件名:
      cn_windows_7_ultimate_x64_dvd_x15-66043.iso
    • SHA1:4A98A2F1ED794425674D04A37B70B9763522B0D4
    • 文件大小:3.11GB
    • 发布时间:2009-08-26
    • 下载链接:
      ed2k://|file|cn_windows_7_ultimate_x64_dvd_x15-66043.iso|3341268992|7DD7FA757CE6D2DB78B6901F81A6907A|/
  • Windows 7 旗舰版 32位
    • 文件名:
      cn_windows_7_ultimate_x86_dvd_x15-65907.iso
    • SHA1:B589336602E3B7E134E222ED47FC94938B04354F
    • 文件大小:2.43GB
    • 发布时间:2009-08-23
    • 下载链接:
      ed2k://|file|cn_windows_7_ultimate_x86_dvd_x15-65907.iso|2604238848|D6F139D7A45E81B76199DDCCDDC4B509|/
  • Windows 7 旗舰版 SP1 64位
    • 文件名:
      cn_windows_7_ultimate_with_sp1_x64_dvd_u_677408.iso
    • SHA1:2CE0B2DB34D76ED3F697CE148CB7594432405E23
    • 文件大小:3.19GB
    • 发布时间:2011-05-12
    • 下载链接:
      • ed2k://|file|cn_windows_7_ultimate_with_sp1_x64_dvd_u_677408.iso|3420557312|B58548681854236C7939003B583A8078|/
      • magnet:?xt=urn:btih:E86414F638E11104248108B155BE9408A8362509&dn=cn_windows_7_ultimate_with_sp1_x64_dvd_u_677408.iso&xl=3420557312
  • Windows 7 旗舰版 SP1 32位
    • 文件名:
      cn_windows_7_ultimate_with_sp1_x86_dvd_u_677486.iso
    • SHA1:B92119F5B732ECE1C0850EDA30134536E18CCCE7
    • 文件大小:2.47GB
    • 发布时间:2011-05-12
    • 下载链接:
      • ed2k://|file|cn_windows_7_ultimate_with_sp1_x86_dvd_u_677486.iso|2653276160|7503E4B9B8738DFCB95872445C72AEFB|/
      • magnet:?xt=urn:btih:585DF592DE43A067C75CFE5A639B41FC3F24DA6F&dn=cn_windows_7_ultimate_with_sp1_x86_dvd_u_677486.iso&xl=2653276160
  • Windows 7 旗舰版 SP1 7601.24214 64位
    • 文件名:
      7601.24214.180801-1700.win7sp1_ldr_escrow_CLIENT_ULTIMATE_x64FRE_en-us.iso
    • MD5:8CE237E3D43CCFB41BFE32CCD4420E10
    • SHA1:7CC76B0015220DE956328FB934D61B710A94293D
    • SHA256:DEC04CBD352B453E437B2FE9614B67F28F7C0B550D8351827BC1E9EF3F601389
    • 文件大小:5.47GB
    • 发布时间:2019-02-14
    • 下载链接:
      • ed2k://|file|7601.24214.180801-1700.win7sp1_ldr_escrow_CLIENT_ULTIMATE_x64FRE_en-us.iso|5876357120|9C55A020B327AD60CB8A37D0317743F2|/
      • magnet:?xt=urn:btih:0499F84DB242096F2185E38B696CD3D6C8D0E62C&dn=7601.24214.180801-1700.win7sp1_ldr_escrow_CLIENT_ULTIMATE_x64FRE_en-us.iso&xl=5876357120
  • Windows 7 旗舰版 SP1 7601.24214 32位
    • 文件名:
      7601.24214.180801-1700.win7sp1_ldr_escrow_CLIENT_ULTIMATE_x86FRE_en-us.iso
    • MD5:23EFFC7708412E1FF4C1B3A935C1400E
    • SHA1:6F8791FBB4E883FF96B7FFC202640B0A8053D122
    • SHA256:40F7CD2DFF1CE4E8AA815CCBF3EC1A7A49D2FF365BC73BCD738C3B365BFF9E4C
    • 文件大小:3.71GB
    • 发布时间:2019-02-14
    • 下载链接:
      • ed2k://|file|7601.24214.180801-1700.win7sp1_ldr_escrow_CLIENT_ULTIMATE_x86FRE_en-us.iso|3983136768|3AB2254FD70B094D68235D07B6007BAD|/
      • magnet:?xt=urn:btih:6E172F686E99342A6B7FD889730D7C3A592F3913&dn=7601.24214.180801-1700.win7sp1_ldr_escrow_CLIENT_ULTIMATE_x86FRE_en-us.iso&xl=3983136768

Windows Vista

Service Pack为升级包,建议安装。Windows Vista最新Service Pack为Service Pack 2(SP2)。

  • Windows Vista 64位
    • 文件名:
      cn_windows_vista_x64_dvd_X12-63216.iso
    • SHA1:4B7ED66850BB34C818EB282DCFB60C622B411C10
    • 文件大小:3.29GB
    • 发布时间:2006-11-30
    • 下载链接:
      ed2k://|file|cn_windows_vista_x64_dvd_X12-63216.iso|3536730112|73EF8E235F3AD1A359546C89EDE7E4FC|/
  • Windows Vista 32位
    • 文件名:
      cn_windows_vista_x86_dvd_X12-59648.iso
    • SHA1:4AC79C50B11BCB2F4FA6A5660084ED748BCA7254
    • 文件大小:2.43GB
    • 发布时间:2006-11-30
    • 下载链接:
      ed2k://|file|cn_windows_vista_x86_dvd_X12-59648.iso|2613229568|DBC16B06681EE44AA2DA0A8F95192C8F|/
  • Windows Vista SP2 64位
    • 文件名:
      cn_windows_vista_with_sp2_x64_dvd_x15-36322.iso
    • SHA1:A1689C254FB3BD67807EE493EE7D4896BCA39887
    • 文件大小:3.56GB
    • 发布时间:2009-06-16
    • 下载链接:
      ed2k://|file|cn_windows_vista_with_sp2_x64_dvd_x15-36322.iso|3817512960|3719CEC49ECC2D73FCF7AF152A42049A|/
  • Windows Vista SP2 32位
    • 文件名:
      cn_windows_vista_with_sp2_x86_dvd_x15-36285.iso
    • SHA1:DA7F7BDC841DDFFABFF7DDAB6B1158873BF1246D
    • 文件大小:2.87GB
    • 发布时间:2009-06-16
    • 下载链接:
      ed2k://|file|cn_windows_vista_with_sp2_x86_dvd_x15-36285.iso|3078893568|F50709974F03C63BB41B5CA0D406160D|/

Windows XP

Windows XP系统仅支持32位。
Windows XP系统镜像仅提供专业版(Professional)。
Service Pack为升级包,建议安装。Windows XP最新Service Pack为Service Pack 3(SP3)。
VL即VOL(Volume Licensing for Organizations,团体批量许可证),根据许可,企业或者政府需要大量购买时可以获得优惠,功能与零售版无区别,但不需要激活。

  • Windows XP 专业版
    • 文件名:
      CN_WINXP_PRO_ISO.img
    • SHA1:73800FE8959F40361BAE3A6553CC66D27D78722E
    • 文件大小:505.62MB
    • 发布时间:2001-10-30
    • 下载链接:
      ed2k://|file|CN_WINXP_PRO_ISO.img|530186240|7855069CE4216615D761654E2B75A4F7|/
  • Windows XP 专业版 SP3 VOL
    • 文件名:
      zh-hans_windows_xp_professional_with_service_pack_3_x86_cd_vl_x14-74070.iso
    • SHA1:D142469D0C3953D8E4A6A490A58052EF52837F0F
    • 文件大小:601.04MB
    • 发布时间:2008-05-02
    • 下载链接:
      ed2k://|file|zh-hans_windows_xp_professional_with_service_pack_3_x86_cd_vl_x14-74070.iso|630237184|EC51916C9D9B8B931195EE0D6EE9B40E|/
  • Windows XP 专业版 SP3
    • 文件名:
      zh-hans_windows_xp_professional_with_service_pack_3_x86_cd_x14-80404.iso
    • SHA1:69DBF131116760932DCF132ADE111D6B45778098
    • 文件大小:601.04MB
    • 发布时间:2008-05-01
    • 下载链接:
      ed2k://|file|zh-hans_windows_xp_professional_with_service_pack_3_x86_cd_x14-80404.iso|630239232|CD0900AFA058ACB6345761969CBCBFF4|/

Windows 2000

Windows 2000系统仅支持32位。
Windows 2000系统镜像仅提供专业版(Professional)。
Service Pack为升级包,建议安装。Windows 2000最新Service Pack为Service Pack 4(SP4)。

  • Windows 2000 专业版 SP4
    • 文件名:
      ZRMPSEL_CN.iso
    • SHA1:82EB2EB7F145EBD0A23BC7E2767788BA88B91E69
    • 文件大小:384.04MB
    • 发布时间:2003-07-09
    • 下载链接:
      ed2k://|file|ZRMPSEL_CN.iso|402690048|00D1BDA0F057EDB8DA0B29CF5E188788|/

Windows Me

  • Windows Me
    • 文件名:
      SC_WINME.exe
    • SHA1:2CED2F517DA3F56C8E55737C9C3F627A71CCBFB8
    • 文件大小:166.03MB
    • 发布时间:2000-08-08
    • 下载链接:
      ed2k://|file|SC_WINME.exe|174098008|EEBAABADCD0162DA9F66F68E91B1B92A|/

Windows 98

  • Windows 98 Second Edition
    • 文件名:
      SC_WIN98SE.exe
    • SHA1:9014AC7B67FC7697DEA597846F980DB9B3C43CD4
    • 文件大小:265.64MB
    • 发布时间:1999-11-04
    • 下载链接:
      ed2k://|file|SC_WIN98SE.exe|278540368|939909E688963174901F822123E55F7E|/

Windows 3.1x

  • Windows 3.2.144
    • 文件名:
      SC_Windows32_144.exe
    • SHA1:363C2A9B8CAA2CC6798DAA80CC9217EF237FDD10
    • 文件大小:12.24MB
    • 发布时间:2001-03-06
    • 下载链接:
      ed2k://|file|SC_Windows32_144.exe|12835440|782F5AF8A1405D518C181F057FCC4287|/

The official release of the well-known simulator KMS URL

Some well-known official release of KMS emulator URL:

Native self-activated KMS to activate the software installation class, easily killing the failure of the system upgrade, and can easily be tied backdoor virus software in the communication process is not recommended to try.

Loader Windows
https://forums.mydigitallife.net/threads/windows-loader-download.58464/

KMS_VL_ALL
https://forums.mydigitallife.net/threads/kms_vl_all-online-offline-kms-activator.63471/

KMSpico
HTTPS: //forums.mydigitallife.net/threads/kmspico-official-thread.65739/

vlmcsd and KMS-Py
https://forums.mydigitallife.net/threads/emulated-kms-servers-on-non-windows-platforms.50234 /

in the Microsoft Toolkit
https://forums.mydigitallife.net/threads/microsoft-toolkit-official-kms-solution-for-microsoft-products.28669/

virtualbox 6.1安装windows xp

系统安装

1.安装系统;

2.重启->F8进入安全模式;

3.安装virtualbox guest additions驱动

4.正常启动至系统。

4k设置

在虚拟机参数设置中

displayer TAB

Scal Fact设置为200%


解决杂音问题

将音频输出改为alsa


Fix: Microsoft Store Error Code 0x80072F7D in Windows 10

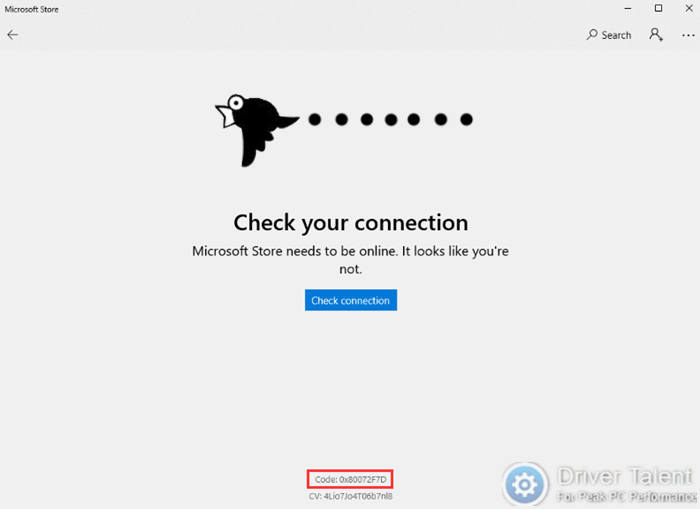
re you stopped by the error code 0x80072F7D when trying to access the Microsoft Store in Windows 10? Many users encountered this issue after they upgraded their OS to Windows 10. The error message is as follows: Check your connection. Microsoft Store needs to be online. It looks like you’re not.

fix-microsoft-store-error-code-0x80072f7d.png

If you are also troubled by this issue, don’t worry. There are ways to work it out. To fix the Microsoft Store error code 0x80072F7D in Windows 10, you can follow the feasible methods listed below.

Method 1. Run the Internet Connection Troubleshooter

Microsoft Store error code 0x80072F7D will occur when there’s something wrong with your Internet connection. To address the issue in this case, the first thing you can do is to run the Internet Connection troubleshooter. The steps are as follows.

Step 1. Type “troubleshoot” into the search bar, and click on Troubleshoot in the search results.

troubleshoot-fix-microsoft-store-error-code-0x80072f7d.png

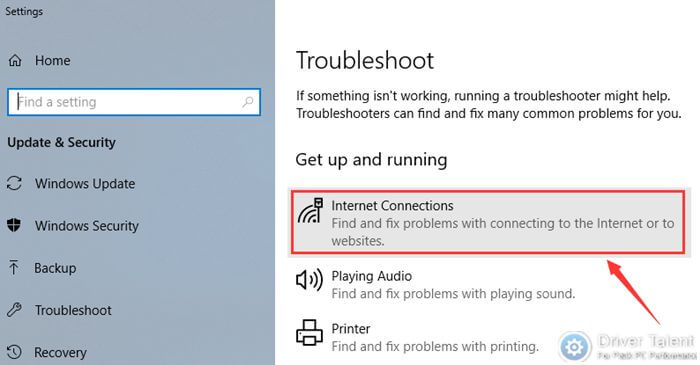
Step 2. Find Internet Connections and click on it.

internet-connections-fix-microsoft-store-error-code-0x80072f7d.jpg

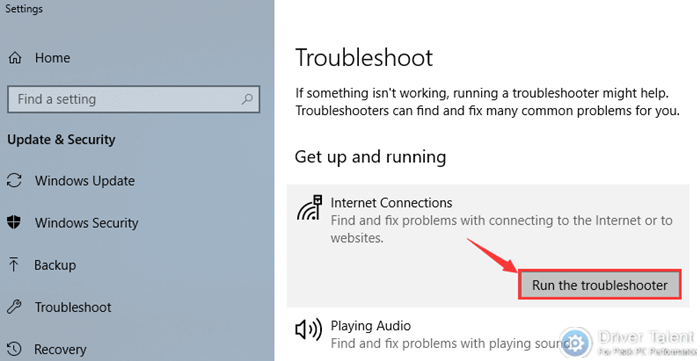
Step 3. Click on Run the troubleshooter.

run-troubleshooter-fix-microsoft-store-error-code-0x80072f7d.png

Step 4. Select Troubleshoot my connections to the Internet. Then the troubleshooter will find and fix the problems with connecting to the Internet or to websites.

troubleshoot-connections-fix-microsoft-store-error-code-0x80072f7d.png

Method 2. Run WSReset.exe to Reset the Microsoft Store

The second method you can try is to reset the Microsoft Store. The operation is also very simple. You just need to run WSReset.exe like this:

Step 1. Use the shortcut keys Windows + R to launch the Run dialog box.

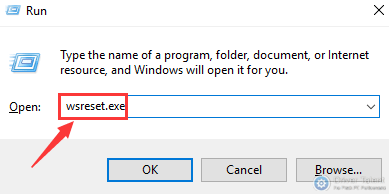
Step 2. Type “wsreset.exe” into the box and hit Enter to run it.

wsreset-fix-microsoft-store-error-code-0x80072f7d.png

Step 3. Restart your computer and check if the Microsoft Store error code 0x80072F7D is gone.


Method 3. Modify the Internet Settings

According to some users who encountered the Microsoft Store error code 0x80072F7D, the Internet Settings may be partly to blame for this issue. To determine if you are in the same situation, you can follow the steps below to check your Internet Settings.

Step 1. Use the shortcut keys Windows + I to launch Windows Settings.

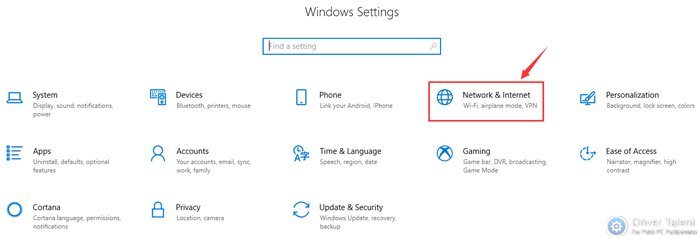
Step 2. Click on Network & Internet.

network-internet-fix-microsoft-store-error-code-0x80072f7d.png

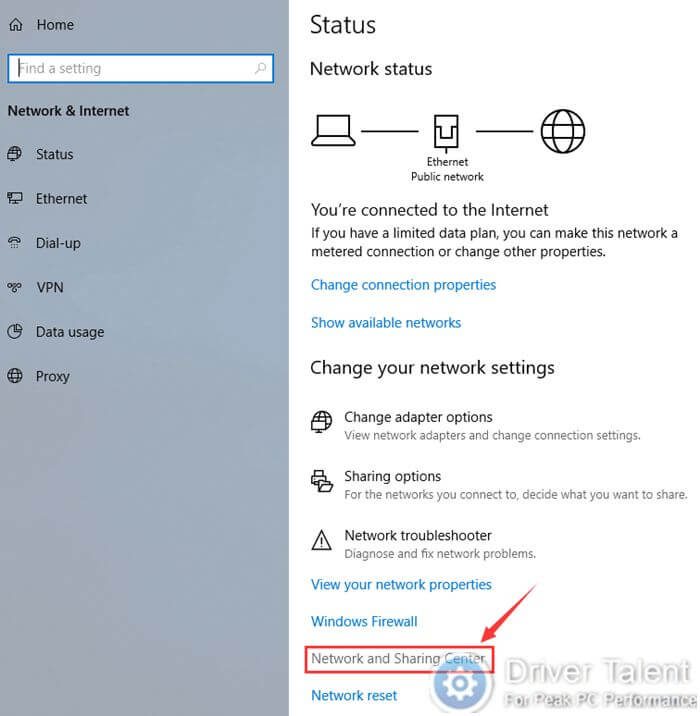
Step 3. Click on Network and Sharing Center to open it.

sharing-center-fix-microsoft-store-error-code-0x80072f7d.jpg

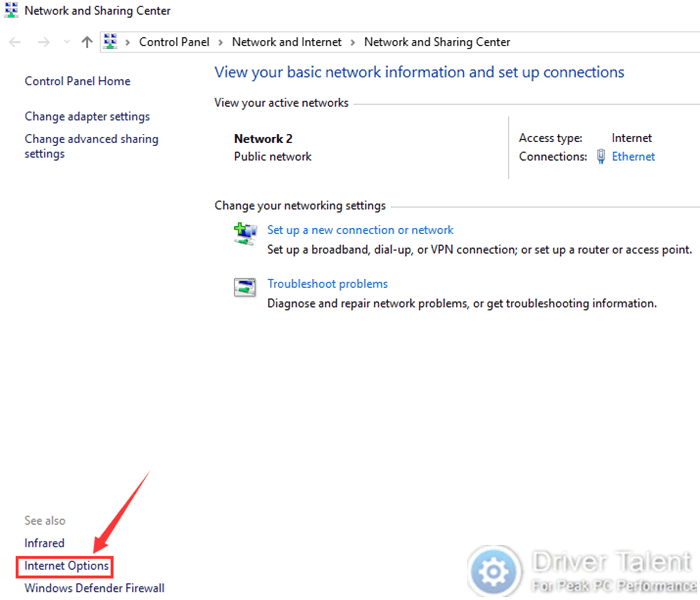
Step 4. Find Internet Options in the lower-left corner and click on it.

internet-options-fix-microsoft-store-error-code-0x80072f7d.png

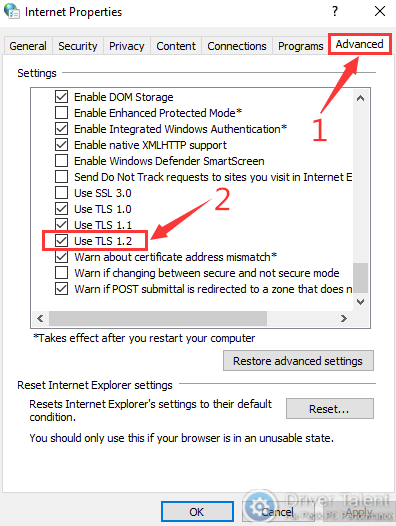
Step 5. Get to the Advanced tab and see if the Use TLS 1.2 option under Settings is checked.

advanced-fix-microsoft-store-error-code-0x80072f7d.png

If no, that means you are in the same situation and it’s the problem with TLS 1.2. In this case, to get rid of the Microsoft Store error code 0x80072F7D, you just need to check the Use TLS 1.2 option and click on Apply and OK to save the change. Then reboot your computer and the Microsoft Store to see whether the error code is gone.

Method 4. Clear the Cache & Cookies in Microsoft Edge

If all else fails, try clearing the cache and cookies in Microsoft Edge to resolve the Microsoft Store error code 0x80072F7D. Take these steps:

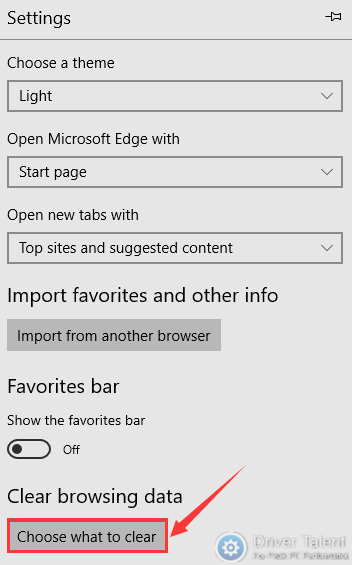
Step 1. Launch Microsoft Edge and tap the ellipsis icon in the top right. Then select Settings.

settings-fix-microsoft-store-error-code-0x80072f7d.png

Step 2. Click on the Choose what to clear button.

choose-what-to-clear-fix-microsoft-store-error-code-0x80072f7d.png

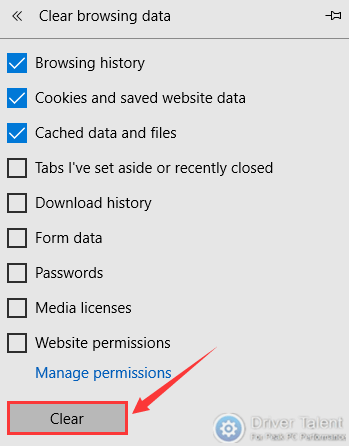
Step 3. Check the Browsing historyCookies and saved website data and Cached data and files options, and then click on the Clear button.

clear-fix-microsoft-store-error-code-0x80072f7d.png

After clearing the cache and cookies completely, close the browser and restart your computer to let the changes take effect.

想下载微软原版Windows 10 20H2企业版,就用官方工具

除了最新发行的Windows 10 20H2版,微软还发行了20H2企业版的可下载ISO版本。企业版主要针对IT专业人员和企业用户。尽管如此,拥有微软帐户的任何人都可以免费下载和安装Windows 10 20H2企业版。

但是,免费版本不会持续很长时间。你可以下载并安装ISO映像,但由于它是评估版,因此只能使用90天。试用期过后,桌面屏幕将变黑,然后将继续提示用户购买企业版的许可版本。计算机也会在每小时后自动重新启动,以鼓励用户购买企业许可证。。

如前所述,企业版旨在管理中型到大型组织的配置,家里只有几台计算机的个人不需要购买企业版,只需选择专业版或家庭版即可。

一、使用媒体创建工具下载Windows 10企业版

你也可以使用Windows10媒体创建工具下载Windows 10企业版ISO,步骤如下:

1.在微软下载网站下载最新的Windows 10媒体创建工具。

2.打开命令提示符,然后转到保存媒体创建工具的文件夹,例如,如果将其下载到默认的“下载”文件夹中,请使用以下命令:

cd C:\Users\Username\Downloads

用当前登录的帐户名替换“Username”。

3.运行以下命令:

MediaCreationTool20H2.exe /Eula Accept /Retail /MediaArch x64 /MediaLangCode en-US /MediaEdition Enterprise

你可以将en-US代码更改为要下载的任何其他语言代码,例如简体中文是zh-cn。

4.如果要求输入产品密钥,请输入企业版安装密钥

NPPR9-FWDCX-D2C8J-H872K-2YT43。

5.在下一个屏幕上选择“为另一台电脑创建安装介质”选项,然后单击下一步。

6.在“选择要使用的介质”窗口上,选择“ISO文件”,然后单击“下一步”。

7.在下一个弹出对话框中,导航到保存ISO的位置,单击“保存”。

然后就会自动开始下载,同时,你可以继续使用计算机,因为它不是在更新电脑,而只是在下载文件。

二、20H2企业版与LTSC 2019企业版之间有何区别?

Windows 10企业版20H2

这个频道是为那些希望在稳定版本中尽快获得所有Windows最新功能的用户设计的。如果你安装了稳定的版本,则所有Windows功能更新只要通过Windows更新就可以安装。

Windows 10企业版LTSC 2019

与常规Windows 10企业版相邻,长期支持渠道(LTSC)意味着此版本的Windows将在更长的时间内获得微软的支持,直至达到其支持终止和生命周期终止。LTSC分支用于那些不需要定期更新的系统。它还适用于没有大量计算资源的老式电脑和服务器。由于LTSC默认情况下不包括许多通用应用程序,因此它减轻了资源消耗,并且功能较少。

如果想检查运行的是哪个版本和分支的Windows 10企业版,可以打开PowerShell并运行以下命令:

get-computerinfo | fl WindowsProductName, OsVersion

结束语

我们不建议普通家庭用户选择企业版,因为他们可能不需要那么多功能,并且需要额外付费。对于日常基本使用,我们建议使用Windows 10家庭版。与专业版相比,它确实缺少一些功能,但是我们已经为你制定了一些策略来安装一些重要的功能,例如BitLocker的替代产品、管理本地用户帐户、安装组策略编辑器、启用沙盒、启用Hyper-V、启用远程桌面和安装Dockers。

如果你认为可能需要这些功能中的大多数,请选择专业版。如果没有,并且你有一台旧电脑,则家庭版可能是你的最佳选择。

BypassESU v7 AIO

原文:https://forums.mydigitallife.net/threads/bypass-windows-7-extended-security-updates-eligibility.80606/


BypassESU v7 AIO

* A project to install Extended Security Updates for Windows 7 and Server 2008 R2

* It consist of three parts:

– patch WU engine to allow receiving ESU updates

– suppress ESU eligibility check for OS updates (including .NET 3.5.1)

– bypass ESU validation for .NET 4 updates (4.5.2 up to 4.8) // See Notice below

## Important Notes:

* Make sure that “Windows Management Instrumentation (winmgmt)” service is not disabled

* For Live OS installation, it is recommended to install KB4538483 after WU ESU Patcher, or else a restart will be required

* After using WU patcher, if you still not offered ESU updates, try to:

> restart, then check WU

> stop wuauserv service, delete the folder “C:\Windows\SoftwareDistribution”, restart, then check WU

* You can also acquire and download the updates manually from Microsoft Update Catalog
https://www.catalog.update.microsoft.com

to track the updates KB numbers, either check the official Update History page
https://support.microsoft.com/en-us/help/4009469

or follow this MDL thread
https://forums.mydigitallife.net/threads/19461/

* ESU updates for each month will require (at least) the latest extended SSU from previous month(s)

e.g.
April 2020 updates require March SSU at least
May 2020 updates require April SSU at least
June 2020 updates require May SSU at least
July 2020 updates will require May SSU or June SSU (if any)
and so on…

* Unless you integrate the ESU Suppressor, ESU updates are not supported offline (you cannot integrate them), they must be installed online on live system.

* Extract the 7z pack contents to a folder with simple path, example C:\files\BypassESU

* Temporarily turn off Antivirus protection (if any), or exclude the extracted folder

## Prerequisite Updates

the following updates must be installed and ready before using BypassESU:

– KB4490628: Servicing Stack Update, March 2019

Code:
x86
http://download.windowsupdate.com/c/msdownload/update/software/secu/2019/03/windows6.1-kb4490628-x86_3cdb3df55b9cd7ef7fcb24fc4e237ea287ad0992.msu
x64
http://download.windowsupdate.com/c/msdownload/update/software/secu/2019/03/windows6.1-kb4490628-x64_d3de52d6987f7c8bdc2c015dca69eac96047c76e.msu

– KB4474419: SHA-2 code signing support update, September 2019

Code:
x86
http://download.windowsupdate.com/c/msdownload/update/software/secu/2019/09/windows6.1-kb4474419-v3-x86_0f687d50402790f340087c576886501b3223bec6.msu
x64
http://download.windowsupdate.com/c/msdownload/update/software/secu/2019/09/windows6.1-kb4474419-v3-x64_b5614c6cea5cb4e198717789633dca16308ef79c.msu

– Latest Extended Servicing Stack Update, KB4555449 (May 2020) or later

Code:
x86
http://download.windowsupdate.com/c/msdownload/update/software/secu/2020/04/windows6.1-kb4555449-x86_36683b4af68408ed268246ee3e89772665572471.msu
x64
http://download.windowsupdate.com/c/msdownload/update/software/secu/2020/04/windows6.1-kb4555449-x64_92202202c3dee2f713f67adf6622851b998c6780.msu

– KB4538483: ESU Licensing Preparation Package (only required to get updates via WU)

Code:
x86
http://download.windowsupdate.com/d/msdownload/update/software/secu/2020/05/windows6.1-kb4538483-x86_f77ee698928fb42232b70b01f53a4c5f68553323.msu
x64
http://download.windowsupdate.com/d/msdownload/update/software/secu/2020/05/windows6.1-kb4538483-x64_3e861ae5fe3f6b3c9d185decbd96a436ca0c5035.msu

– Updated Windows Update Client, at least KB3138612

Code:
x86
http://download.windowsupdate.com/d/msdownload/update/software/updt/2016/02/windows6.1-kb3138612-x86_6e90531daffc13bc4e92ecea890e501e807c621f.msu
x64
http://download.windowsupdate.com/d/msdownload/update/software/updt/2016/02/windows6.1-kb3138612-x64_f7b1de8ea7cf8faf57b0138c4068d2e899e2b266.msu

if you installed any Monthly Quality Rollup, or July 2016 update rollup KB3172605, both already have updated WUC

if you installed January 2020 Security Only update KB4534314, or the fix update KB4539602, both already have updated WUC

How to Use – Live OS Installation

*Make sure to install the prerequisite updates (reboot if required)

* right-click on LiveOS-Setup.cmd and “Run as administrator”

* from the menu, press the corresponding number for the desired option:

[1] Full Installation {ESU Suppressor + WU ESU Patcher + .NET 4 ESU Bypass}
most recommended option

[2] Install ESU Suppressor
mainly for security-only updates users, whom don’t need the Monthly Rollup through WU

[3] Install WU ESU Patcher
this only allow to offer ESU updates via WU

[7] Install .NET 4 ESU Bypass
this allow to install NDP4 ESU updates (manually or via WU)

* Remarks

– LiveOS-Setup.cmd will remove BypassESU-v4 if detected, and override KB4528069-Lite if present

– You get option [1] only if all Suppressor/Patcher/.NET Bypass are not installed

– ESU Suppressor cannot be uninstalled after installing ESU updates, and option [5] is not shown in that case

– Warning: unless you have another bypass installed, ESU updates installation will fail if you used option [3] alone

How to Use – Offline Image/Wim Integration

* Wim-Integration.cmd support two target types to integrate BypassESU:

Code:
[1] Direct WIM file (not mounted), either install.wim or boot.wim

[2] Already Mounted image directory, or offline image deployed on another partition/drive/vhd

** Direct WIM file integration **

– place install.wim or boot.wim (one of them, not both) next to Wim-Integration.cmd, then run the script as administrator

– alternatively, run the script as administrator, and when prompted, enter the full path for the wim file

– choose the desired option from the menu (similar to live setup)

– Notes about this method:

it will integrate KB4528069-Lite, and it does not need the prerequisite updates

it will also integrate the Suppressor for winre.wim, if it exists inside install.wim

it does not provide options to remove the Suppressor/Patcher/.NET Bypass, for that, mount the wim image then use second method

==

** Mounted directory / offline image integration **

– manually mount the image of install.wim or boot.wim
no need for this step if the image is already deployed on another partition/drive/vhd, example Z:\

– Make sure to integrate the prerequisite updates

– right-click on Wim-Integration.cmd and “Run as administrator”

– enter the correct path for mounted directory or offline image drive letter

– choose the desired option from the menu (similar to live setup)

– afterwards, continue to integrate other updates, including ESU updates

– manually unmount install.wim/boot.wim image and commit changes

## Download

Credits

– IMI Kurwica
– mspaintmsi (superUser)
– @Enthousiast (testing)

– Notice: Regarding .NET 4 ESU Bypass

it has incompatibility issue and may cause msiexec.exe or other Windows Installer (MSI) programs to stop working
therefore, it’s recommended to install it only when new .NET 4 updates are available, then remove it after installing the updates

if it fails to install .NET 4 updates, temporary disable Antivirus protection, or try the revised separate bypass

– Tutorial: Using BypassESU AIO + ESU Updates Overview
https://forums.mydigitallife.net/posts/1578167/

– Troubleshoot Q&A:
https://forums.mydigitallife.net/posts/1583751/

– Note for KabeLake/Ryzen CPUs with wufuc patcher:
https://forums.mydigitallife.net/posts/1583875/

– dotNetFx4 ESU Bypass to install .NET 4.x ESU updates
https://forums.mydigitallife.net/posts/1596946/

– KUC W7 UpdateChecker now support ESU
https://forums.mydigitallife.net/posts/1583368/

– W7ESUI: Standalone Installer for ESU updates without bypass
https://forums.mydigitallife.net/posts/1584892/

Win10 LTSC 2019 长期支持版


win 10 LTSB 2016

文件名:cn_windows_10_enterprise_2016_ltsb_x86_dvd_9057089.iso (2.62GB)

语言: Chinese – Simplified

SHA1:0422052F25C9C8DF983F3B287F725860AAB907CF

ed2k://|file|cn_windows_10_enterprise_2016_ltsb_x86_dvd_9057089.iso|2817034240|67C3865D03E765BDD4845BA2CB7649F8|/


文件名:cn_windows_10_enterprise_2016_ltsb_x64_dvd_9060409.iso (3.56GB)

语言: Chinese – Simplified

SHA1:9E405E950890D2A196565BCA35E152F9CFAD296D

ed2k://|file|cn_windows_10_enterprise_2016_ltsb_x64_dvd_9060409.iso|3821895680|FF17FF2D5919E3A560151BBC11C399D1|/


激活Windows 10 2016 ltsb:

slmgr /ipk DCPHK-NFMTC-H88MJ-PFHPY-QJ4BJ

slmgr /skms xykz.f3322.org

slmgr /ato


激活Office2016专业增强VL版

cd C:\Program Files\Microsoft Office\Office16

cscript ospp.vbs /sethst:xykz.f3322.org

cscript ospp.vbs /dstatus #查看原密钥后五位

cscript ospp.vbs /unpkey:XXXXX #卸载原密钥,XXXXX代表后五位

cscript ospp.vbs /inpkey:XQNVK-8JYDB-WJ9W3-YJ8YR-WFG99

cscript ospp.vbs /act


Windows 10 2016 Key:

7JJ3P-NDBYD-33PGY-F33JB-K772D

RRKNC-793T6-FMH82-9CG92-8XDF3

2ND39-CHXP3-8FBRY-FDFMX-T84CD


KMS:

xykz.f3322.org

kms.chinancce.com

kms.lotro.cc

www.zgbs.cc

cy2617.jios.org

kms-win.msdn123.com

k.zpale.com

m.zpale.com

mvg.zpale.com

kms.shuax.com

ss.yechiu.xin

kms.dwhd.org

kms.03k.org

kms.luody.info

kms.digiboy.ir


win 10 LTSC 2019 

本地址为msdn i tell you提供地址!


Windows 10 Enterprise LTSC 2019 (x64) – DVD (Chinese-Simplified)

文件名:cn_windows_10_enterprise_ltsc_2019_x64_dvd_9c09ff24.iso

SHA1:24b59706d5eded392423936c82ba5a83596b50cc


文件大小:4.17GB

发布时间:2019-03-15

下载地址:ed2k://|file|cn_windows_10_enterprise_ltsc_2019_x64_dvd_9c09ff24.iso|4478906368|E7C526499308841A4A6D116C857DB669|/


Windows 10 Enterprise LTSC 2019 (x86) – DVD (Chinese-Simplified)

文件名:cn_windows_10_enterprise_ltsc_2019_x86_dvd_1814dbab.iso

SHA1:ba2169edd94f123211cd4aaca68352f1ab6195d9

文件大小:2.98GB

发布时间:2019-03-15


下载地址:ed2k://|file|cn_windows_10_enterprise_ltsc_2019_x86_dvd_1814dbab.iso|3196803072|2D39C54A2E99BAC308191C74A15B3237|/


激活 win10 LTSC 2019

这是KMS激活,每次激活有效期为半年也就是半年后需要再次按照教程激活下,具体教程

win 10 以管理员身份打开 CMD 终端,依次输入如下命令,若激活不成功,可以多尝试几次:

1、slmgr -ipk M7XTQ-FN8P6-TTKYV-9D4CC-J462D

2、slmgr -skms kms.03k.org

3、slmgr -ato

4、slmgr -dlv

每一行命令 都会有一个提示框出来

最后一行是显示,是否激活成功。


确认是否永久激活,可以在命令提示符执行    slmgr.vbs -xpr     查看是否永久激活

Dism++ 良心不流氓免费而强大的 Windows 系统优化与垃圾清理工具

说起免费系统优化工具,大家都会想起 360 安全卫士、腾讯电脑管家、还有各种助手大师。对小白来说,似乎一装上就能打败全国90%以上的电脑,简直好用到爆炸了不是么?

然而老司机们都明白,这些优化管家软件根本没什么底线,很多都会在你背后偷偷做些奇怪的事情。毕竟「免费」的背后都承载着“推广”任务,所以偷偷给你电脑安装全家桶、引诱你下载乱七八糟的软件、弹窗广告、上传隐私、耍流氓的见怪不怪了。那么,不耍流氓的良心系统优化工具哪找呢?

Dism ++ 免费且良心的系统优化清理软件
相对而言,国外一些需要付费的系统优化软件都会纯粹干净一些 (比如 WinOptimizer),而免费的话,值得推荐就是 Dism++ 这款强大实用的系统优化和清理工具了。Dism++ 可帮助你有效清理垃圾回收 C 盘的硬盘空间,并借助各种优化设置让你的电脑保持最佳性能。

Dism++ 系统优化软件

Dism++ 功能丰富强大,同时又小巧实用。集成了系统优化、垃圾清理、启动项管理、软件卸载、文件关联管理、驱动管理、系统更新管理、系统修复维护等许多 Windows 相关功能。也额外提供了诸如系统备份还原、引导修复、ESD镜像转ISO格式、ISO 生成器、系统激活备份、hosts 编辑器、文件浏览器等实用小工具。

Dism++ 实用工具

值得推荐的是,Dism++ 的优化项非常的细致丰富!因为它会整合一些由用户提交的实用规则来“充实”自己,使得 Dism++ 有着很多其他同类优化软件所没有的选项。这些设置项都非常的贴心实用,比如是关闭 Win10 应用推广、关闭小娜语音助手、隐藏任务栏人脉、显示文件扩展名、禁用删除右键菜单、关闭游戏录制工具等等……

Dism++ 系统优化

不只是优化,还有很多系统维护实用功能
另外,Dism++ 的系统热备份热还原功能也很强大!热备份就是你在系统运行中的同时也可以进行备份,哪天发现系统变卡变慢了,乱成一头糟了,随手打开 Dism++ (要放在非系统盘里),还原并重启后,你的电脑就穿越回到备份的那一天了,你无需去搞什么 WinPE 环境、引导开机盘之类的,对懒人或小白都很友好。

说这么多,DISM++ 是什么来头?
Dism++ 是基于「DISM.exe 命令行工具」而来的系统优化软件。原本的 DISM (Deployment Imaging and Management 部署映像服务和管理工具) 是一款「微软开发」的纯命令行程序,用于维护和准备 Windows 映像,虽然其功能强大,但对普通用户来说学习和使用都太麻烦。

Dism++ 垃圾清理

而 Dism++ 则可看作是 Dism.exe 的 GUI 图形界面版,点几下鼠标即可完成复杂的优化操作,可以让几乎所有人都能轻松上手。而且它还增加了不少原来 Dism 没有的实用功能。

开发者的原话:其实我们都是一些强迫症晚期患者,只想要找个轻巧、好使、透明、不流氓、不装可怜、不唠唠叨叨的实用工具。不过找了半天没找到,但是我们没有放弃治疗,用自己的双手初步实现了梦想,联手打造Dism++——一个不为利益、不跟风、不做作、单纯为执着与激情而生的小工具。

Dism++ 功能特性:
绿色免安装,完全免费,无广告、无后门。
支持直接在 WinPE 环境下运行。
兼容 Vista、Win7 ~ Windows 10 等高低版本系统
系统优化——各种系统设置非常丰富,可由用户提供规则,有很多意想不到的小功能。
空间回收——深入系统底层,扫描包括 Windows 更新,程序缓存、临时文件等垃圾文件。
启动项管理——扫描系统开机启动项,包括服务箱,可启动或禁用相关项目。
工具箱——包含系统备份还原、引导修复、账户管理以及ESD转ISO、ISO生成器等工具。
驱动管理——可加载显示设备驱动,添加或导出驱动程序。
程序和功能——与系统中“程序和功能”相同,可卸载程序,开启或禁止windows功能。
更新管理——Windows Update,可自动扫描更新,一键安装,移除更新缓存垃圾。
系统还原——支持系统热备份、热还原,无需PE!
即便集成了如此多功能,Dism++的体积也才几 MB!!!绝对的小巧精悍了!
总结:
Dism++ 的界面非常简单朴素,没有华丽的特效、也没有全国速度对比排行等乱七八糟的“面子”跟“玩心理”功能。毕竟作为一款实在的 Windows 系统优化、垃圾清理的工具软件,这样简单纯粹就足够了!而且,Dism++ 还拥有非常强大专业的各种系统维护功能,这是很多优化工具所没有的。

如果你也不喜欢 360、腾讯管家那些软件,需要对 Windows 系统进行一定调教设置或者偶尔清理垃圾文件,而又想找一款不耍流氓、干净、纯粹、免费又足够强大专业的垃圾清理与系统优化工具,Dism++ 值得你拥有!妥妥的 Windows 装机必备工具之一哦~

在现在使用Windows XP的一些使用建议

原文:https://zhuanlan.zhihu.com/p/47893655


事先声明:由于微软已经于2014年4月8日停止对Windows XP的支持,本人不推荐继续使用Windows XP作为你的工作用操作系统。

如果你已经了解了在2018年继续使用Windows XP的风险并且能够为你在2018年使用Windows XP引发的一切损失负责,请接着往下看:


0.你为什么需要Windows XP?

现在已经是2018年了,如果你的设备足以运行Windows 7或者更新版本的Windows,请不要安装Windows XP,这样会将你的设备暴露于危险的互联网环境之中,从而损害你的数据,甚至引发令你后悔的不可挽回的硬件损坏。如果你的设备和我的Thinkpad T42一样老或者驱动出现问题的话,那么,你可以在使用Windows XP时参照如下的一些建议。


1.安装官方版本的Windows XP Professional

这很重要,为了避免Ghost还原软件方式安装系统对老电脑磁盘的伤害,并且现在Ghost还原软件方式的Windows XP含有较多的不受欢迎的软件。虽然通过Ghost还原软件方式安装Windows XP较为方便并且无需打补丁,但是为了避免对你的老电脑的伤害,你需要安装原版Windows XP,并且最好是Professional版本,这样可以避免更大的不兼容问题。你可以选择在“MSDN,我告诉你”下载。

2.更新你的内置软件

为了更好的使Windows XP使用现代操作系统的绝大多数功能,我建议及时升级你的IE到Windows XP可以安装最高的版本IE8,升级你的WMP到Windows XP可以安装最高的版本WMP11,否则你将遇到许多现代网页无法打开,无法使用/无法完美使用MTP功能,无法打开现代的媒体文件等一系列严重的问题

3.打开Windows Update

为了尽可能保护你的安全,并且方便后面的操作,这里建议你通过Windows Update为你的操作系统安装补丁。否则你可能遇到无法安装部分软件(如QQ等),Chrome 49无法正常打开网页等一系列问题。

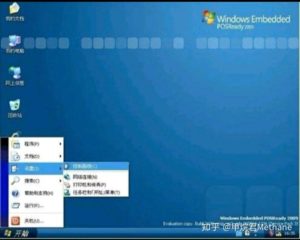
4.修改你的Windows XP版本为Windows Embedded POSReady 2009

为了获取更多的更新,解决“证书过期”等一系列问题,建议你在安装完所有适用于Windows XP的更新以后将Windows版本通过一些方法(下面给出)修改为Windows Embedded POSReady 2009。

以下是详细操作方法:

创建任意一个TXT文件。用记事本在文档中输入以下命令:

Windows Registry Editor Version 5.00
[HKEY_LOCAL_MACHINE\SYSTEM\WPA\PosReady]
“Installed”=dword:00000001

这时,把文件保存为*.reg,再打开即可,当提示“XXX已添加到你的注册表”时,重新启动你的设备,再次打开Windows Update搜索更新。

当然,如果你有条件其实你可以直接安装Windows Embedded POSReady 2009。

5.安装现代的浏览器

在2018年,IE8已经变得极度不安全,并且兼容性极差,所以你需要安装更现代的浏览器来打开现代的网页,并且在最基本的程度上保护你的安全。

这里建议Chrome 49和Firefox 52 ESR。Firefox 52 ESR我建议通过Mozilla FTP下载到电脑上,Chrome 49可以去下载站进行搜索。

6.关于杀毒软件的一些事情

如果你需要杀毒软件,我首先推荐那些支持XP的付费杀毒软件,最为推荐ESET NOD32反病毒软件。

然后是免费杀毒软件,如果需要纯净建议火绒,其他的国内杀毒软件也够用(拒绝瑞星),但是国内除了火绒之外的杀软我都不建议打开开机启动+主动防御,因为现在国内的杀毒软件(火绒除外)相对来讲都不太干净。

360中国版的话千万别碰卫士系列软件。因为现在的360安全卫士中国版及这个系列的其他软件已经充满了广告和弹窗,外加一堆花哨的功能,所以极度不建议使用。电脑管家除非你想加速QQ等级,否则不建议使用。金山问题同360中国版,过于不干净,捆绑过多,极度不建议使用。

7.安装各种工具软件

压缩软件建议使用7-Zip或者Easy 7-Zip,速度快,轻巧易用,兼容性好。

PDF打开可以使用旧版的Foxit Reader,现在的新版本体验极度糟糕,在旧的设备上卡死严重,不建议使用。

办公软件建议Office 2010 Plus,版本是可以兼容的最新的版本,并且兼容性较好,颜值较高。不推荐WPS,因为过于不干净,捆绑多。

播放器可以使用MPC-HC或者VLC Player,最好是MPC-HC,因为播放性能较好,对旧的设备较为友好。

8.写在最后的一些话

在开头的时候,我已经将在2018年使用Windows XP的风险完全阐述了一遍,这里再次强调:除非情况特殊,我非常不建议在2018年继续使用Windows XP。

不过Windows XP也是一代经典,是我个人认为微软历史上最为经典的三个操作系统之一(其他两个是Windows 95和Windows 7)。其Luna界面放在今天都是不错的界面设计。并且Windows XP完善了Windows 2000的功能,使NT内核操作系统更加的便于普通人使用。在微软历史的长河中,Windows XP激起的风浪应该是最大的几个之一了。

我虽然也很怀念Windows XP,但是我们正处于2018年,我们正处于Windows 10的时代。是云计算和人工智能的时代,所以我希望我们能够拥抱全新的2018(或者是2019),向现代的电脑体验前进。

教程:利用$OEM$文件夹制作Windows 7多版本合集

原文:http://zxkh19501.blog.163.com/blog/static/123785179200910743455354/

OEM激活要具备三个要素:证书、OEM SLP KEY和主板BIOS具备SLIC,WINDOWS VISTA要求为SLIC2.0,WINDOWS 7要求为SLIC2.1,SLIC2.1一般情况兼容2.0,SLIC是有区分品牌的。第三个要素在硬件上,即你的主板要符合激活要求。举例:你的主板BIOS有联想的SLIC2.1,你现在想安装WINDOWS 7 专业版,如果光盘中有整合联想的证书,同时整合专业版的SLP KEY(不限品牌),安装后将自动激活。OEMLOGO、壁纸、帮助、服务网址等属OEM体验与厂商服务范畴,不是构成激活的必要条件。

下面的讲解主要就OEM激活的前两个要素展开,因为第三个要素是硬件上而不是光盘上。

一、$OEM$文件夹的优势与不足

优势:操作简便快捷,不需要复杂的IMAGEX命令或DISM命令,只需要UltraISO这样光盘处理小软件就可以了,制作好的$OEM$文件夹只需加入到ISO文件的sources目录下就可以了。应该说人人皆宜。(忘记说了,ISO的sources目录下的ei.cfg要删除掉或替换掉)

替换成这样的ei.cfg:

[EditionID]
Ultimate
Professional
HomePremium
HomeBasic
Starter
[Channel]
OEM
[VL]
3

不足:主要体现在多品牌的制作上,一般来说制作OEM版是需要一些LOGO,那怕是简单点,这时候$OEM$文件夹就会体现出它的不足来了。在制作33in1这样的大合集,如果不去动到install.wim这个文件,恐怕难以做到,更主要的是人们习惯在开始安装时有个选择菜单然后选择一个品牌来安装,这是$OEM$文件夹无法做到。

二、$OEM$文件夹发布的基本原理

利用$OEM$文件夹来发布共享,不是WINDOWS 7的专利,XP时期就有了。

1、$OEM$文件夹的调用

安装复制文件时,光盘中SOURCES中的$OEM$文件夹里面的文件或文件夹会被复制到C盘下的指定目录内。(安装分区以C盘为例)

2、$OEM$文件夹的基本结构

里面的文件(夹)按什么规则进行复制呢?路径怎么确定?先看一下$OEM$文件夹一个例子(联想恢复盘风格为例),文件目录结构和文件如下:

H:\$OEM$
+—$$          ———此目录内的文件复制到C盘WINDOWS目录内
|   +—Panther       ———此目录及目录内文件夹、文件复制到C盘WINDOWS目录内,下同。
|   |       unattend.xml
|   |
|   +—Resources
|   |   \—Themes
|   |           Lenovo_1.theme
|   |           Lenovo_2.theme
|   |           Lenovo_3.theme
|   |           Lenovo_4.theme
|   |
|   +—Setup
|   |   \—Scripts       ———此目录内的文件是用来导入OEM SLP KEY(必须的)
|   |           HbSlp.cmd              ———CMD文件(可并入OOBE.CMD)
|   |           HpSlp.cmd               ——— CMD文件(可并入OOBE.CMD)
|   |           oobe.cmd                ———CMD 主文件(必须的)
|   |           ProSlp.cmd               ——— CMD文件(可并入OOBE.CMD)
|   |           StaSlp.cmd                ——— CMD文件(可并入OOBE.CMD)
|   |           UltSlp.cmd                  ——— CMD文件(可并入OOBE.CMD)
|   |
|   +—System32
|   |   +—OEM                    ———此目录是用来放置OEM证书,以便激活程序查找(必须的)
|   |   |       lenovo.oemcert.100036.xrm-ms             ——证书(必须的)
|   |   |       Lenovo.reg
|   |   |
|   |   \—OOBE
|   |       \—info
|   |           |   Lenovo.bmp
|   |           |   Lenovo.png
|   |           |   logo.bmp
|   |           |   mcelogo.png
|   |           |   oobe.xml
|   |           |   PLA.rtf
|   |           |   userlenovo.png
|   |           |
|   |           +—Backgrounds
|   |           |       BackgroundDefault.jpg
|   |           |
|   |           \—default
|   |               \—2052
|   |                       oobe.xml
|   |                       PLA.rtf
|   |
|   \—Web
|       \—Wallpaper
|           +—Lenovo_1
|           |       Lenovo_11.jpg
|           |       Lenovo_12.jpg
|           |       Lenovo_13.jpg
|           |       Lenovo_14.jpg
|           |       Lenovo_15.jpg
|           |       Lenovo_16.jpg
|           |
|           +—Lenovo_2
|           |       Lenovo_21.jpg
|           |       Lenovo_22.jpg
|           |       Lenovo_23.jpg
|           |       Lenovo_24.jpg
|           |
|           +—Lenovo_3
|           |       Lenovo_31.jpg
|           |       Lenovo_32.jpg
|           |       Lenovo_33.jpg
|           |       Lenovo_34.jpg
|           |
|           \—Lenovo_4
|                   Lenovo_41.jpg
|                   Lenovo_42.jpg
|                   Lenovo_43.jpg
|                   Lenovo_44.jpg
|
\—$1                                            ———此目录内的文件复制到C盘根目录下
\—Users
\—Default
\—Favorites
\—Lenovo
联想.url
联想支持.url

重点看一下$$、$1以及几个标有“必须的”文件夹和文件。这些文件安装开始时被复制到指定的位置,安装程序将在OOBE阶段开始之后调用它们,安装KEY和证书。

$$、$1内的文件夹、文件复制到对应目录,比如$$内有一个Panther文件夹复制到C盘WINDOWS目录内,如果C盘WINDOWS里面已有一个Panther文件夹,那么将是合并这两个文件夹,如果没有,那么就是复制添加Panther文件夹(包括$$\Panther里面子文件夹和文件)到安装分区的Windows目录下。

如: 以安装分区为C盘为例:

      $$\System32\oem对应的是C:\windows\system32\oem

       $1\Users\Default\Favorites\Lenovo对应的是C:\Users\Default\Favorites\Lenovo

     如果是D盘:

      $$\System32\oem对应的是D:\windows\system32\oem

       $1\Users\Default\Favorites\Lenovo对应的是D:\Users\Default\Favorites\Lenovo

3、安装程序是什么时候安装KEY和证书呢?

安装程序是OOBE阶段安装KEY和证书。OOBE 阶段包含以下 Windows 任务:

  • Unattend (oobeSystem)
  • WinSAT
  • OOBE.cmd
  • OOBE 向导(欢迎使用 Windows)
  • OOBE 任务
  • 重新启动(可能)
  • Setupcomplete.cmd
  • 登录
  • 首次登录命令
  • 桌面

证书的安装是在导入KEY之后,证书的安装是不需要我们手工加入CMD命令的,当然你要添加也可以。CMD命令导入KEY之后,安装程序会自动搜索windows\system32\oem目录,如果里面有适合于BIOS SLIC的证书,将自动安装此证书。这就是制作通用版本的原理,因为KEY是不同版本通用的,安装时导入KEY之后,将自动搜索oem目录,如果我们把所有品牌的证书都放在这里,不管你安装什么品牌,安装程序都可以找到证书,并自动帮你安装适合你的BIOS SLIC的证书,从而实现自动激活。

总结一下,利用$OEM$文件夹发布共享,我们不需要用复杂的IMAGEX或DISM命令去解开install.wim文件。目的很简单,就是安装开始时,预先把导入KEY的CMD文件和证书复制到安装分区的WINDOWS中的指定目录内,让安装程序帮你导入KEY和证书,而不是安装结束后你自己手工去做这件事。

既然安装程序能帮你事先KEY和证书,这种事何乐而不为!

特别是证书的安装,这种方法比系统安装后手工导入要方便许多,WINDOWS安装程序的证书安装是智能安装,安装程序会搜索WINDOWS\SYSTEM32\OEM目录内的最合适的证书,如果是你自己导入证书,有时还搞不清楚是哪个证书是合适的,因为有的品牌有好几个证书。

三、OOBE.CMD中多版本导入KEY的命令

有时候我是用多个CMD文件来安装不同版本的KEY,当然也可以将这几个CMD合并到OOBE.CMD文件之中。

1、多个CMD文件的OOBE.CMD文件命令示例:

@echo off
start /w regedit /s %systemroot%\System32\oem\Lenovo.reg
reg QUERY “HKLM\SOFTWARE\Microsoft\Windows NT\CurrentVersion” /v “EditionID” > %TEMP%\Edition.txt
findstr /i “homeBasic” “%TEMP%\Edition.txt” && call %systemroot%\setup\scripts\HbSlp.cmd
findstr /i “Starter” “%TEMP%\Edition.txt” && call %systemroot%\setup\scripts\StaSlp.cmd
findstr /i “HomePremium” “%TEMP%\Edition.txt” && call %systemroot%\setup\scripts\HpSlp.cmd
findstr /i “Professional” “%TEMP%\Edition.txt” && call %systemroot%\setup\scripts\ProSlp.cmd
findstr /i “Ultimate” “%TEMP%\Edition.txt” && call %systemroot%\setup\scripts\UltSlp.cmd
del /F /Q %systemroot%\setup\scripts\HpSlp.cmd
del /F /Q %systemroot%\setup\scripts\ProSlp.cmd
del /F /Q %systemroot%\setup\scripts\UltSlp.cmd
del /F /Q %systemroot%\setup\scripts\StaSlp.cmd
del /F /Q %systemroot%\setup\scripts\HbSlp.cmd
del /F /Q %systemroot%\system32\oem\Lenovo.reg

:Cleanup
del /F /Q %systemroot%\setup\scripts\oobe.cmd

分析:

start /w regedit /s %systemroot%\System32\oem\Lenovo.reg ,注册表写入OEM信息(非必要)

reg QUERY “HKLM\SOFTWARE\Microsoft\Windows NT\CurrentVersion” /v “EditionID” > %TEMP%\Edition.txt ,此时将安装版本信息EditionID导出,转变为Edition.txt 文件。

findstr /i “homeBasic” “%TEMP%\Edition.txt” && call %systemroot%\setup\scripts\HbSlp.cmd,如果在Edition.txt 找到“homeBasic”字样,将调用HbSlp.cmd文件导入homeBasic的OEM SLP KEY;如果在Edition.txt 中找到“Ultimate”字样,将调用UltSlp.cmd文件导入Ultimate版本的OEM SLP KEY;其他几个不一细述。再下几行是删除CMD文件的命令,因为后面我们不再需要这些CMD文件。

2、单个CMD文件的OOBE.CMD文件命令示例:

(意思是只用一个OOBE.CMD就可以了)

@echo off

reg QUERY “HKLM\SOFTWARE\Microsoft\Windows NT\CurrentVersion” /v “EditionID” > %TEMP%\Edition.txt

findstr /i “Ultimate” “%TEMP%\Edition.txt” && cscript %windir%\system32\slmgr.vbs -ipk 6K2KY-BFH24-PJW6W-9GK29-TMPWP
findstr /i “Professional” “%TEMP%\Edition.txt” && cscript %windir%\system32\slmgr.vbs -ipk 32KD2-K9CTF-M3DJT-4J3WC-733WD
findstr /i “HomePremium” “%TEMP%\Edition.txt” && cscript %windir%\system32\slmgr.vbs -ipk 27GBM-Y4QQC-JKHXW-D9W83-FJQKD
findstr /i “homeBasic” “%TEMP%\Edition.txt” && cscript %windir%\system32\slmgr.vbs -ipk 22MFQ-HDH7V-RBV79-QMVK9-PTMXQ
findstr /i “Starter” “%TEMP%\Edition.txt” && cscript %windir%\system32\slmgr.vbs -ipk TGBKB-9KBGJ-3Y3J6-K8M2F-J2HJQ

:Cleanup
del /F /Q %systemroot%\setup\scripts\oobe.cmd

分析:findstr /i “Ultimate” “%TEMP%\Edition.txt” && cscript %windir%\system32\slmgr.vbs -ipk 6K2KY-BFH24-PJW6W-9GK29-TMPWP,这里只不过把原来调用的UltSlp.cmd文件里面的内容搬进OOBE.CMD文件而已。不细述了。