How To Configure Suricata as an Intrusion Prevention System (IPS) on Ubuntu 20.04

原文:

https://www.digitalocean.com/community/tutorials/how-to-configure-suricata-as-an-intrusion-prevention-system-ips-on-ubuntu-20-04

https://suricata.readthedocs.io/en/suricata-6.0.0/setting-up-ipsinline-for-linux.html

Introduction

In this tutorial you will learn how to configure Suricata’s built-in Intrusion Prevention System (IPS) mode on Ubuntu 20.04. By default Suricata is configured to run as an Intrusion Detection System (IDS), which only generates alerts and logs suspicious traffic. When you enable IPS mode, Suricata can actively drop suspicious network traffic in addition to generating alerts for further analysis.

Before enabling IPS mode, it is important to check which signatures you have enabled, and their default actions. An incorrectly configured signature, or a signature that is overly broad may result in dropping legitimate traffic to your network, or even block you from accessing your servers over SSH and other management protocols.

In the first part of this tutorial you will check the signatures that you have installed and enabled. You will also learn how to include your own signatures. Once you know which signatures you would like to use in IPS mode, you’ll convert their default action to drop or reject traffic. With your signatures in place, you’ll learn how to send network traffic through Suricata using the netfilter NFQUEUE iptables target, and then generate some invalid network traffic to ensure that Suricata drops it as expected.

Prerequisites

If you have been following this tutorial series then you should already have Suricata running on an Ubuntu 20.04 server.

If you still need to install Suricata then you can follow How To Install Suricata on Ubuntu 20.04

You should also have the ET Open Ruleset downloaded using the suricata-update command, and included in your Suricata signatures.

The jq command line JSON processing tool. If you do not have it installed from a previous tutorial, you can do so using the apt command:

sudo apt update
sudo apt install jq

You may also have custom signatures that you would like to use from the previous Understanding Suricata Signatures tutorial.

Step 1 — Including Custom Signatures

The previous tutorials in this series explored how to install and configure Suricata, as well as how to understand signatures. If you would like to create and include your own rules then you need to edit Suricata’s /etc/suricata/suricata.yaml file to include a custom path to your signatures.

First, let’s find your server’s public IPs so that you can use them in your custom signatures. To find your IPs you can use the ip command:

ip -brief address show

You should receive output like the following:

Output
lo UNKNOWN 127.0.0.1/8 ::1/128
eth0 UP 203.0.113.5/20 10.20.0.5/16 2001:DB8::1/32 fe80::94ad:d4ff:fef9:cee0/64
eth1 UP 10.137.0.2/16 fe80::44a2:ebff:fe91:5187/64

Your public IP address(es) will be similar to the highlighted 203.0.113.5 and 2001:DB8::1/32 IPs in the output.

Now let’s create the following custom signature to scan for SSH traffic to non-SSH ports and include it in a file called /var/lib/suricata/rules/local.rules. Open the file with nano or your preferred editor:

sudo nano /var/lib/suricata/rules/local.rules

Copy and paste the following signature:

Invalid SSH Traffic Signature

alert ssh any any -> 203.0.113.5 !22 (msg:"SSH TRAFFIC on non-SSH port"; flow:to_client, not_established; classtype: misc-attack; target: dest_ip; sid:1000000;)
alert ssh any any -> 2001:DB8::1/32 !22 (msg:"SSH TRAFFIC on non-SSH port"; flow:to_client, not_established; classtype: misc-attack; target: dest_ip; sid:1000001;)

Substitute your server’s public IP address in place of the 203.0.113.5 and 2001:DB8::1/32 addresses in the rule. If you are not using IPv6 then you can skip adding that signature in this and the following rules.

You can continue adding custom signatures to this local.rules file depending on your network and applications. For example, if you wanted to alert about HTTP traffic to non-standard ports, you could use the following signatures:

HTTP traffic on non-standard port signature

alert http any any -> 203.0.113.5 !80 (msg:"HTTP REQUEST on non-HTTP port"; flow:to_client, not_established; classtype:misc-activity; sid:1000002;)
alert http any any -> 2001:DB8::1/32 !80 (msg:"HTTP REQUEST on non-HTTP port"; flow:to_client, not_established; classtype:misc-activity; sid:1000003;)

To add a signature that checks for TLS traffic to ports other than the default 443 for web servers, add the following:

TLS traffic on non-standard port signature

alert tls any any -> 203.0.113.5 !443 (msg:"TLS TRAFFIC on non-TLS HTTP port"; flow:to_client, not_established; classtype:misc-activity; sid:1000004;)
alert tls any any -> 2001:DB8::1/32 !443 (msg:"TLS TRAFFIC on non-TLS HTTP port"; flow:to_client, not_established; classtype:misc-activity; sid:1000005;)

When you are done adding signatures, save and close the file. If you are using nano, you can do so with CTRL+X, then Y and ENTER to confirm. If you are using vi, press ESC and then 😡 then ENTER to save and exit.

Now that you have some custom signatures defined, edit Suricata’s /etc/suricata/suricata.yaml configuration file using nano or your preferred editor to include them:

sudo nano /etc/suricata/suricata.yaml

Find the rule-files: portion of the configuration. If you are using nano use CTRL+_ and then enter the line number 1879. If you are using vi enter 1879gg to go to the line. The exact location in your file may be different, but you should be in the correct general region of the file.

Edit the section and add the following highlighted – local.rules line:

/etc/suricata/suricata.yaml

. . .
rule-files:
- suricata.rules
- local.rules
. . .

Save and exit the file. Be sure to validate Suricata’s configuration after adding your rules. To do so run the following command:

sudo suricata -T -c /etc/suricata/suricata.yaml -v

The test can take some time depending on how many rules you have loaded in the default suricata.rules file. If you find the test takes too long, you can comment out the – suricata.rules line in the configuration by adding a # to the beginning of the line and then run your configuration test again. Be sure to remove the # comment if you plan to use the suricata.rules signature in your final running configuration.

Once you are satisfied with the signatures that you have created or included using the suricata-update tool, you can proceed to the next step, where you’ll switch the default action for your signatures from alert or log to actively dropping traffic.

Step 2 — Configuring Signature Actions

Now that you have your custom signatures tested and working with Suricata, you can change the action to drop or reject. When Suricata is operating in IPS mode, these actions will actively block invalid traffic for any matching signature.

These two actions are described in the previous tutorial in this series, Understanding Suricata Signatures. The choice of which action to use is up to you. A drop action will immediately discard a packet and any subsequent packets that belong to the network flow. A reject action will send both the client and server a reset packet if the traffic is TCP-based, and an ICMP error packet for any other protocol.

Let’s use the custom rules from the previous section and convert them to use the drop action, since the traffic that they match is likely to be a network scan, or some other invalid connection.

Open your /var/lib/suricata/rules/local.rules file using nano or your preferred editor and change the alert action at the beginning of each line in the file to drop:

sudo nano /var/lib/suricata/rules/local.rules

/var/lib/suricata/rules/local.rules

drop ssh any any -> 203.0.113.5 !22 (msg:"SSH TRAFFIC on non-SSH port"; classtype: misc-attack; target: dest_ip; sid:1000000;)
drop ssh any any -> 2001:DB8::1/32 !22 (msg:"SSH TRAFFIC on non-SSH port"; classtype: misc-attack; target: dest_ip; sid:1000001;)
. . .

Repeat the step above for any signatures in /var/lib/suricata/rules/suricata.rules that you would like to convert to drop or reject mode.

Note: If you ran suricata-update in the prerequisite tutorial, you may have more than 30,000 signatures included in your suricata.rules file.

If you convert every signature to drop or reject you risk blocking legitimate access to your network or servers. Instead, leave the rules in suricata.rules for the time being, and add your custom signatures to local.rules. Suricata will continue to generate alerts for suspicious traffic that is described by the signatures in suricata.rules while it is running in IPS mode.

After you have a few days or weeks of alerts collected, you can analyze them and choose the relevant signatures to convert to drop or reject based on their sid.

Once you have all the signatures configured with the action that you would like them to take, the next step is to reconfigure and then restart Suricata in IPS mode.

Step 3 — Enabling nfqueue Mode

Suricata runs in IDS mode by default, which means it will not actively block network traffic. To switch to IPS mode, you’ll need to edit Suricata’s /etc/default/suricata configuration file.

Open the file in nano or your preferred editor:

sudo nano /etc/default/suricata

Find the LISTENMODE=af-packet line and comment it out by adding a # to the beginning of the line. Then add a new line LISTENMODE=nfqueue line that tells Suricata to run in IPS mode.

Your file should have the following highlighted lines in it when you are done editing:

/etc/default/suricata

. . .
# LISTENMODE=af-packet
LISTENMODE=nfqueue
. . .

Save and close the file. Now you can restart Suricata using systemctl:

sudo systemctl restart suricata.service

Check Suricata’s status using systemctl:

sudo systemctl status suricata.service

You should receive output like the following:


Output
● suricata.service - LSB: Next Generation IDS/IPS
Loaded: loaded (/etc/init.d/suricata; generated)
Active: active (running) since Wed 2021-12-01 15:54:28 UTC; 2s ago
Docs: man:systemd-sysv-generator(8)
Process: 1452 ExecStart=/etc/init.d/suricata start (code=exited, status=0/SUCCESS)
Tasks: 12 (limit: 9513)
Memory: 63.6M
CGroup: /system.slice/suricata.service
└─1472 /usr/bin/suricata -c /etc/suricata/suricata.yaml --pidfile /var/run/suricata.pid -q 0 -D -vvv

Dec 01 15:54:28 suricata systemd[1]: Starting LSB: Next Generation IDS/IPS...
Dec 01 15:54:28 suricata suricata[1452]: Starting suricata in IPS (nfqueue) mode... done.
Dec 01 15:54:28 suricata systemd[1]: Started LSB: Next Generation IDS/IPS.

Note the highlighted active (running) line that indicates Suricata restarted successfully. Also note the Starting suricata in IPS (nfqueue) mode… done. line, which confirms Suricata is now running in IPS mode.

With this change you are now ready to send traffic to Suricata using the UFW firewall in the next step.

Step 4 — Configuring UFW To Send Traffic to Suricata

Now that you have configured Suricata to process traffic in IPS mode, the next step is to direct incoming packets to Suricata. If you followed the prerequisite tutorials for this series and are using an Ubuntu 20.04 system, you should have the Uncomplicated Firewall (UFW) installed and enabled.

To add the required rules for Suricata to UFW, you will need to edit the firewall files in the /etc/ufw/before.rules (IPv4 rules) and /etc/ufw/before6.rules (IPv6) directly.

Open the first file for IPv4 rules using nano or your preferred editor:

sudo nano /etc/ufw/before.rules

Near the beginning of the file, insert the following highlighted lines:

/etc/ufw/before.rules

(此处参考https://suricata.readthedocs.io/en/suricata-6.0.0/setting-up-ipsinline-for-linux.html,hosts规则)

. . .
# Don't delete these required lines, otherwise there will be errors
*filter
:ufw-before-input - [0:0]
:ufw-before-output - [0:0]
:ufw-before-forward - [0:0]
:ufw-not-local - [0:0]
# End required lines

## Start Suricata NFQUEUE rules
-I FORWARD -j NFQUEUE
-I OUTPUT -j NFQUEUE
## End Suricata NFQUEUE rules

# allow all on loopback
-A ufw-before-input -i lo -j ACCEPT
-A ufw-before-output -o lo -j ACCEPT
. . .

Save and exit the file when you are done editing it. Now add the same highlighted lines to the same section in the /etc/ufw/before6.rules file:

sudo nano /etc/ufw/before.rules

Ensure that both files have the same contents. Save and exit the file when you are done editing it.

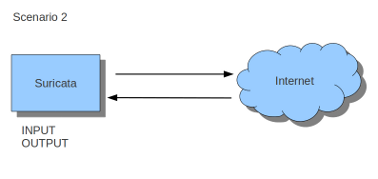
The first two INPUT and OUTPUT rules are used to bypass Suricata so that you can connect to your server using SSH, even when Suricata is not running. Without these rules, an incorrect or overly broad signature could block your SSH access. Additionally, if Suricata is stopped, all traffic will be sent to the NFQUEUE target and then dropped since Suricata is not running.

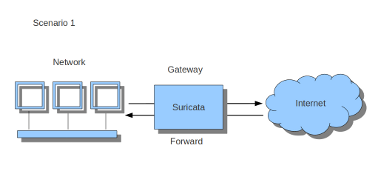
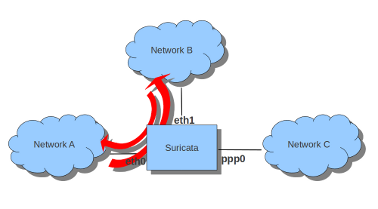
The next FORWARD rule ensures that if your server is acting as a gateway for other systems, all that traffic will also go to Suricata for processing.

The final two INPUT and OUTPUT rules send all remaining traffic that is not SSH traffic to Suricata for processing.

Restart UFW to load the new rules:

sudo systemctl restart ufw.service

Note: If you are using another firewall you will need to modify these rules to match the format your firewall expects.

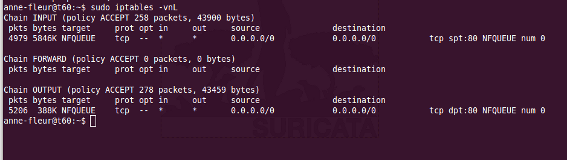
If you are using iptables, then you can insert these rules directly using the iptables and ip6tables commands. However, you will need to ensure that the rules are persistent across reboots with a tool like iptables-persistent.

If you are using firewalld, then the following rules will direct traffic to Suricata:

firewall-cmd --permanent --direct --add-rule ipv4 filter INPUT 0 -p tcp --dport 22 -j NFQUEUE --queue-bypass
firewall-cmd --permanent --direct --add-rule ipv4 filter INPUT 1 -j NFQUEUE
firewall-cmd --permanent --direct --add-rule ipv6 filter INPUT 0 -p tcp --dport 22 -j NFQUEUE --queue-bypass
firewall-cmd --permanent --direct --add-rule ipv6 filter INPUT 1 -j NFQUEUE

firewall-cmd --permanent --direct --add-rule ipv4 filter FORWARD 0 -j NFQUEUE
firewall-cmd --permanent --direct --add-rule ipv6 filter FORWARD 0 -j NFQUEUE

firewall-cmd --permanent --direct --add-rule ipv4 filter OUTPUT 0 -p tcp --sport 22 -j NFQUEUE --queue-bypass
firewall-cmd --permanent --direct --add-rule ipv4 filter OUTPUT 1 -j NFQUEUE
firewall-cmd --permanent --direct --add-rule ipv6 filter OUTPUT 0 -p tcp --sport 22 -j NFQUEUE --queue-bypass
firewall-cmd --permanent --direct --add-rule ipv6 filter OUTPUT 1 -j NFQUEUE

At this point in the tutorial you have Suricata configured to run in IPS mode, and your network traffic is being sent to Suricata by default. You will be able to restart your server at any time and your Suricata and firewall rules will be persistent.

The last step in this tutorial is to verify Suricata is dropping traffic correctly.

Step 5 — Testing Invalid Traffic

Now that you have Suricata and your firewall configured to process network traffic, you can test whether Suricata will drop packets that match your custom and other included signatures.

Recall signature sid:2100498 from the previous tutorial, which is modified in this example to drop matching packets:

sid:2100498

drop ip any any -> any any (msg:"GPL ATTACK_RESPONSE id check returned root"; content:"uid=0|28|root|29|"; classtype:bad-unknown; sid:2100498; rev:7; metadata:created_at 2010_09_23, updated_at 2010_09_23;)

Find and edit the rule in your /var/lib/suricata/rules/suricata.rules file to use the drop action if you have the signature included there. Otherwise, add the rule to your /var/lib/suricata/rules/local.rules file.

Send Suricata the SIGUSR2 signal to get it to reload its signatures:

sudo kill -usr2 $(pidof suricata)

Now test the rule using curl:

curl --max-time 5 http://testmynids.org/uid/index.html

You should receive an error stating that the request timed out, which indicates Suricata blocked the HTTP response:

Output
curl: (28) Operation timed out after 5000 milliseconds with 0 out of 39 bytes received

You can confirm that Suricata dropped the HTTP response using jq to examine the eve.log file:

jq 'select(.alert .signature_id==2100498)' /var/log/suricata/eve.json

You should receive output like the following:

Output
{
. . .
"community_id": "1:tw19kjR2LeWacglA094gRfEEuDU=",
"alert": {
"action": "blocked",
"gid": 1,
"signature_id": 2100498,
"rev": 7,
"signature": "GPL ATTACK_RESPONSE id check returned root",
"category": "Potentially Bad Traffic",
"severity": 2,
"metadata": {
"created_at": [
"2010_09_23"
],
"updated_at": [
"2010_09_23"
]
}
},
"http": {
"hostname": "testmynids.org",
"url": "/uid/index.html",
"http_user_agent": "curl/7.68.0",
"http_content_type": "text/html",
"http_method": "GET",
"protocol": "HTTP/1.1",
"status": 200,
"length": 39
},
. . .

The highlighted “action”: “blocked” line confirms that the signature matched, and Suricata dropped or rejected the test HTTP request.

Conclusion

In this tutorial you configured Suricata to block suspicious network traffic using its built-in IPS mode. You also added custom signatures to examine and block SSH, HTTP, and TLS traffic on non-standard ports. To tie everything together, you also added firewall rules to direct traffic through Suricata for processing.

Now that you have Suricata installed and configured in IPS mode, and can write your own signatures that either alert on or drop suspicious traffic, you can continue monitoring your servers and networks, and refining your signatures.

Once you are satisfied with your Suricata signatures and configuration, you can continue with the last tutorial in this series, which will guide you through sending logs from Suricata to a Security and Information Event Management (SIEM) system built using the Elastic Stack.

suricata ips/inline mode

ref:

https://redmine.openinfosecfoundation.org/projects/suricata/wiki/Suricata_User_Guide

https://samiux.blogspot.jp/2013/01/howto-suricata-on-ubuntu-1204-lts-server.html

Install

Installation

To setup to install the latest stable Suricata, do:

sudo add-apt-repository ppa:oisf/suricata-stable
sudo apt-get update

Then you can install the latest stable Suricata with:

sudo apt-get install suricata 

or for the Suricata package with build in (enabled) debugging!

sudo apt-get install suricata-dbg

After installation, continue with the Basic Setup.

Upgrading

Upgrading is simple:

sudo apt-get update
sudo apt-get upgrade

Remove

To remove Suricata from your system:

sudo apt-get remove suricata

Beta or RC releases

If you would like to help test the beta or RC packages the same procedures as above applies, we’re just using another PPA “suricata-beta”.

sudo add-apt-repository ppa:oisf/suricata-beta
sudo apt-get update
sudo apt-get upgrade

You can use both the suricata-stable and suricata-beta repositories together. Suricata will then always be the latest release, stable or beta.

https://launchpad.net/~oisf/+archive/suricata-beta

Daily releases

If you would like to help test the daily build packages from our latest git(dev) repository , the same procedures as above applies, we’re just using another PPA “suricata-daily”.

sudo add-apt-repository ppa:oisf/suricata-daily
sudo apt-get update
sudo apt-get upgrade

Please have in mind this is packaged from our latest development git master.

We are doing our best to make you aware of continuing development and items within the engine that are not yet complete or optimal. With this in mind, please
notice the list we have included of known items we are working on. See http://redmine.openinfosecfoundation.org/projects/suricata/issues
for an up to date list and to report new issues.

See http://redmine.openinfosecfoundation.org/projects/suricata/wiki/Known_issues for a discussion and time line for the major issues.

https://launchpad.net/~oisf/+archive/suricata-daily

Init Scripts

https://redmine.openinfosecfoundation.org/projects/suricata/wiki/Init_Scripts

For Ubuntu with Upstart, the following can be used in /etc/init/suricata.conf:

# suricata
description "Intruder Detection System Daemon" 
start on runlevel [2345]
stop on runlevel [!2345]
expect fork
exec suricata -D --pidfile /var/run/suricata.pid -c /etc/suricata/suricata.yaml -i eth1


Setting up IPS/inline for Linux

In this guide will be explained how to work with Suricata in layer3 inline mode and how to set iptables for that purpose.

First start with compiling Suricata with NFQ support. For instructions see Ubuntu Installation.
For more information about NFQ and iptables, see suricata.yaml.

To check if you have NFQ enabled in your Suricata, enter the following command:

suricata --build-info

and examine if you have NFQ between the features.

To run suricata with the NFQ mode, you have to make use of the -q option. This option tells Suricata which of the queue numbers it should use.

sudo suricata -c /etc/suricata/suricata.yaml -q 0


Iptables configuration

First of all it is important to know which traffic you would like to send to Suricata. Traffic that passes your computer or traffic that is generated by your computer.


If Suricata is running on a gateway and is meant to protect the computers behind that gateway you are dealing with the first scenario: forward_ing .
If Suricata has to protect the computer it is running on, you are dealing with the second scenario: host (see drawing 2).
These two ways of using Suricata can also be combined.

The easiest rule in case of the gateway-scenario to send traffic to Suricata is:

sudo iptables -I FORWARD -j NFQUEUE

In this case, all forwarded traffic goes to Suricata.

In case of the host situation, these are the two most simple iptable rules;

sudo iptables -I INPUT -j NFQUEUE
sudo iptables -I OUTPUT -j NFQUEUE

It is possible to set a queue number. If you do not, the queue number will be 0 by default.

Imagine you want Suricata to check for example just TCP-traffic, or all incoming traffic on port 80, or all traffic on destination-port 80, you can do so like this:

sudo iptables -I INPUT -p tcp  -j NFQUEUE
sudo iptables -I OUTPUT -p tcp -j NFQUEUE

In this case, Suricata checks just TCP traffic.

sudo iptables -I INPUT -p tcp --sport 80  -j NFQUEUE
sudo iptables -I OUTPUT -p tcp --dport 80 -j NFQUEUE

In this example, Suricata checks all input and output on port 80.

To see if you have set your iptables rules correct make sure Suricata is running and enter:

sudo iptables -vnL

In the example you can see if packets are being logged.

This description of the use of iptables is the way to use it with IPv4. To use it with IPv6 all previous mentioned commands have to start with ‘ip6tables’. It is also possible to let Suricata check both kinds of traffic.

There is also a way to use iptables with multiple networks (and interface cards). Example:

sudo iptables -I FORWARD -i eth0 -o eth1 -j NFQUEUE
sudo iptables -I FORWARD -i eth1 -o eth0 -j NFQUEUE

The options -i (input) -o (output) can be combined with all previous mentioned options

If you would stop Suricata and use internet, the traffic will not come through. To make internet work correctly, you have to erase all iptable rules.

To erase all iptable rules, enter:

sudo iptables -F


Update /etc/init.d/suricata

vi /etc/init.d/suricata

修改

SURICATA_OPTIONS=" -c $SURCONF --pidfile $PIDFILE $LISTEN_OPTIONS -D -vvv $USER_SWITCH"

SURICATA_OPTIONS=" -D -c /etc/suricata/suricata.yaml -q 0"


Rule Management with Oinkmaster

It is possible to download and install rules manually, but there is a much easier and quicker way to do so. There are special programs which you can use for downloading and installing rules. There is for example Pulled Pork and Oinkmaster. In this documentation the use of Oinkmaster will be described.

To install Oinkmaster, enter:

sudo apt-get install oinkmaster

There are several rulesets. There is for example Emerging Threats (ET) Emerging Threats Pro and VRT.
In this example we are using Emerging Threats.

Oinkmaster has to know where the rules an be found. These rules can be found at:

http://rules.emergingthreats.net/open/suricata/emerging.rules.tar.gz

open oinkmaster.conf to add this link by entering:

sudo nano /etc/oinkmaster.conf

Place a # in front of the url that is already there and add the new url like this:

(Close oinkmaster.conf by pressing ctrl x, followed by y and enter. )

The next step is to create a directory for the new rules. Enter:

sudo mkdir /etc/suricata/rules

Next enter:

cd /etc
sudo oinkmaster -C /etc/oinkmaster.conf -o /etc/suricata/rules

In the new rules directory a classification.config and a reference.config can be found. The directories of both have to be added in the suricata.yaml file. Do so by entering:

sudo nano /etc/suricata/suricata.yaml

And add the new file locations instead of the file locations already present, like this:

To see if everything works as pleased, run Suricata:

suricata -c /etc/suricata/suricata.yaml -i wlan0 (or eth0)

You will notice there are several rule-files Suricata tries to load, but are not available. It is possible to disable those rule-sets in suricata.yaml by deleting them or by putting a # in front of them.
To stop Suricata from running, press ctrl c.

Emerging Threats contains more rules than loaded in Suricata. To see which rules are available in your rules directory, enter:

ls /etc/suricata/rules/*.rules

Find those that are not yet present in suricata.yaml and add them in yaml if desired.

You can do so by entering :

sudo nano /etc/suricata/suricata.yaml

If you disable a rule in your rule file by putting a # in front of it, it will be enabled again the next time you run Oinkmaster. You can disable it through Oinkmaster instead, by entering the following:

cd /etc/suricata/rules

and find the sid of the rule(s) you want to disable.

Subsequently enter:

sudo nano /etc/oinkmaster.conf

and go all the way to the end of the file.
Type there:

disablesid 2010495

Instead of 2010495, type the sid of the rule you would like to disable. It is also possible to disable multiple rules, by entering their sids separated by a comma.

If you run Oinkmaster again, you can see the amount of rules you have disabled.
You can also enable rules that are disabled by default. Do so by entering:

ls /etc/suricata/rules

In this directory you can see several rule-sets
Enter for example:

sudo nano /etc/suricata/rules/emerging-malware.rules

In this file you can see which rules are enabled en which are not.
You can not enable them for the long-term just by simply removing the #. Because each time you will run Oinkmaster, the rule will be disabled again.
Instead, look up the sid of the rule you want to enable. Place the sid in the correct place of oinkmaster.config:

sudo nano /etc/oinkmaster.conf

do so by typing:

enablesid: 2010495

Instead of 2010495, type the sid of the rule you would like to to enable. It is also possible to enable multiple rules, by entering their sids separated by a comma.

In oinkmaster.conf you can modify rules. For example, if you use Suricata as inline/IPS and you want to modify a rule that sends an alert when it matches and you would like the rule to drop the packet instead, you can do so by entering the following:

sudo nano oinkmaster.conf

At the part where you can modify rules, type:

modifysid 2010495 “alert” | “drop”

The sid 2010495 is an example. Type the sid of the rule you desire to change, instead.

Rerun Oinkmaster to notice the change.


Updating your rules

If you have already downloaded a ruleset (in the way described in this file), and you would like to update the rules, enter:

sudo oinkmaster -C /etc/oinkmaster.conf -o /etc/suricata/rules

It is recommended to update your rules frequently. Emerging Threats is modified daily, VRT is updated weekly or multiple times a week.


Ubuntu下保存iptables规则并开机自动加载的方法:


Saving iptables 保存设置

If you were to reboot your machine right now, your iptables configurationwould disapear. Rather than type this each time you reboot, however, you cansave the configuration, and have it start up automatically. To save theconfiguration, you can use iptables-save and iptables-restore.

机器重启后,iptables中的配置信息会被清空。您可以将这些配置保存下来,让iptables在启动时自动加载,省得每次都得重新输入。iptables-save和iptables-restore 是用来保存和恢复设置的。

Configuration onstartup 开机自动加载配置

Save your firewall rules to a file

先将防火墙规则保存到/etc/iptables.up.rules文件中

# iptables-save > /etc/iptables.up.rules   #需要sudo su – root切换用户后执行,直接sudo cmd是不行的

Then modify the/etc/network/interfacesscript to apply the rulesautomatically (the bottom line is added)

然后修改脚本/etc/network/interfaces,使系统能自动应用这些规则(最后一行是我们手工添加的)。

auto eth0

iface eth0 inet dhcp

pre-up iptables-restore < /etc/iptables.up.rules

You can also prepare a set of down rules and apply it automatically

当网络接口关闭后,您可以让iptables使用一套不同的规则集。

auto eth0

iface eth0 inet dhcp

pre-up iptables-restore < /etc/iptables.up.rules

post-down iptables-restore < /etc/iptables.down.rules

HOWTO : Suricata on Ubuntu 12.04 LTS Server

Suricata is an Open Source Next Generation Intrusion Detection and Prevention Engine. This engine is not intended to just replace or emulate the existing tools in the industry, but will bring new ideas and technologies to the field.

There is an Ubuntu PPA of Suricata for Ubuntu 10.04 to 13.04 and the Ubuntu 13.04 is included Suricata in her repositories too. Meanwhile, those packages have IPS mode through NFQUEUE enabled. In addition, Suricata supports nVidia CUDA which requires to recompile the source code with suitable parameter.

Suricata not only can installed on servers but also on desktops and laptops. It performs quiet well on an Intel Atom ITX machine.

For the features, please read here for details.

The following is a basic and general setup of Suricata. For more advanced settings, please refer to the Reference below.

Step 1 :

sudo apt-get install python-software-properties
sudo add-apt-repository ppa:oisf/suricata-stable
sudo apt-get update
sudo apt-get install suricata htp

Step 2 :

To get the Emerging Threats rules :

cd /etc/suricata/

sudo wget https://rules.emergingthreatspro.com/open/suricata/emerging.rules.tar.gz

sudo tar -xvzf emerging.rules.tar.gz

sudo ln -s /etc/suricata/rules/reference.config /etc/suricata/reference.config

sudo ln -s /etc/suricata/UbuntuPPA-configs/classification.config /etc/suricata/classification.config

sudo cp /etc/suricata/UbuntuPPA-configs/suricata-ppa-1.4-6ubuntu6.yaml /etc/suricata/suricata.yaml

*** You can use reference.config and classification.config at /etc/suricata/rules.

sudo mkdir /var/log/suricata
sudo touch /etc/suricata/threshold.config

Step 3 :

sudo nano /etc/suricata/suricata.yaml

Locate the following lines :

default-log-dir: /usr/local/var/log/suricata/
default-rule-path: /usr/local/etc/suricata/rules
classification-file: /usr/local/etc/suricata/classification.config
reference-config-file: /usr/local/etc/suricata/reference.config
#pid-file: /var/run/suricata.pid
#- rule-reload: true
#threshold-file: /usr/local/etc/suricata/threshold.config

– drop
enable: no

Replace with the following lines :

default-log-dir: /var/log/suricata/
default-rule-path: /etc/suricata/rules
classification-file: /etc/suricata/classification.config
reference-config-file: /etc/suricata/reference.config
pid-file: /var/run/suricata.pid
- rule-reload: true
threshold-file: /usr/local/etc/suricata/threshold.config

– drop
enable: yes

To test if it work or not :

sudo suricata -c /etc/suricata/suricata.yaml -i eth0

Several minutes later, check the /var/log/suricata/stats.log and /var/log/suricata/http.log to see if there are some entries or not.

Step 4 :

sudo iptables -A INPUT -j NFQUEUE
sudo iptables -A OUTPUT -j NFQUEUE
sudo iptables -A FORWARD -j NFQUEUE

To test if it work or not :

sudo suricata -c /etc/suricata/suricata.yaml -q 0

Step 5 :

sudo apt-get install oinkmaster

sudo nano /etc/oinkmaster.conf

Append the following line :

url = https://rules.emergingthreatspro.com/open/suricata/emerging.rules.tar.gz

sudo oinkmaster -C /etc/oinkmaster.conf -o /etc/suricata/rules

Step 6 :

When everything is working fine, you can put them in the /etc/rc.local just right above “exit 0” :

#iptables -F
iptables -A INPUT -j NFQUEUE
iptables -A OUTPUT -j NFQUEUE
iptables -A FORWARD -j NFQUEUE

/etc/suricata/ips

Then create a file /etc/suricata/ips :

sudo nano /etc/suricata/ips  suricata -D -c /etc/suricata/suricata.yaml -q 0  oinkmaster -C /etc/oinkmaster.conf -o /etc/suricata/rules kill -USR2 `pidof suricata`

chmod +x /etc/suricata/ips

Then you can write a cron job to update Emerging Threats Rules everyday.

sudo crontab -e

Append the following :

@daily /etc/suricata/update-rules

Then create the update-rule

sudo nano /etc/suricata/update-rules

oinkmaster -C /etc/oinkmaster.conf -o /etc/suricata/rules
kill -USR2 `pidof suricata`

sudo chmod +x /etc/suricata/update-rules

Remarks :

If you want to create a user-interface for the IPS, you can refer to the “Reference” item [12].

If the Suricata acts as IPS gateway, it requires to bridge 2 NICs and 1 NIC for management purpose. In addition, you need to do some changes on the configure files.

If you have 4-cores CPU, you need to change the settings as the following :

iptables -A INPUT -j NFQUEUE --queue-balance 0:3
iptables -A OUTPUT -j NFQUEUE --queue-balance 0:3
iptables -A FORWARD -j NFQUEUE --queue-balance 0:3

suricata -D -c /etc/suricata/suricata.yaml -q 0 -q 1 -q 2 -q 3

How To Set Up An IPS (Intrusion Prevention System) On Fedora 17

How To Set Up An IPS (Intrusion Prevention System) On Fedora 17

Vuurmuur is a linux firewall manager. It takes a human readable rule syntax and turns it into the proper iptables commands. It supports logviewing, traffic shaping, connection killing and a lot of other features. Suricata is a relatively new network IDS/IPS. It’s multithreaded for performance, supports IDS and IPS modes, can extract files from HTTP streams and has a lot of other features.

Fedora 17 includes both Vuurmuur and Suricata in its repository. In this howto I’ll describe how to get a functional IPS using only Fedora packages.


Installing Vuurmuur and Suricata

Install both Vuurmuur and Suricata through “yum”:

yum install suricata Vuurmuur-daemon Vuurmuur-tui


Running Suricata in IDS mode

As an IPS will block traffic is it is misconfigured, it’s adviced to first test in the passive IDS mode.

We’re getting the free Emerging Threats IDS rules optimized for Suricata and setting them up in /etc/suricata/rules/

cd /etc/suricata/
curl -O https://rules.emergingthreatspro.com/open/suricata/emerging.rules.tar.gz
tar xzvf emerging.rules.tar.gz
ln -s /etc/suricata/rules/reference.config /etc/suricata/reference.config
ln -s /etc/suricata/rules/classification.config /etc/suricata/classification.config
cp /etc/suricata/rules/suricata-1.2-prior-open.yaml /etc/suricata/suricata.yaml

Test Suricata with:

suricata -c /etc/suricata/suricata.yaml -i eth0

Leave it running for a few minutes and check /var/log/suricata/stats.log and /var/log/suricata/http.log to confirm that things work. Make sure to generate some traffic by for example opening a browser and visiting your favorite sites.


Running Suricata in IPS mode

To make sure Suricata can inspect the traffic, iptables needs to be set up to pass traffic to Suricata. We’re using Vuurmuur to manage the firewall.

Open vuurmuur_conf, go to “Rules” and add a new rule with the following properties:

accept service any from any to any log

The rule looks like this:

Click to enlarge


Next, to be able to start the Vuurmuur service we need to add an interface to it’s configuration.

Go to “Interfaces” and add a new interface, name it however you like. In device add “eth0”:

Click to enlarge


When this is done, exit vuurmuur_conf.

For Vuurmuur’s logging to work properly we need to adapt the rsyslog configuration. Edit /etc/rsyslog.conf and add:

*.debug /var/log/debug

Close the file and restart rsyslog to effectuate the changes:

service rsyslog restart

We can now start Vuurmuur:

service vuurmuur start

Make sure Vuurmuur gets started on boot:

systemctl enable vuurmuur.service

Open vuurmuur_conf, go to the logviewer and check if traffic is passing:

Click to enlarge


If thats all good, lets get to passing the traffic to Suricata for deep inspection.

First, change the rule in vuurmuur to:

nfqueue service any from any to any

The rule looks like this:

Click to enlarge


This will pass all traffic to Suricata.

Then “apply changes” in vuurmuur_conf, this will automatically update the firewall. The logview will now show:

Click to enlarge


Then, start suricata:

suricata -c /etc/suricata/suricata.yaml -q0

Open your browser and check if traffic is flowing. Open /var/log/suricata/stats.log and /var/log/suricata/http.log to see if things are working as expected.

stats.log:

-------------------------------------------------------------------
Date: 10/8/2012 -- 17:20:08 (uptime: 0d, 01h 39m 02s)
-------------------------------------------------------------------
Counter                   | TM Name                   | Value
-------------------------------------------------------------------
decoder.pkts              | Decode1                   | 3147
decoder.bytes             | Decode1                   | 1453192
decoder.ipv4              | Decode1                   | 3147
decoder.ipv6              | Decode1                   | 0
decoder.ethernet          | Decode1                   | 0
decoder.raw               | Decode1                   | 0
decoder.sll               | Decode1                   | 0
decoder.tcp               | Decode1                   | 2426
decoder.udp               | Decode1                   | 589
decoder.sctp              | Decode1                   | 0
decoder.icmpv4            | Decode1                   | 0
decoder.icmpv6            | Decode1                   | 0
decoder.ppp               | Decode1                   | 0
decoder.pppoe             | Decode1                   | 0
decoder.gre               | Decode1                   | 0
decoder.vlan              | Decode1                   | 0
decoder.avg_pkt_size      | Decode1                   | 461.770575
decoder.max_pkt_size      | Decode1                   | 1492
defrag.ipv4.fragments     | Decode1                   | 0
defrag.ipv4.reassembled   | Decode1                   | 0
defrag.ipv4.timeouts      | Decode1                   | 0
defrag.ipv6.fragments     | Decode1                   | 0
defrag.ipv6.reassembled   | Decode1                   | 0
defrag.ipv6.timeouts      | Decode1                   | 0
tcp.sessions              | Decode1                   | 76                                                                                                                                                                                   
tcp.ssn_memcap_drop       | Decode1                   | 0                                                                                                                                                                                    
tcp.pseudo                | Decode1                   | 5                                                                                                                                                                                    
tcp.invalid_checksum      | Decode1                   | 0                                                                                                                                                                                    
tcp.no_flow               | Decode1                   | 0                                                                                                                                                                                    
tcp.reused_ssn            | Decode1                   | 0                                                                                                                                                                                    
tcp.memuse                | Decode1                   | 6029312.000000                                                                                                                                                                       
tcp.syn                   | Decode1                   | 76                                                                                                                                                                                   
tcp.synack                | Decode1                   | 101                                                                                                                                                                                  
tcp.rst                   | Decode1                   | 19                                                                                                                                                                                   
tcp.segment_memcap_drop   | Decode1                   | 0                                                                                                                                                                                    
tcp.stream_depth_reached  | Decode1                   | 0                                                                                                                                                                                    
tcp.reassembly_memuse     | Decode1                   | 11292544.000000                                                                                                                                                                      
tcp.reassembly_gap        | Decode1                   | 0                                                                                                                                                                                    
flow_mgr.closed_pruned    | FlowManagerThread         | 75                                                                                                                                                                                   
flow_mgr.new_pruned       | FlowManagerThread         | 5                                                                                                                                                                                    
flow_mgr.est_pruned       | FlowManagerThread         | 101                                                                                                                                                                                  
flow.memuse               | FlowManagerThread         | 3690424.000000                                                                                                                                                                       
flow.emerg_mode_entered   | FlowManagerThread         | 0                                                                                                                                                                                    
flow.emerg_mode_over      | FlowManagerThread         | 0                                                                                                                                                                                    
detect.alert              | Detect                    | 0

http.log:

10/08/2012-17:24:02.447292 www.howtoforge.com [**] / [**] Mozilla/5.0 (X11; Linux x86_64; rv:15.0) Gecko/20100101 Firefox/15.0.1 [**] 192.168.122.48:48396 -> 188.40.16.205:80
10/08/2012-17:24:02.544458 static.howtoforge.com [**] /misc/drupal.css [**] Mozilla/5.0 (X11; Linux x86_64; rv:15.0) Gecko/20100101 Firefox/15.0.1 [**] 192.168.122.48:52942 -> 178.63.27.110:80
10/08/2012-17:24:02.549184 static.howtoforge.com [**] /modules/copyright/copyright.css [**] Mozilla/5.0 (X11; Linux x86_64; rv:15.0) Gecko/20100101 Firefox/15.0.1 [**] 192.168.122.48:52944 -> 178.63.27.110:80

Close the running suricata (ctr-c on it’s console) and open /etc/sysconfig/suricata. Change “OPTIONS” to look like this:

OPTIONS="-q 0 -D --pidfile /var/run/suricata.pid"

Start Suricata through the service and make sure it’s getting started at boot:

service suricata start
systemctl enable suricata.service


Dropping Traffic

So far nothing was dropped. However, we’re an IPS so lets start dropping something. All the rules we downloaded default to “alert”, so nothing is dropped yet.

Open /etc/suricata/suricata.yaml in your editor and scroll down to the “stream” section. There, set “inline” to “yes”. This will force Suricata to do stream reassembly in a IPS aware way.

stream:
  memcap: 32mb
  checksum_validation: yes      # reject wrong csums
  inline: yes

Add local.rules to the rules to be loaded by Suricata:

default-rule-path: /etc/suricata/rules/
rule-files:
 - local.rules
 - emerging-ftp.rules
 - emerging-policy.rules

Create local.rules in /etc/suricata/rules/ using a text editor. Add on a single line:

drop tcp any any -> any any (msg:"facebook is blocked"; content:"facebook.com"; http_header; nocase; classtype:policy-violation; sid:1;)

Restart Suricata:

service suricata restart

Now open Firefox, and try to go to http://www.facebook.com/, the request should time out.

The logfile /var/log/suricata/fast.log will have:

10/06/2012-11:40:49.018377  [Drop] [**] [1:1:0] facebook is blocked [**] [Classification: Potential Corporate Privacy Violation] [Priority: 1] {TCP} 192.168.122.48:57113 -> 173.252.100.16:80
10/06/2012-11:40:49.020955  [Drop] [**] [1:1:0] facebook is blocked [**] [Classification: Potential Corporate Privacy Violation] [Priority: 1] {TCP} 192.168.122.48:57114 -> 173.252.100.16:80
10/06/2012-11:40:51.991876  [Drop] [**] [1:1:0] facebook is blocked [**] [Classification: Potential Corporate Privacy Violation] [Priority: 1] {TCP} 192.168.122.48:57115 -> 173.252.100.16:80

Obviously there is a lot more to managing an IPS, but this should get you started!

Recommended further reading: