asus路由器ipv6设置

原文:https://rog.asus.com.cn/support/FAQ/113990


如何在路由器中设置IPv6?

请与您的ISP网络运营商确认IPv6信息 (例如:联机类型、IPv6地址和DSN设置等)

1. 请用浏览器输入  http://router.asus.com ,输入登录路由器的账号和密码。

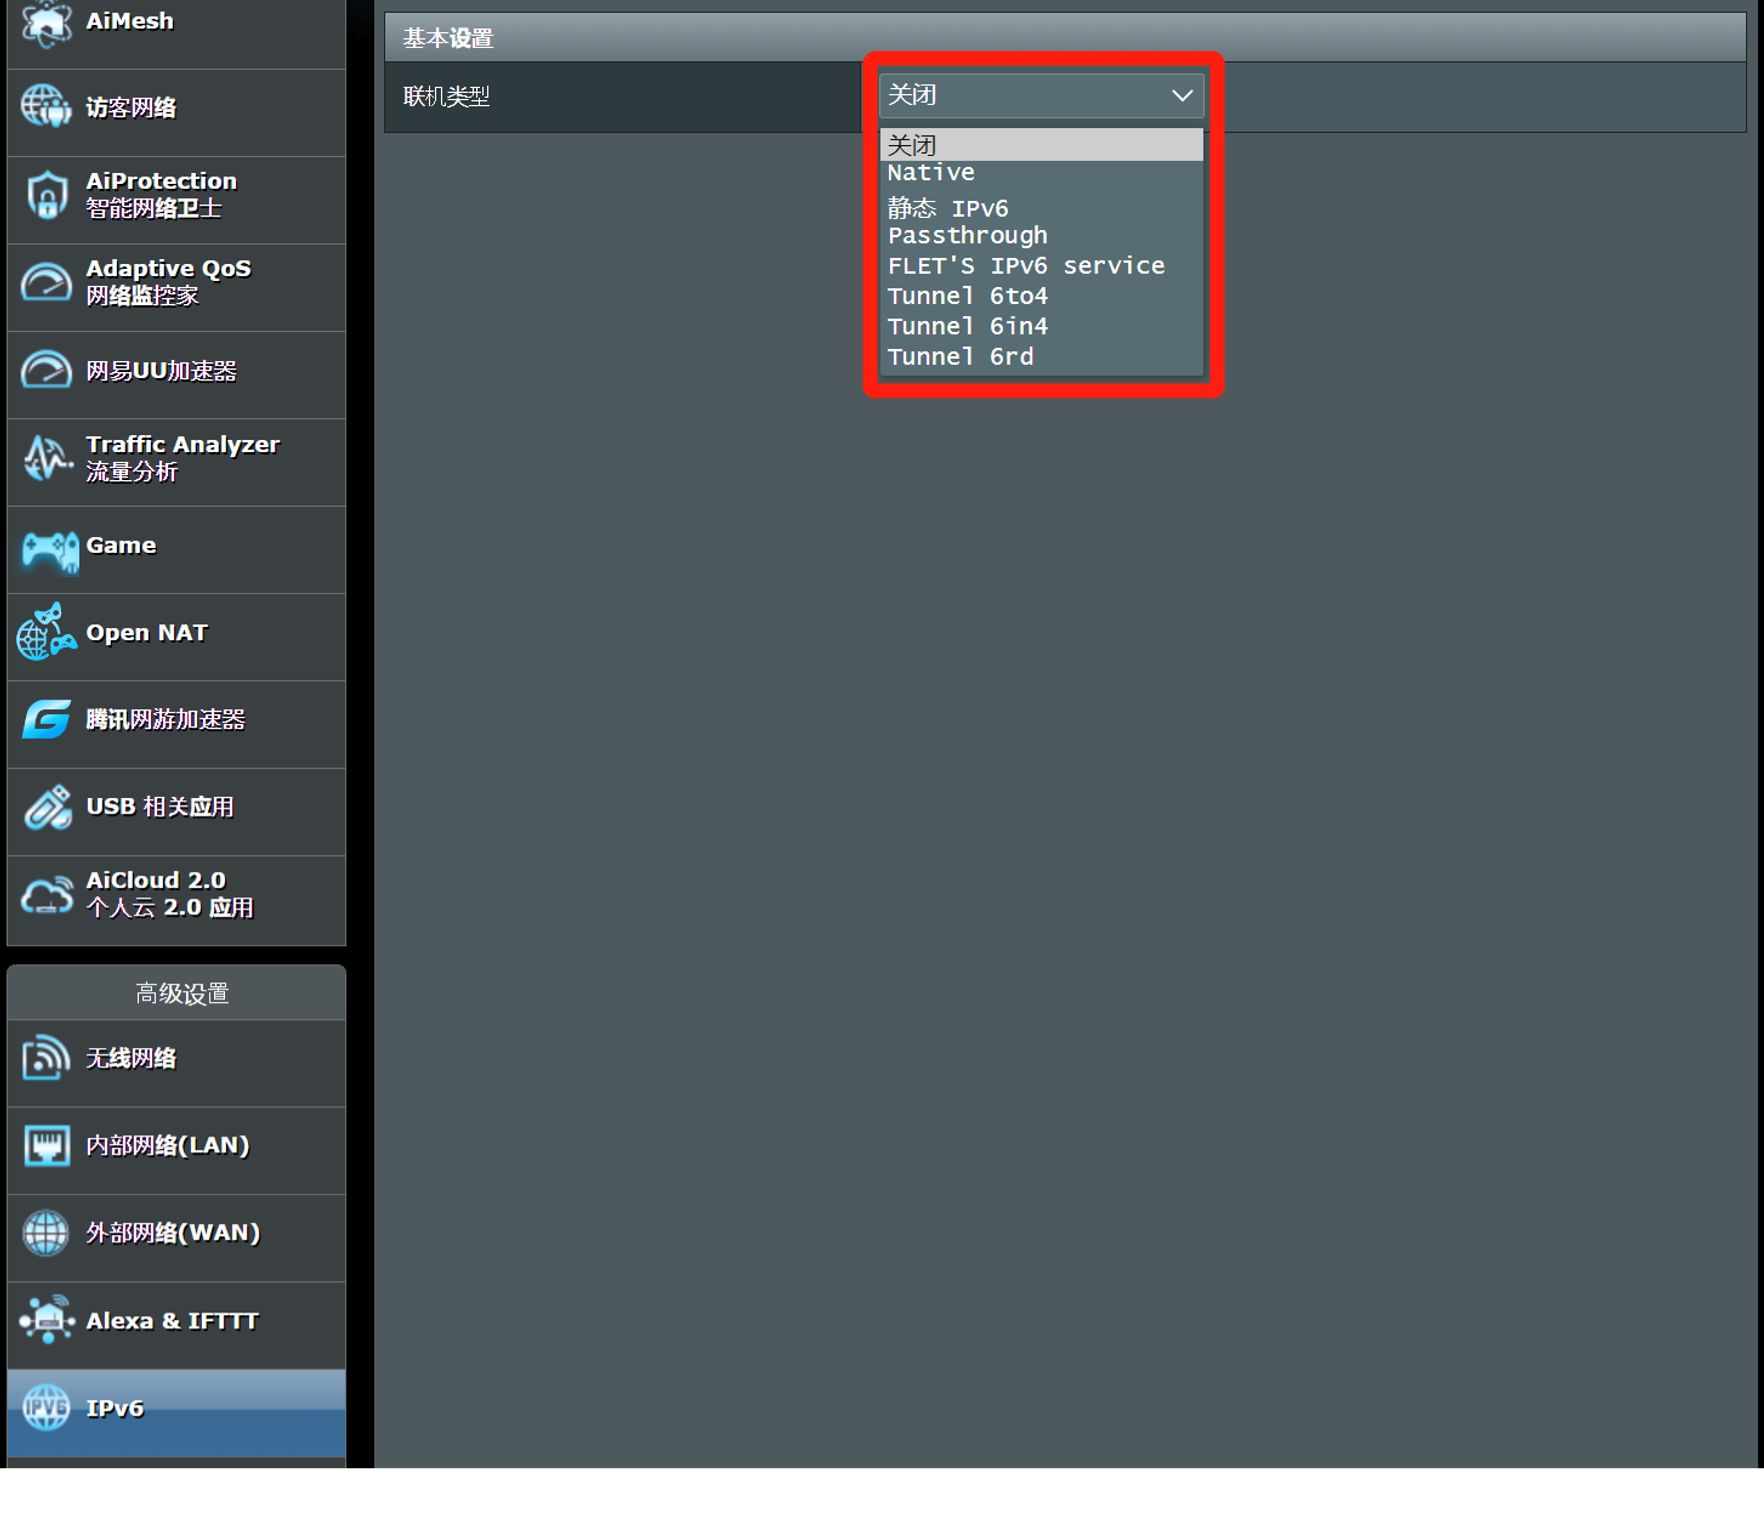
2. 点击[高级设置]>[IPv6],[联机类型]请按照ISP网络运营商提供的信息进行设置。

  • 当您的外部网络(WAN) > 互联网连接 > WAN联机类型为 [PPPoE], 在IPv6联机类型请选择 [Native]
  • 当您的外部网络(WAN) > 互联网连接 > WAN联机类型为 [动态IP], 在IPv6联机类型请选择 [Passthrough]
  • 当您的外部网络(WAN) > 互联网连接 > WAN联机类型为 [静态IP], 在IPv6联机类型请选择 [静态 IPv6]
  • 其他IPv6类型,请与您的ISP确认需要填写的信息。

注意: 外部网络(WAN) > 互联网连接 > WAN联机类型一定要先设置。

Native 
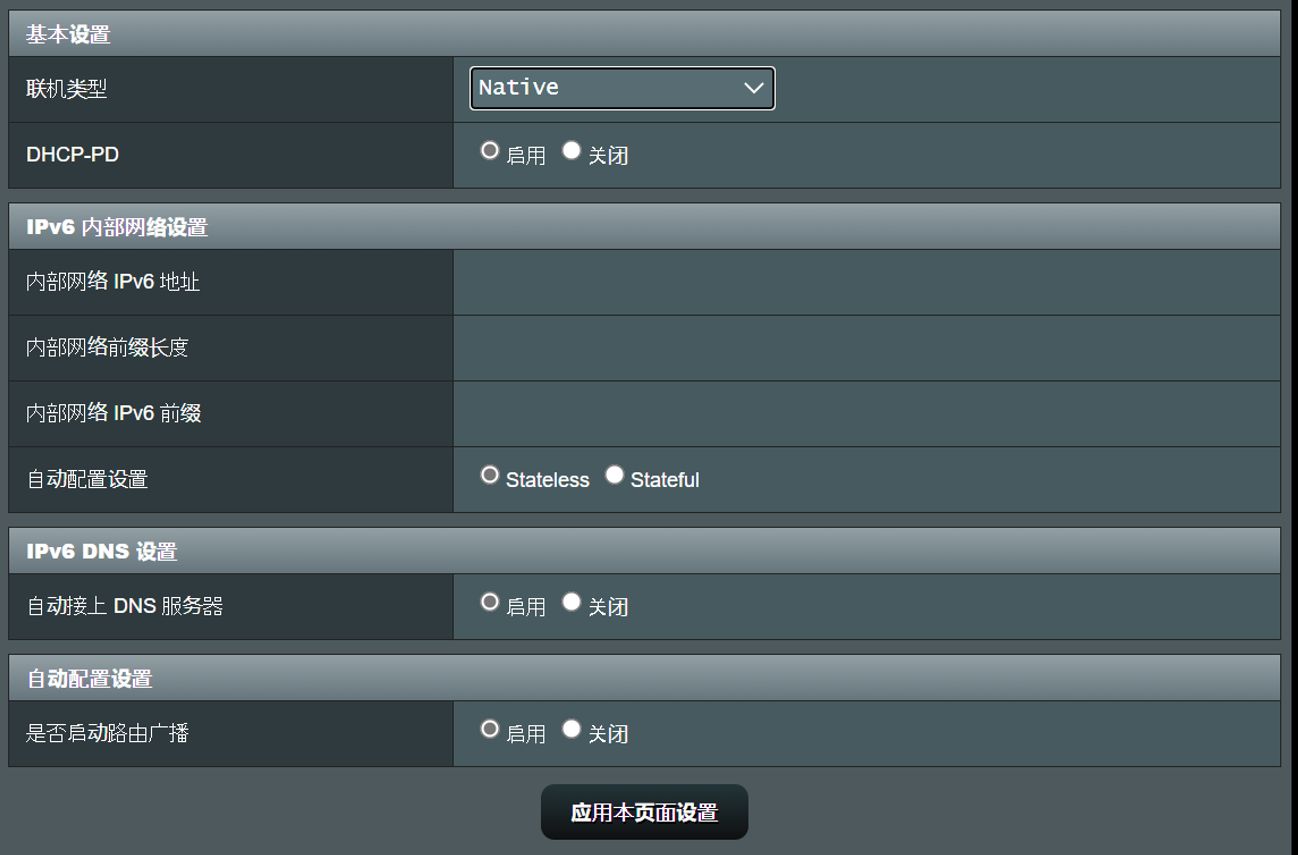
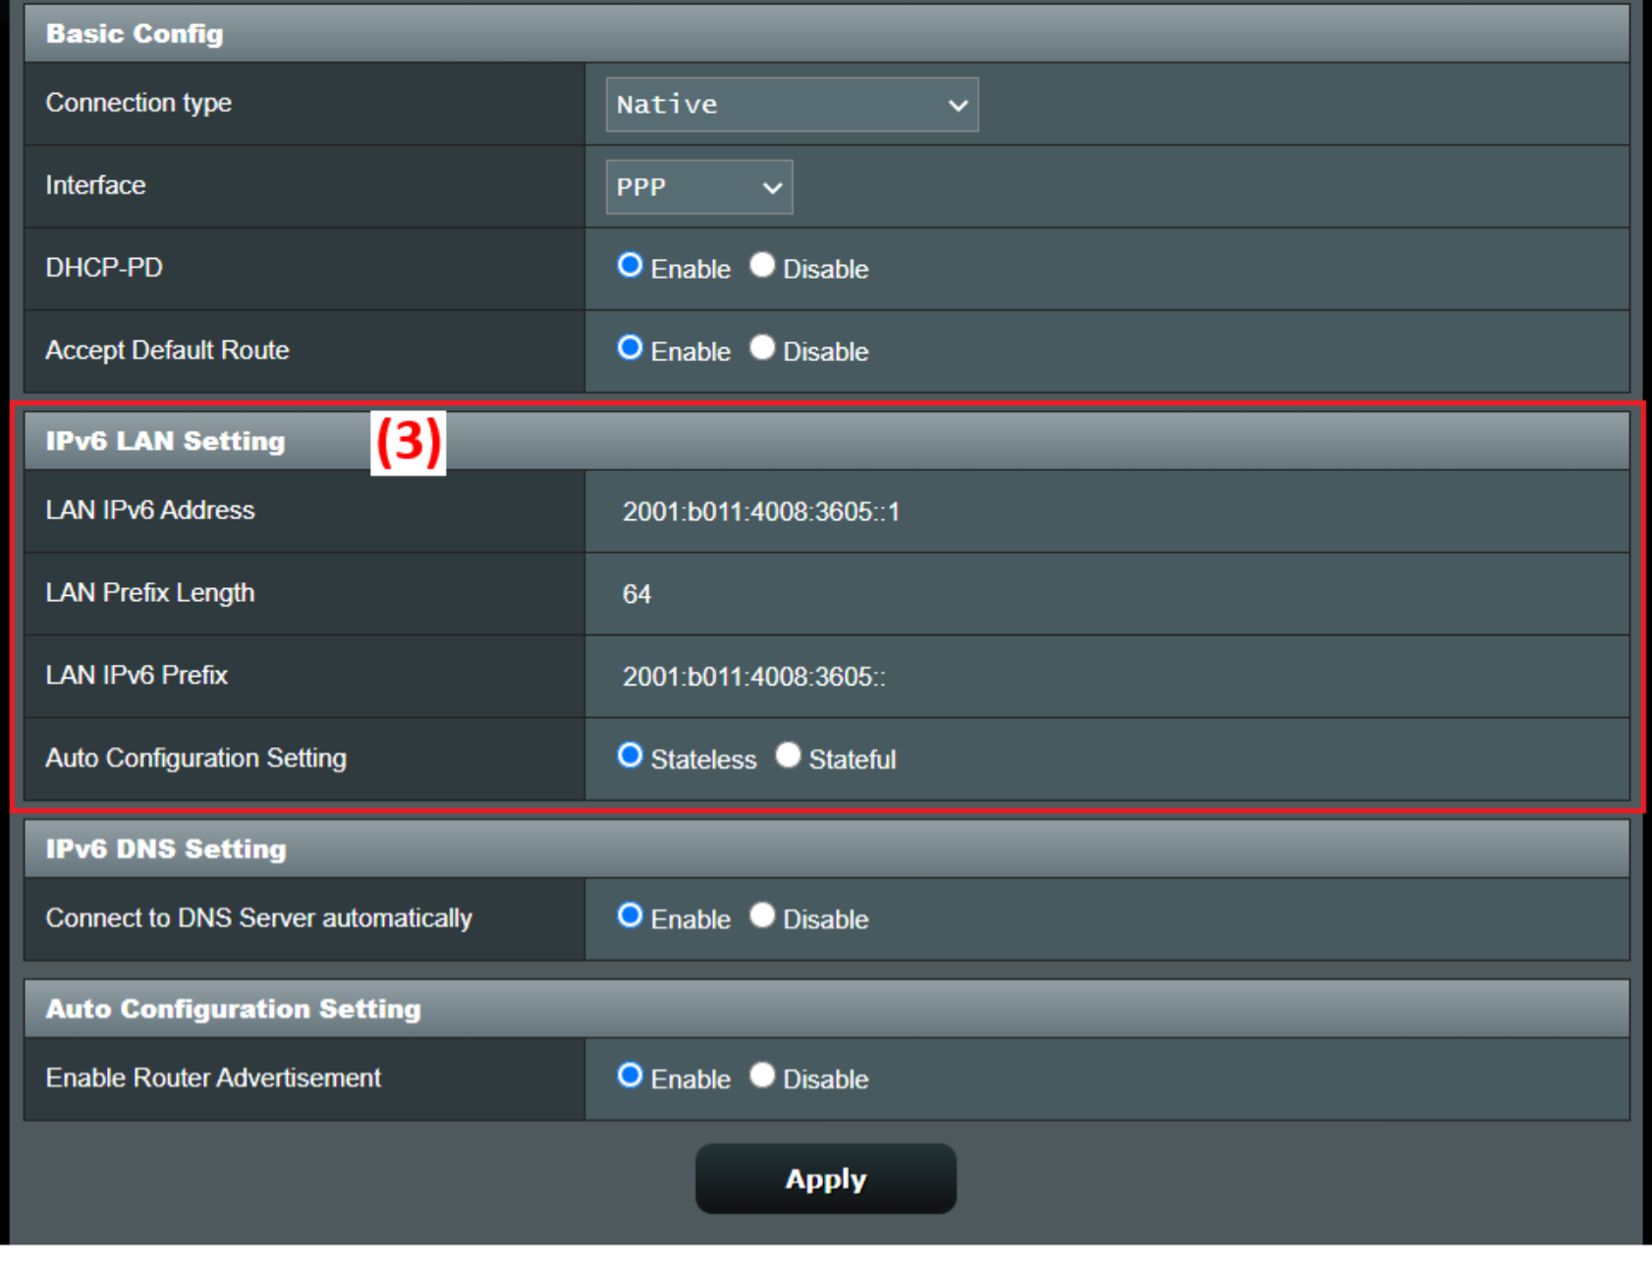
3. 若选择IPv6联机类型为 [Native],建议设置方式为直接点击[应用本页面设置]。

保存设置后再回到IPv6的页面,当[IPv6内部网络设置]出现IPv6信息,即[Native]的设置就完成了。

静态IPv6 

4. 若选择IPv6联机类型为 [静态 IPv6] 请按照ISP网络运营商提供的信息进行设置,输入完成后点击[应用本页面设置] 保存设置即可。

举例如下(不同运营商,及不同地区会有差异)

栏位 IPv6
外部网络IPv6地址 2001:B030:2309:FF00::0001/64
外部网络IPv6网关 2001:B030:2309:FF00::FFFF/64
内部网络IPv6地址 2001:B030:2309:0000::/56


Passthrough

5. 若选择IPv6联机类型为 [Passthrough] ,点击[应用本页面设置] 保存设置即可。


注意:您可以通过以下网址确认IPv6连接情况  http://flets-v6.jp/


注意:

电信拨号获得的ipv6为动态ip,openwrt使用relay,asus路由器使用passthrough

最简单Openwrt ipv6配置,局域网WAN6中继模式获取原生ipv6地址

原文:https://cloud.tencent.com/developer/article/1888169

条件

condition

wan 和 wan6 是默认配置

Wan and wan6 are the default configurations

同时wan6可以获取到原生IPv6

At the same time wan6 can get native IPv6

ssh链接之后,进行备份配置文件后,并进行修改

After the ssh link, after backing up the configuration file, and modifying it

root@cby:~# vim /etc/config/dhcp
root@cby:~# cat /etc/config/dhcp

config dnsmasq
option localise_queries '1'
option rebind_protection '1'
option rebind_localhost '1'
option local '/lan/'
option domain 'lan'
option expandhosts '1'
option authoritative '1'
option readethers '1'
option leasefile '/tmp/dhcp.leases'
option resolvfile '/tmp/resolv.conf.auto'
option nonwildcard '1'
option localservice '1'
option noresolv '0'
list server '127.0.0.1#5333'

config dhcp 'lan'
option interface 'lan'
option start '100'
option limit '150'
option leasetime '12h'
option ra_slaac '1'
list ra_flags 'managed-config'
list ra_flags 'other-config'
option ra 'relay'
option dhcpv6 'relay'
option ndp 'relay'

config dhcp 'wan'
option interface 'wan'
option ignore '1'
option ra 'relay' 
option dhcpv6 'relay' 
option ndp 'relay' 
option master '1'

config odhcpd 'odhcpd'
option maindhcp '0'
option leasefile '/tmp/hosts/odhcpd'
option leasetrigger '/usr/sbin/odhcpd-update'
option loglevel '4'

config srvhost
option srv '_vlmcs._tcp'
option target 'cby'
option port '1688'
option class '0'
option weight '100'

配置文件修改为以上配置即可,注意wan口的配置。若有wan6接口的配置,将以下配置添加到wan6。若没有即配置到wan口即可。

The configuration file can be modified to the above configuration, pay attention to the configuration of the wan port. If there is a wan6 interface configuration, add the following configuration to wan6. If not, configure it to the wan port.

 option ra 'relay' 
option dhcpv6 'relay' 
option ndp 'relay' 
option master '1'


最后进行IPV6测速

Finally, IPV6 speed test

openwrt 开启wps

ref:

https://gist.github.com/alghanmi/4de45337ca517ebe3a56

https://www.cxyzjd.com/article/bingyu9875/50857500

opkg update
opkg remove wpad-mini wpad-basic
opkg install wpad hostapd-utils

重新启动路由器,进入无线设置,编辑无线连接,无线安全页面卡上有”

需要执行的脚本或者命令:
hostapd_cli -i wlan0 wps_pbc
root@OpenWrt:/# hostapd_cli -i wlan0 wps_pbc
OK

或者

root@OpenWrt:~# hostapd_cli -p /var/run/hostapd-phy0 wps_pbc


局域网cups共享打印机

https://www.cups.org/doc/sharing.html

Printer Sharing

This document discusses several ways to configure printer sharing.

The Basics

A “server” is any machine that communicates directly to a printer. A “client” is any machine that sends print jobs to a server for final printing. Clients can also be servers if they communicate directly with any printers of their own.

By default, CUPS uses the Internet Printing Protocol (IPP) to send jobs from a client to a server. When printing to legacy print servers you may also use the Line Printer Daemon (LPD) protocol when printing to older UNIX-based servers or Server Message Block (SMB) when printing to Windows® servers.

Clients can automatically discover and access shared printers via DNS Service Discovery (DNS-SD a.k.a. Bonjour®). SMB browsing can also be used to manually discover and access shared printers when Samba is installed.

Configuring the Server

You must enable printer sharing on the server before clients can print through it. The simplest way to do this is to use the cupsctl(8) command on the server:

cupsctl --share-printers

By default, the above command will allow printing from other clients on the same subnet as your server. To allow printing from any subnet, use the following command instead:

cupsctl --share-printers --remote-any

K30Pro/Poco F2 Pro/lmi刷LineageOS

0.备份数据,解锁,去除开机密码

1.更新固件

firmware

https://xiaomifirmwareupdater.com/firmware/lmi/

vendor/

https://xiaomifirmwareupdater.com/archive/vendor/lmi/

2.刷TWRP

原文:https://forum.xda-developers.com/t/firmware-xiaomi-redmi-k30-pro-poco-f2-pro-lmi-auto-updated.4250275/

原作:MBsRoom

Team Win Recovery Project 3.x, or twrp3 for short, is a custom recovery built with ease of use and customization in mind. Its a fully touch driven user interface no more volume rocker or power buttons to mash. The GUI is also fully XML driven and completely theme-able. You can change just about every aspect of the look and feel.

Code:

Code:
/*
*
* We are not responsible for bricked devices, dead SD cards,
* thermonuclear war, or you getting fired because the alarm app failed. Please
* do some research if you have any concerns about features included in this ROM
* before flashing it! YOU are choosing to make these modifications, and if
* you point the finger at us for messing up your device, we will laugh at you.
*
*/

Features:
– Decryption work
– Otg work
-Vibrator
– Zip Flash
– Mtp/adb
– F2FS support
– Fastbootd
– Adb sideload
– Backup restore and images flash

Not working:
-Tell me

INSTALLATION:
1. Download the TWRP image file to your PC.
2. Put your device into fastboot.
3. Type the following command to flash the recovery:-

Code:
fastboot flash recovery "name_of_recovery.img"

4. On installation of TWRP , to boot the recovery do:-

Code:
fastboot boot "name_of_recovery.img"

The device will automatically reboot into TWRP.

5-A. You are using Xiaomi.eu Miui or custom Rom?
You can enjoy with a functional Data Decrypt

5-B You are using Miui EEA – Global -Cn or any custom rom that doesn’t ship custom vbmeta.

6. Download this zip, copy by pc or using otg and flash this zip that will prevent twrp replacing.​
7. Download VbMeta and flash by fastboot​
Code:
fastboot --disable-verity --disable-verification flash vbmeta vbmeta.img"
7. Reboot into twrp (Take longer Time) 
Code:
fastboot boot "name_of_recovery.img"
8. Format Data and Reboot​

NOTES:
By Command fastboot boot, recovery will decrypt everytimes you need, also with Global Rom and without patched vbmeta.

Download:
TWRP

https://sourceforge.net/projects/mbroms/files/TWRPLMI/

VbMeta

https://sourceforge.net/projects/mbroms/files/TWRP/vbmeta.img/download

(Version tag will follow vendor, a lower version tag than your vendor does not mean that recovery will not work)

Kernel Source: HERE

Donation:
PayPal: paypal.me/manuelbiancodev

Telegram Group: @MBsRoom

3.刷LineageOS

3.1解锁,去除开机密码!!

3.2刷LineageOS

18.1

原文:https://forum.xda-developers.com/t/rom-r-official-lineageos-18-1-for-poco-f2-pro-redmi-k30-pro-redmi-k30-pro-zoom-edition-lmi.4203885/

LineageOS is a free, community built, aftermarket firmware distribution of Android 11.0 (R), which is designed to increase performance and reliability over stock Android for your device.

LineageOS is based on the Android Open Source Project with extra contributions from many people within the Android community. It can be used without any need to have any Google application installed. Linked below is a package that has come from another Android project that restore the Google parts. LineageOS does still include various hardware-specific code, which is also slowly being open-sourced anyway.

All the source code for LineageOS is available in the LineageOS Github repo. And if you would like to contribute to LineageOS, please visit out Gerrit Code Review. You can also view the Changelog for a full list of changes & features.

Downloads

https://download.lineageos.org/lmi

Flashing instructions

https://wiki.lineageos.org/devices/lmi/install

Sources:
LineageOS

Happy modding!

3.3 进入系统

如果无法进入系统,可能刷机前没有去除设备密码。重启至twrp,format date分区

3.3 刷OpenGAPP,magisk


3.3 安装google相机

https://www.celsoazevedo.com/files/android/google-camera/dev-arnova8G2/f/dl2/

https://www.celsoazevedo.com/files/android/google-camera/f/configs-arnova-09/


Trouble Shooting

通讯录无法同步解决方案

google play service和google play给予通讯录的权限

虚拟机安装android-x86

1.下载

https://osdn.net/projects/android-x86/releases

选择k49版本(kernel 4.9)

2.安装

默认安装,/system选择read/write

3.虚拟机设置

3.1 virtualbox

1.CPU 勾选虚拟化支持

2.显示选项:选择VboxSVGA,去除3D加速

3.2 vmware

vi /mnt/grub/menu.lst

replace quiet to nomodeset xforcevesa DPI=320

最后加上

vga=ask(ask可以替换为后来的分辨率代码)


4.安装houdini库

4.1 Android x86 Arm NativeBridge (libhoudini)

Houdini is an ARM translation layer for android developed by Intel and Google to run ARM apps on x86 architecture. The project is closed source and nowadays android x86 doesn’t have it pre-installed in the system. To enable ARM Native Bridge on android x86 you need to run the enable_nativebridge command from the terminal, which downloads the .sfs image file from the android x86 servers and runs the ARM activation commands according to your device architecture.

There are mainly 3 types of libhoudini used in android x86 :-

  • houdini_7_x = (x86 arm translation)
  • houdini_7_y = (x86_64 arm translation)
  • houdini_7_z = (x86_64 arm64 translation)

Houdini files are named according to their android version :-

  • Houdini_6 series = android 6.0
  • Houdini_7 series = android 7.0
  • Houdini_8 series = android 8.0
  • Houdini_9 series = android 9.0

Houdini_6 series can be used in android 7.1 as well and the Houdini_8 series can be used in Android 9.0, but a higher version of Houdini is not compatible with the lower version of android.

Download Links :-

Houdini_6 series


http://dl.android-x86.org/houdini/6_x/houdini.sfs
http://dl.android-x86.org/houdini/6_y/houdini.sfs
http://dl.android-x86.org/houdini/6_z/houdini.sfs

Houdini_7 series


http://dl.android-x86.org/houdini/7_x/houdini.sfs
http://dl.android-x86.org/houdini/7_y/houdini.sfs
http://dl.android-x86.org/houdini/7_z/houdini.sfs

Houdini_8 series

http://dl.android-x86.org/houdini/8_x/houdini.sfs
http://dl.android-x86.org/houdini/8_y/houdini.sfs

Houdini_9 series

http://dl.android-x86.org/houdini/9_y/houdini.sfs

How to manually install Arm Native Bridge in android x86

  • Download the required .sfs file from the above links.
  • Rename the file houdini.sfs to houdini7_y.sfs
  • Copy the houdini7_y.sfs file to /data/arm/ folder
  • Do the same for the z series if you want to run the arm64 app.
  • Press alt+f1 to open terminal & run the command enable_nativebridge.
  • if you don’t get any error msg then you’ve successfully activated ARM Native Bridge on your system.
  • Press alt+f7 to return to GUI & download any game/app to test libhoudini.

4.2 connetc adb

adb connect *.*.*.*:5555
adb push houdini.sfs /sdcard/

4.3 启用houdini库

:/sdcard # cp houdini.sfs /system/etc/houdini{version}_y.sfs
:/sdcard # cp houdini.sfs /system/etc/houdini{version}_z.sfs
:/sdcard # /system/bin/enable_nativebridge
:/sdcard # reboot

注:

1.{version}为对应android版本

2.android 8、9无houdini z.sfs


5.系统设置

进入系统,在设置->应用兼容性->兼容模式

启用兼容模式


6.相关快捷键

右ctr+h 电源

win   Home

menu  menu

alt+tab 任务切换


解除MS Office文档写保护

1.打开文档

2.另存为Word XML Document (*.xml)

3.使用文本编辑器打开保存的xml文件

4.搜索DoumentProtection字段

5.修改

方法一

将“DoumentProtection”改为“unDoumentProtection”

方法二

将w:enforcement=”1″ 或者 w:enforcement=”on”改为w:enforcement=”0″ or w:enforcement=”off”

6.用Office 打开修改后的xml文件,另存为word文档


How to force fsck to check filesystem after system reboot on Linux

原文:https://linuxconfig.org/how-to-force-fsck-to-check-filesystem-after-system-reboot-on-linux

This article will explain a procedure on how to force fsck to perform a filesystem check on the next system reboot or force filesystem check for any desired number of system reboots whether it is root or non-root mount point.

Let’s start with discussion about some tools which can be used to obtain filesystem information and configurations which control filesystem check after system reboot. The tool which we are going to discuss is tune2fs filesystem managing utility. Using tune2fs we can export some important information related to filesystem health check. The following linux command will tell as when was the last time the filesystem /dev/sdX was checked:

# tune2fs -l /dev/sdbX | grep Last\ c
Last checked:             Sun Dec 13 09:14:22 2015

Anther useful information which can be retrieved by tune2fs command relates to how many times our /dev/sdX filesystem was mounted:

# tune2fs -l /dev/sdbX | grep Mount
Mount count:              157


and lastly how many mounts are allowed to pass before filesystem check is forced:

# tune2fs -l /dev/sdbX | grep Max
Maximum mount count:      -1

From the above outputs we can establish the following information summary. The /dev/sdbX filesystem was last checked on Sun Dec 13 09:14:22 2015. Since the last check, this filesystem was mounted 157 times and maximum amount of mounts before next filesystem fsck check. In the above case the value -1 means that fsck is disabled.


Now, that we have learned about some tune2fs basics let’s discuss PASS system configuration option found in /etc/fstab file containing all on boot mountable partitions and their relevant mount options.

# blkid | grep sdb1
/dev/sdb1: UUID="c6e22f63-e63c-40ed-bf9b-bb4a10f2db66" TYPE="ext2"
# grep c6e22f63-e63c-40ed-bf9b-bb4a10f2db66 /etc/fstab
UUID=c6e22f63-e63c-40ed-bf9b-bb4a10f2db66 /mnt            ext2    errors=remount-ro 0      0

We have used blkid command to retrieve UUID for a given partition and then used the retrieved partition UUID to get a relevant information related to /dev/sdb1 partition from /etc/fstbab.
The last column that is a column 6, aka fsck PASS column is used by fsck to determine whether fsck should check filesystem before it is mounted and in which order given partitions in /etc/fstab should be checked. Possible entries for fstab PASS column are 0,1 and 2.

  1. 0 – disabled, that is do not check filesystem
  2. 1 – partition with this PASS value has a higher priority and is check first. This value is usually set to root / partition
  3. 2 – partitions with this PASS value will be checked last

The connection between fstab PASS value, last checked value and number of mounts value is as follows:
During the system boot the first value which is checked is fstab PASS value. If this value is 0 that not other values are checked ( exemption .. see “Force fsck for root partition” below ) and the fsck will NOT perform filesystem check. If the PASS value found in /etc/fstab is any other than 0, that is 1 or 2 then values of maximum mounts and total mounts are checked. If the value of maximum mounts is greater or equal to total number of mounts value then fsck’s filesytem check will be performed. Few examples:

FSCK DISABLED
fstab PASS: 1
Maximum mount count:      -1
Mount count:              157
----
FSCK DISABLED
fstab PASS: 0
Maximum mount count:      -1
Mount count:              157
----
FSCK ON NEXT REBOOT
fstab PASS: 1 or 2
Maximum mount count:      1
Mount count:              157
----
FSCK DISABLED
fstab PASS: 0
Maximum mount count:      1
Mount count:              1
----
FSCK ON NEXT REBOOT
fstab PASS: 1 or 2
Maximum mount count:      1
Mount count:              1
----
NO FSCK ON NEXT REBOOT
fstab PASS: 1 or 2
Maximum mount count:      200
Mount count:              157


Force fsck for root partition

The simplest way to force fsck filesystem check on a root partition eg. /dev/sda1 is to create an empty file called forcefsck in the partition’s root directory.

# touch /forcefsck

This empty file will temporarily override any other settings and force fsck to check the filesystem on the next system reboot. Once the filesystem is checked the forcefsck file will be removed thus next time you reboot your filesystem will NOT be checked again. To enable more permanent solution and force filesystem check on every reboot we need to manipulate filesystem’s “Maximum mount count” parameter. The following linux command will ensure that filesystem /dev/sdb1 is checked every time your Linux system reboots. Please note that for this to happen the fsck’s PASS value in /etc/fstab must be set to a positive integer as discussed above.

# tune2fs -c 1 /dev/sdb1

alternatively we can set fsck after every 10 reboots:

# tune2fs -c 10 /dev/sdb1

Force fsck for all other non-root partitions

As oppose to root partition creating empty forcefsck file will NOT trigger partition check on reboot. The only way to force fsck on all other non-root partitions is to manipulate filesystem’s “Maximum mount count” parameter and PASS value within /etc/fstab configuration file. To force filesystem check on non-root partition change fsck’s PASS value in /etc/fstab to value 2. For example:

UUID=c6e22f63-e63c-40ed-bf9b-bb4a10f2db66 /mnt            ext2    errors=remount-ro 0      2

and change maximum mounts filesystem parameter to a positive integer, depending on how many times you wish to allow a specified filesystem to be mounted without being checked. Force fsck on every reboot:

# tune2fs -c 1 /dev/sdb1

alternatively we can set fsck to check filesystem after every 5 reboots:

# tune2fs -c 5 /dev/sdb1

To disable fsck run:

# tune2fs -c 0 /dev/sdb1
OR
# tune2fs -c -1 /dev/sdb1

Which will set the filesystem’s “Maximum mount count” parameter to -1

The official release of the well-known simulator KMS URL

Some well-known official release of KMS emulator URL:

Native self-activated KMS to activate the software installation class, easily killing the failure of the system upgrade, and can easily be tied backdoor virus software in the communication process is not recommended to try.

Loader Windows
https://forums.mydigitallife.net/threads/windows-loader-download.58464/

KMS_VL_ALL
https://forums.mydigitallife.net/threads/kms_vl_all-online-offline-kms-activator.63471/

KMSpico
HTTPS: //forums.mydigitallife.net/threads/kmspico-official-thread.65739/

vlmcsd and KMS-Py
https://forums.mydigitallife.net/threads/emulated-kms-servers-on-non-windows-platforms.50234 /

in the Microsoft Toolkit
https://forums.mydigitallife.net/threads/microsoft-toolkit-official-kms-solution-for-microsoft-products.28669/

「技巧」Chrome、Edge 默认下载器也能多线程下载?隐藏黑科技了解一下!

原文:https://zhuanlan.zhihu.com/p/93176490

注意:任何基于 Chromium 内核的浏览器(国内套壳、Edge等)都支持该功能!

大家在使用 Chrome、Edge 浏览器的时候,下载一些小文件往往都会直接用默认下载器,但是下载大文件的时候,一般都会搭配其他 专业多线程下载工具 使用,但是嫌麻烦…

最近我发现 Chrome、Edge 浏览器有个多线程下载选项,默认是关闭的,我试了下发现挺好用。

Chrome、Edge 浏览器这个多线程下载虽然不如专业下载工具,但也够用了!

速度对比

多线程下载 开启前
多线程下载 开启后

一键开启

  • Chrome 浏览器,地址栏输入并回车:chrome://flags/#enable-parallel-downloading
  • Edge 新版浏览器,地址栏输入并回车:edge://flags/#enable-parallel-downloading

就会看到如下图所示,将默认的 Default 改为 Enabled 即可!

然后重启 Chrome 浏览器再去下载个文件试试速度吧!

Enabled = 开启

为什么下载速度没有翻倍?

两种可能性:

  • 该文件不允许多线程下载!

例如,网站服务器限制了同一时间一个 IP 只能建立 1 个下载连接。

  • 该文件没有显示文件总大小!

部分网站下载文件时,不会显示文件总大小,这样的话就没办法多线程下载了(其他任何多线程下载工具都不行),没有文件总大小,就没办法等份分割文件进行并行下载。


多线程下载是什么?

一些人的可能并不清楚 多线程下载 是什么,我简单解释下。

目前的 专业下载工具(HTTP下载) 之所以下载速度更快,就是因为使用了 多线程下载 技术。

目前的 BT 软件也都支持 HTTP 多线程下载(因为 BT 下载上传也是需要文件分片)。

这个多线程下载技术很容易理解,那就是将下载的文件分割成多份。

假设下载一个 1GB 的文件,会被分割为 8 个 128MB 的文件块(8线程为例),然后与服务器建立 8 个连接,同时下载这 8 个分割后的文件块,如果单线程时最多 1MB/s 下载速度,那么现在理论上你的下载速度就从 1MB/s 提高到了 8MB/s。

这 8 个文件块都下载完成后,就会开始合并文件,这也是为什么下载完成后总会停顿一会儿才会提示下载完成。