1.编译aria2
来源:http://www.jianshu.com/p/1042483f90fe
到处搜了下,知识都很零散和碎片,这里做下整理。
想要编译aria2要先编译openwrt。编译平台是debian8。
1.获取openwrt的代码
从openwrt拿到官方代码,见官方页面https://dev.openwrt.org/wiki/GetSource
想要最新的就拉trunk的代码,我之前路由刷的是15.05分支的,创建一个文件夹,拿这个分支的代码:
mkdir openwrt
cd openwrt
git clone git://git.openwrt.org/15.05/openwrt.git
2.安装编译需要的依赖
sudo apt-get install gcc g++ binutils patch bzip2 flex bison make autoconf gettext texinfo unzip sharutils subversion libncurses5-dev ncurses-term zlib1g-dev3.进入源码文件夹,更新软件包
./scripts/feeds update -a4.安装一下
./scripts/feeds install -a5.定制固件
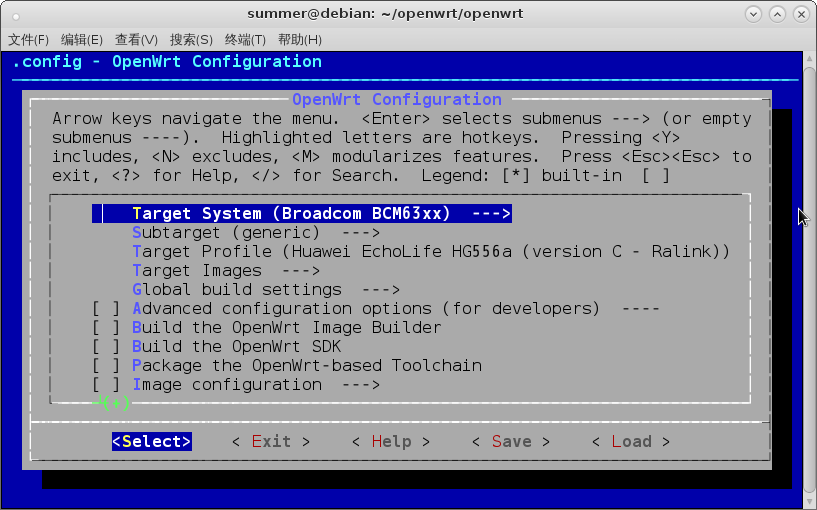
make menuconfig选择平台,Target System我这里选Broadcom BCM63XX。
选择路由器型号,Target Profile我这里选华为HG556a C版。
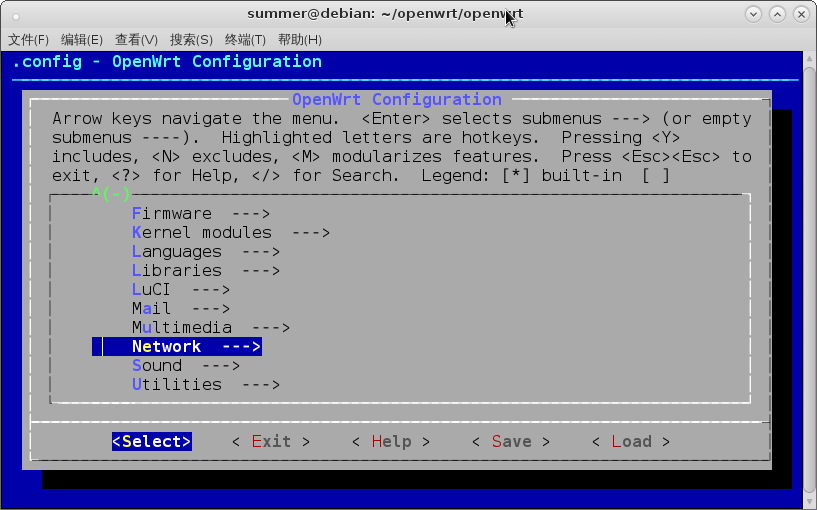
默认是不编译aria2的,这里我们要让它编译aria2。
向下翻找到Network–>File Transfer–>aria2,按空格键选中。
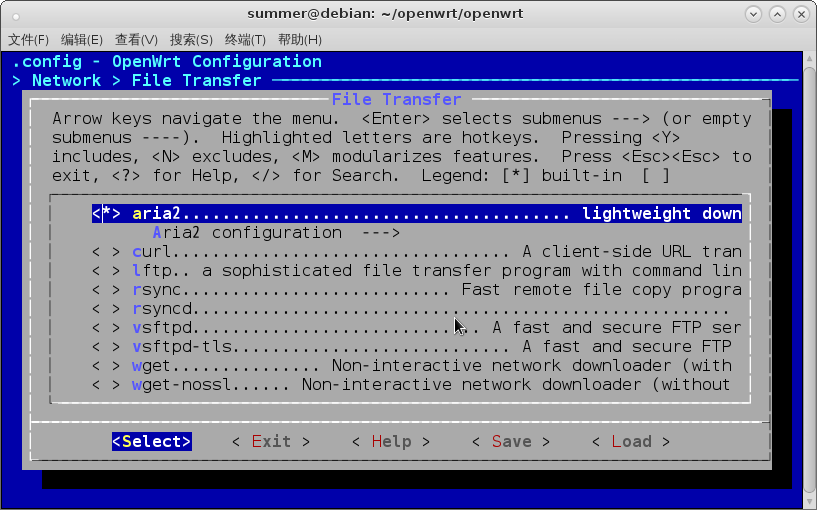
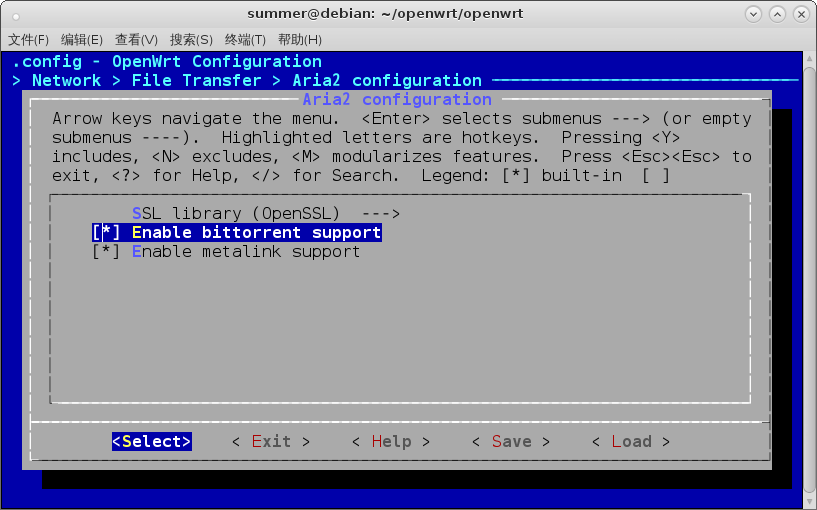
默认配置不支持BT和磁力链,我们要配置一下,让我们编译出来的支持这2种下载方式。
选择aria2下面的Aria2 configuration,把里面的Enable bittorent support和Enable metalink support用空格键选中。
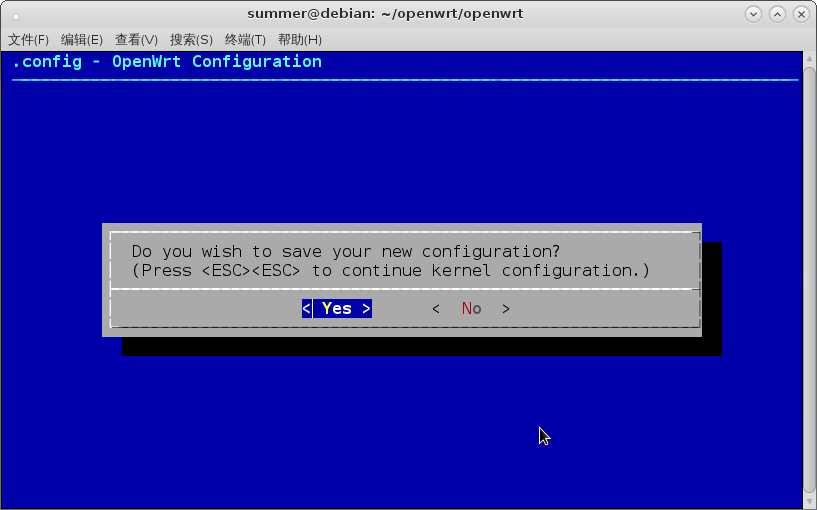
好,现在用方向键选Exit一路退出,最后退出时选YES保存一下
6.开始编译
make -j4 V=99j后面的数字代表用几个线程来编译。
7.编译中遇到的坑
①因为在编译种需要联网下载一些包下来,所以编译的时候一定要联网。
②有的包联网了还不行,还要翻墙才能下载。
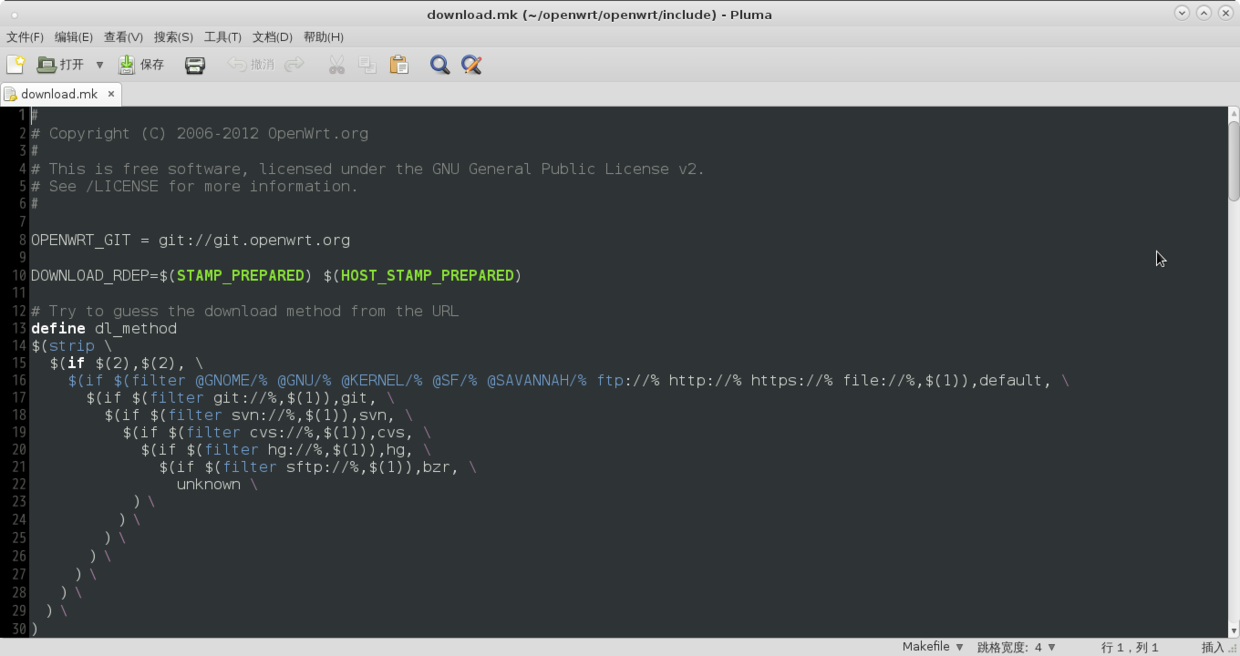
③有的包的下载地址用的http开头的无法下载,可以修改openwrt/include/download.mk文件,将第8行的http换成git
④第一遍编译时最好用make -j1 V=99来编译,即用一个线程来编译,以便编译出错时好定位哪里有问题。
8.编译完成
编译完成后在openwrt/bin/brcm63xx/packages/packages文件夹就会有一个aria2的ipk文件了。但是,这个版本是15.05自带的版本,我们需要最新的版本,所以接下来我们就要重新编译一下aria2.
9.下载最新的aria2代码
打开aria2的github项目,在Releases里面下载最新的代码,现在最新的是1.22.0
https://github.com/aria2/aria2/releases
我们选择下载aria2-1.22.0.tar.bz2这个版本
10.替换aria2的代码
将刚才下载的压缩包(不要解压)复制到openwrt/dl目录下,删掉原来的aria2 1.18的压缩包。
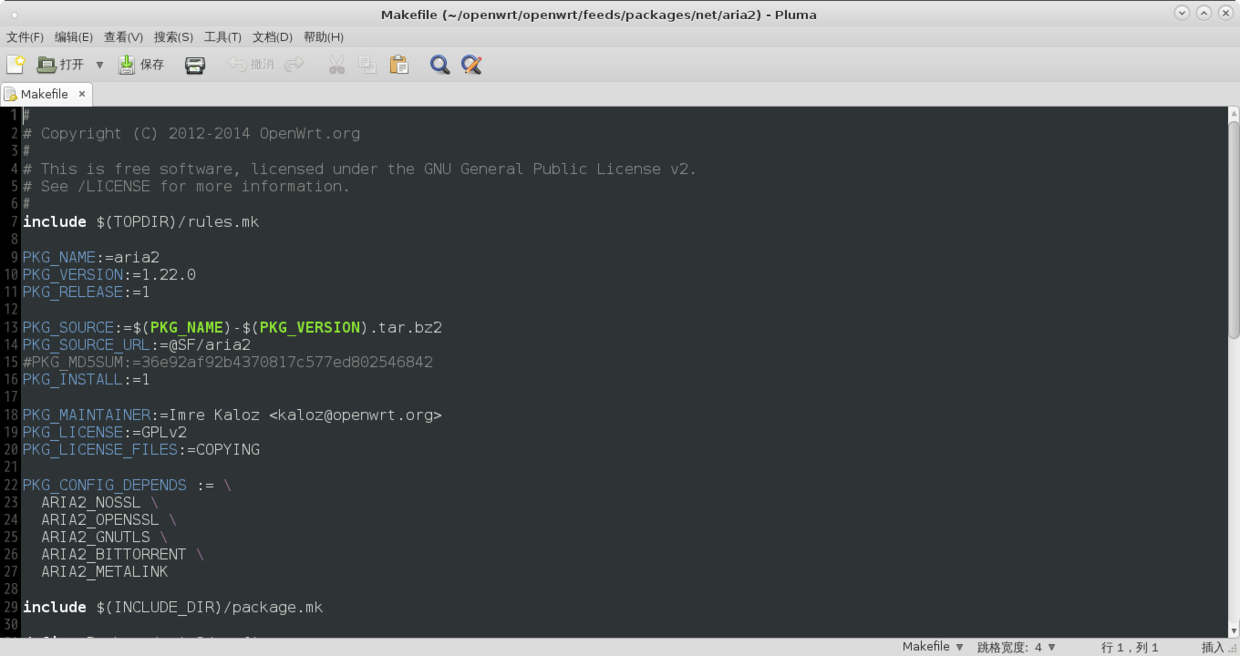
修改openwrt/feeds/packages/net/aria2/Makefile文件
将第10行的版本号修改为1.22.0
将第15行的MD5校验注释掉(前面加#号)
11.重新编译
好,现在可以重新编译了
先清除掉原来的编译结果
make package/feeds/packages/aria2/clean V=99现在查看openwrt/bin/brcm63xx/packages/packages目录,前面编译的aria2 1.18版本已经被清除掉了。
重新编译
make package/feeds/packages/aria2/install V=99等待一段时间,编译完成
再进到openwrt/bin/brcm63xx/packages/packages,已经可以华丽丽地看到aria2_1.22.0-1_brcm63xx.ipk出现在里面了。
大功告成。
2.配置
路由器OpenWrt如何脱机(离线)下载BT文件
本例中所使用之方法为在路由器(OpenWrt维基百科)里面安装Aria2(实测下载速度快于Transmission),直接下载文件到路由器上连接的U盘里(移动硬盘的方法相似), 使用的路由器型号为巴法络(Buffalo)WZR-HP-G450H-CH(刷OpenWrt),前提为需保证路由器可正常连接上互联网。 需要使用以下软件:[PuTTY], WinSCP, Notepad++, FileZilla FTP Client。 如需使用DD-WRT并安装Transmission进行脱机下载,请点击路由器(DD-WRT)如何脱机下载BT文件
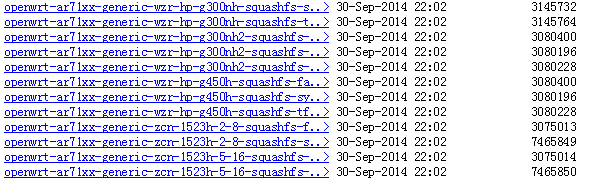
1.首先到如下网址下载OpenWrt固件(确保为您使用路由器型号)。 http://downloads.openwrt.org/snapshots/trunk/ar71xx/openwrt-ar71xx-generic-wzr-hp-g450h-squashfs-sysupgrade.bin
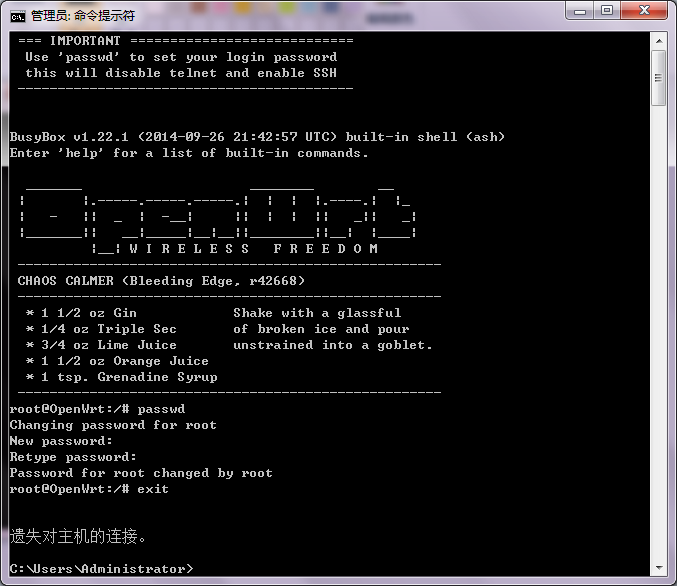
2.路由器升级完毕后在telnet命令行输入192.168.1.1(默认地址)连接到路由器(暂时断开上网路由器),默认密码为空,输入“passwd”命令修改密码,修改成功后输入“exit”退出。 如无法开启Telnet,则请点击[Telnet]开启Telnet.
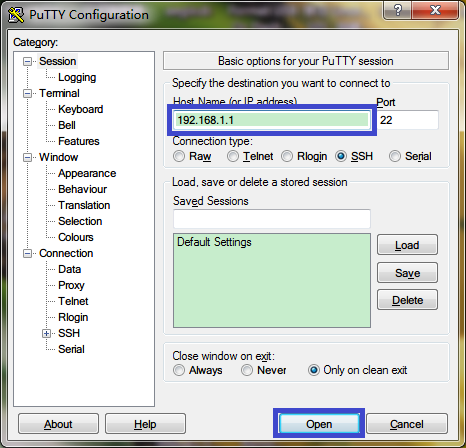
3.在PuTTY中输入192.168.1.1并点击“Open”连接到路由器。关于PuTTY的使用请点击[如何安装及使用PuTTY]。
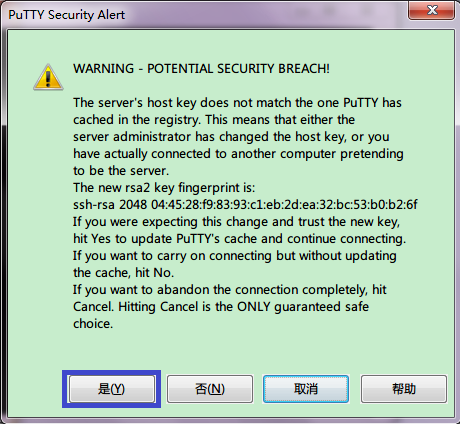
4.因路由器固件更新,出现如下提示,点击“是(Y)”继续。
5.输入账号(本例中为root)及密码登录。
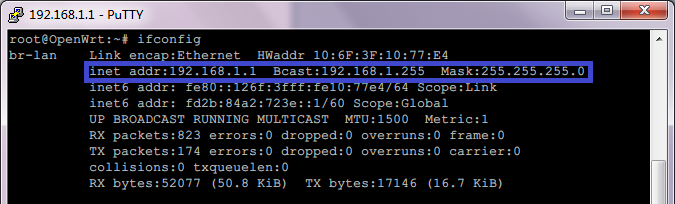
6.输入“ifconfig”查看网络设置。
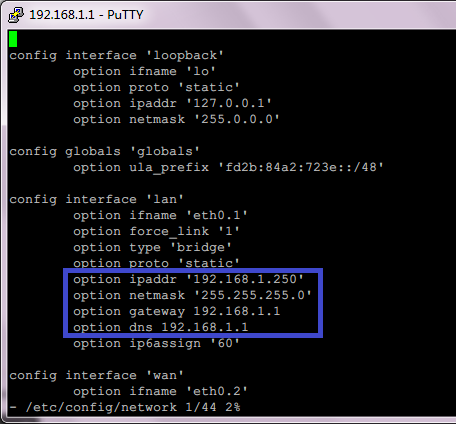
7.因本例中经另一个路由器(192.168.1.1)上网,故需修改网络设置,输入“vi /etc/config/network”。

8.按“i”进入编辑状态,将下图中蓝色方框内内容修改为正确的设置,本例中设置此路由器地址为192.168.1.250/24,网关和DNS均为192.168.1.1。 设置完毕后按ESC键并输入“:x”保存退出。
9.输入“/etc/init.d/network restart”重启服务,并连接上网路由器(192.168.1.1)。

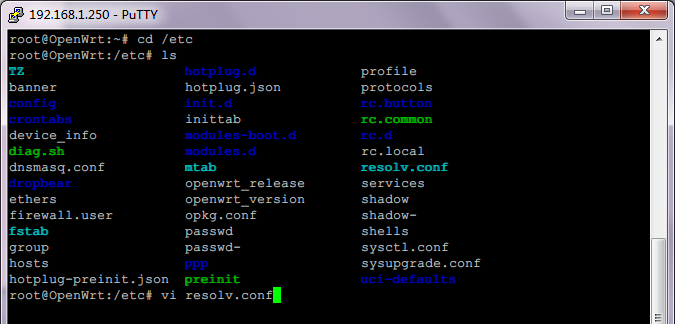
10.重新打开PuTTY输入新地址(192.168.1.250)连接到路由器,如还是无法连接Internet,则输入“cd /etc”转到/etc目录,继续输入“vi resolv.conf”编辑文件, 亦可直接输入“vi /etc/resolv.conf”。
11.将下图蓝色方框内内容修改为另一路由器地址(本例中为192.168.1.1),即“nameserver 192.168.1.1”,修改完毕后按“ESC”并输入“:x”保存退出。

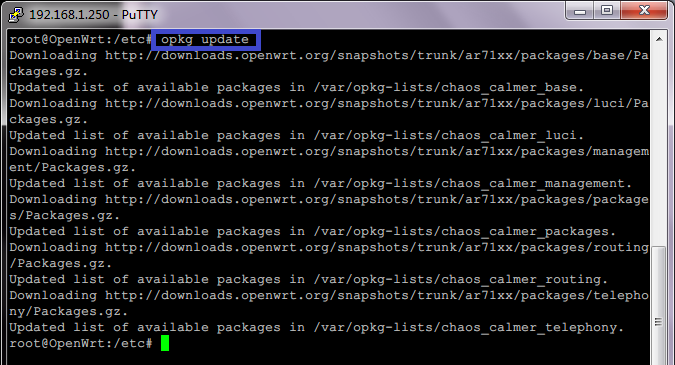
12.输入“opkg update”升级opkg。
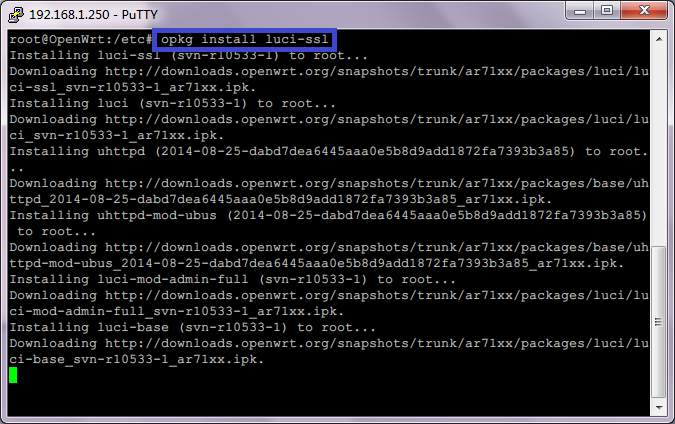
13.输入“opkg install luci-ssl”安装luci。
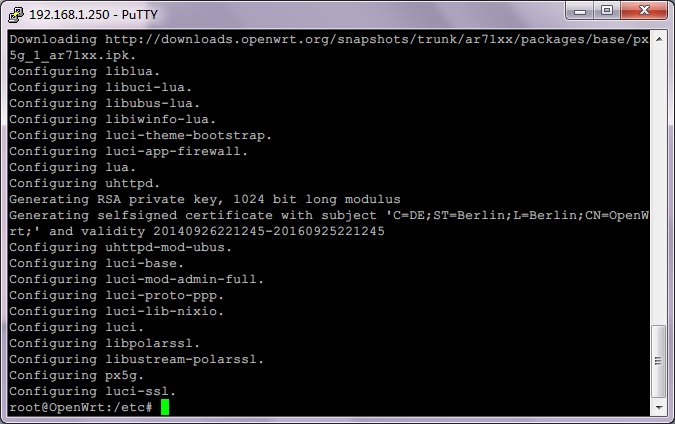
14.提示luci安装完毕。
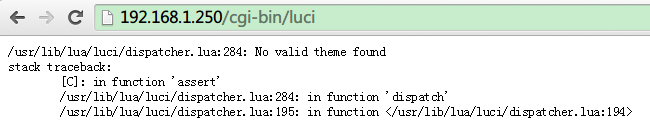
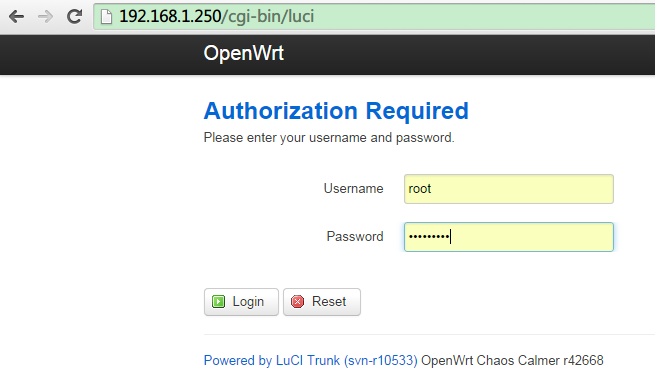
15.在浏览器地址栏输入此路由器地址(本例中为192.168.1.250),出现如下错误提示。
16.在PuTTY里输入“wget -O/etc/config/luci http://svn.luci.subsignal.org/luci/trunk/modules/base/root/etc/config/luci” 下载文件后, 重新安装luci-theme-bootstrap(opkg install luci-theme-bootstrap),安装完毕后输入“reboot”重启此路由器。

17.路由器重启完毕后再浏览器地址栏输入“192.168.1.250”即可打开luci,将U盘正确连接到路由器。
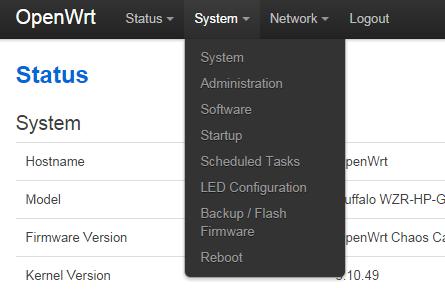
18.输入帐号密码登录,将鼠标移动到“System”,发现无“Mount Points”选项。
19.输入如下命令安装block-mount kmod-fs-ext4 kmod-usb-storage kmod-usb-storage-extras。建议首先运行“opkg update”更新opkg。 opkg install block-mount kmod-fs-ext4 kmod-usb-storage kmod-usb-storage-extras

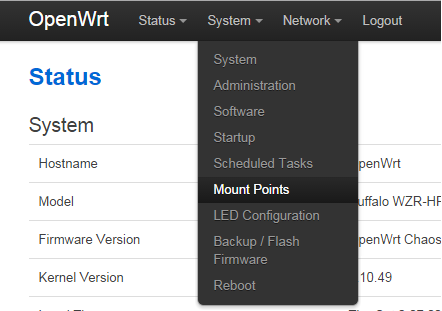
20.重启路由器后用浏览器登录路由器,在“System”下已出现“Mount Points”选项(可与18步比较)。
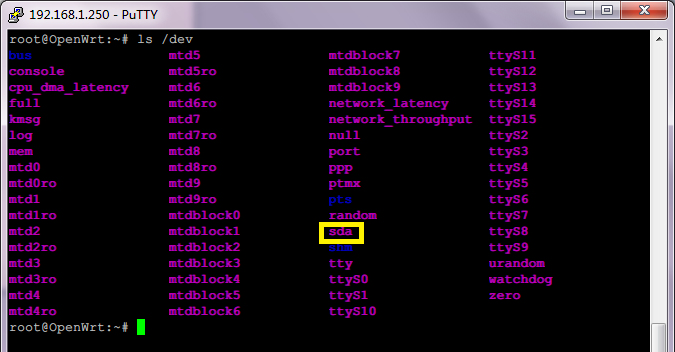
21.用PuTTY登录,输入“ls /dev”查看到U盘已被正确识别(蓝色框内sda)。
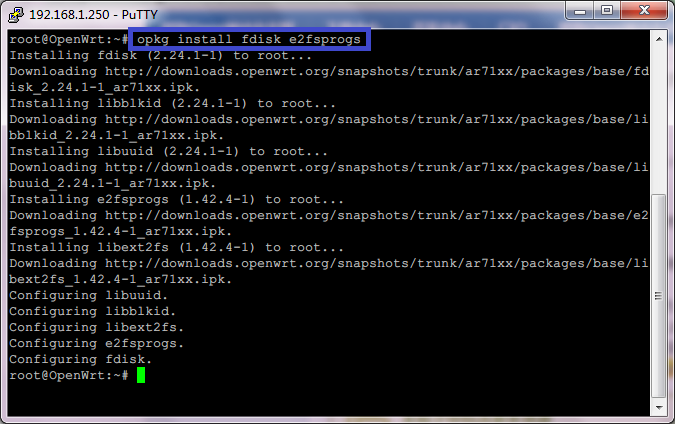
22.输入“opkg install fdisk e2fsprogs”安装fdisk和e2fsprogs。
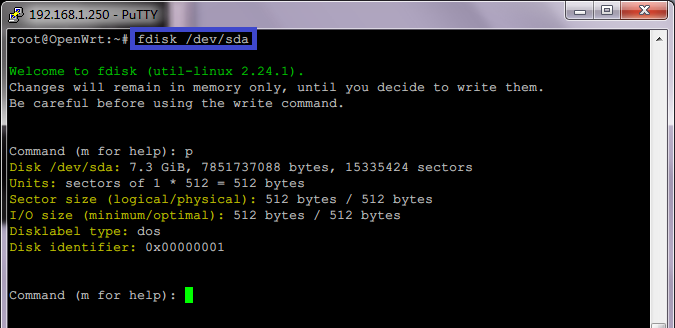
23.安装完毕后输入“fdisk /dev/sda”进行分区。
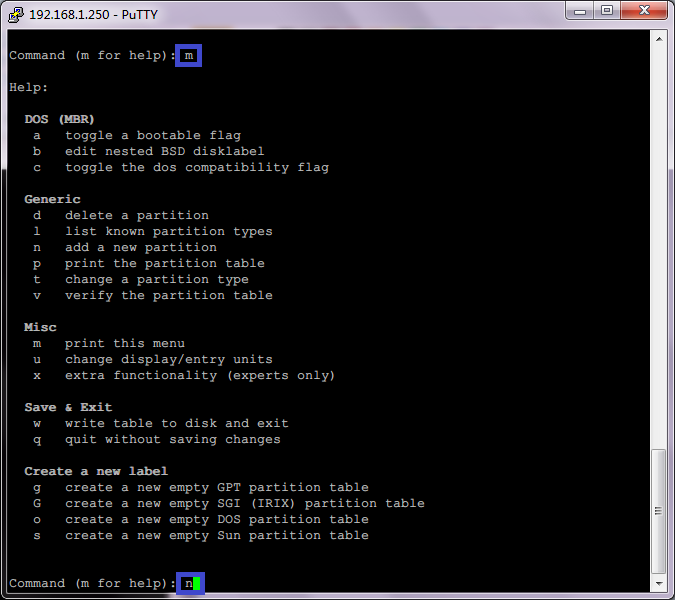
24.输入“m”可查看fdisk命令帮助,输入“n”开始添加新分区。
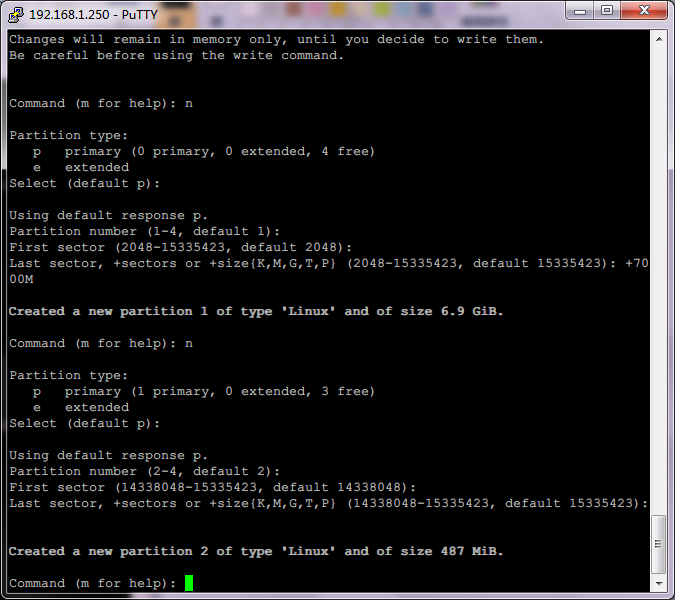
25.将U盘第一个分区设置为7000M,剩余空间设置为第二个分区。
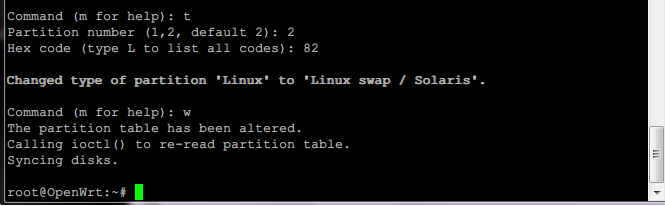
26.输入“t”将第二个分区设置为交换分区(82),继续输入“w”设置分区表。
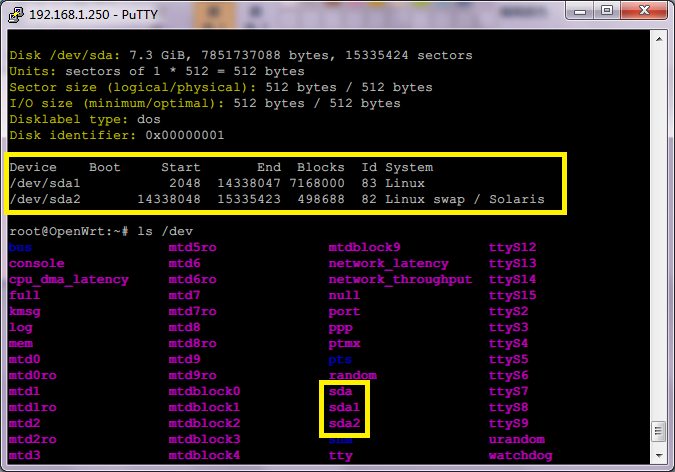
27.输入“fdisk -l”或者“ls /dev”即可发现sda1和sda2。
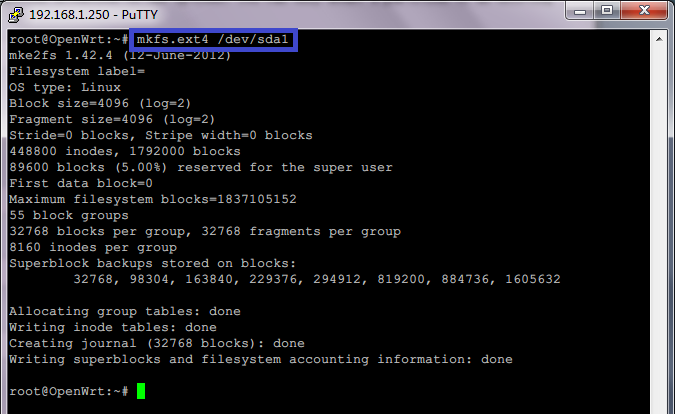
28.输入“mkfs.ext4 /dev/sda1”将第一个分区格式化为ext4格式。
29.输入“mkdir -p /mnt/aria2”在/mnt目录下新建名为aria2的目录,继续输入“mount -t ext4 /dev/sda1 /mnt/aria2 -o rw,sync”将sda1挂载到/mnt/aria2目录下。 注意:如出现类似以下错误,则需检查U盘是否正确连接到路由器或者检查路由器openwrt版本是否正确。 mount: mounting /dev/sda1 on /mnt/aria2 failed: No such device mount: mounting /dev/sda1 on /mnt/aria2 failed: Invalid argument

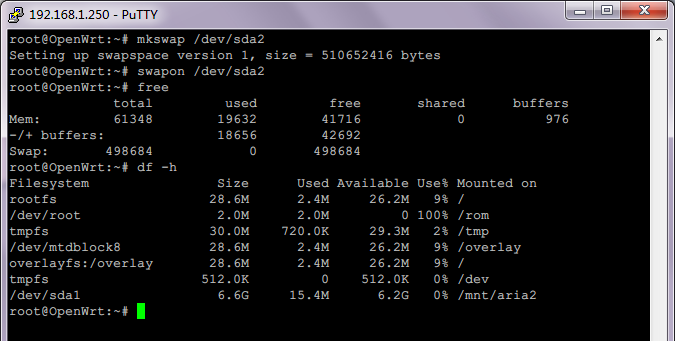
30.输入“mkswap /dev/sda2”将sda2设置为交换分区,继续输入“swapon /dev/sda2”挂载交换分区,输入“free”即可发现交换分区已正确挂载。 继续输入“df -h”查看sda1是否被正确挂载。
31.因需路由器启动时自动挂载U盘,故输入“block detect > /etc/config/fstab”生成标准fstab文件。

32.输入“vi /etc/config/fstab”编辑fstab文件。

33.本例中修改为如下配置并按ESC键,然后输入“:x”保存退出。如需详细了解各参数请点击以下网址。 http://wiki.openwrt.org/doc/uci/fstab

34.输入“/etc/init.d/fstab enable”使fstab文件在路由器启动时自动启动。 注意:以上修改完毕后,建议重启路由器,并使用“df -h”及“free”命令查看是否正确挂载。

35.用WinSCP连接到路由器,并将下载之aria2文件复制到/tmp目录,因aria2从1.18.5版本后默认不支持BT,故不建议使用“opkg install aria2”安装。

36.在PuTTY里输入“opkg install /tmp/aria2.ipk”安装aria2。
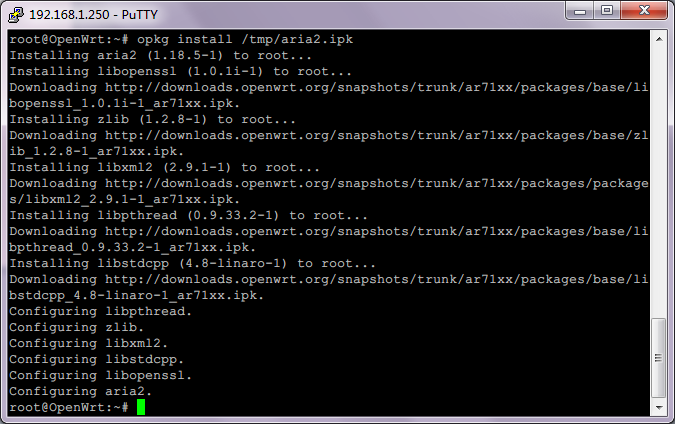
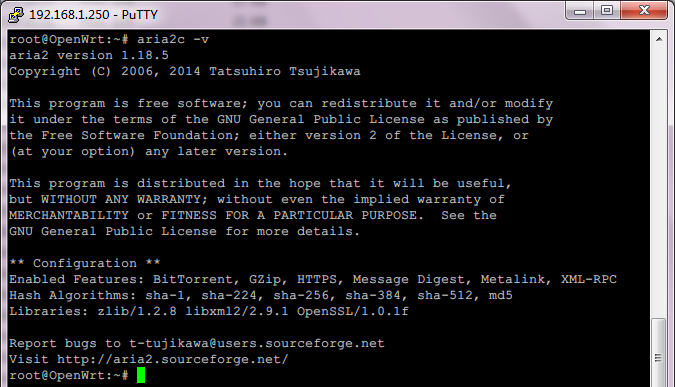
37.安装完毕后输入“aria2c -v”查看aria2版本,本例中版本为1.18.5.
38.安装完毕后输入“touch /mnt/aria2/aria2.session”新建aria2.session文件。

39.输入“aria2c –enable-rpc=true –rpc-listen-all=true –rpc-allow-origin-all -c”启动aria2,需确保可以正常启动再进行下一步。

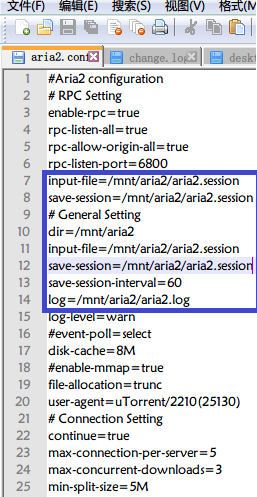
40.为开机自动启动aria2需新建一个配置文件,首先按“ctrl+c”中止aria2,然后输入“vi /etc/aria2.conf”在/etc目录下新建名为aria2.conf的配置文件。

41.按“i”键进入输入状态,输入如下内容,确保无误后按ESC键并输入“:x”保存退出,注意蓝色框内部分需和您的设置一致。
   #Aria2 configuration
   # RPC Setting
   enable-rpc=true
   rpc-listen-all=true
   rpc-allow-origin-all=true
   rpc-listen-port=6800
   # General Setting
   dir=/mnt/aria2
   input-file=/mnt/aria2/aria2.session
   save-session=/mnt/aria2/aria2.session
   save-session-interval=60
   log=/mnt/aria2/aria2.log
   log-level=warn
   #event-poll=select
   disk-cache=8M
   #enable-mmap=true
   file-allocation=trunc
   user-agent=uTorrent/2210(25130)
   # Connection Setting
   continue=true
   max-connection-per-server=5
   max-concurrent-downloads=3
   min-split-size=5M
   split=5
   max-overall-download-limit=0
   max-overall-upload-limit=0
   max-upload-limit=0
   lowest-speed-limit=0
   auto-save-interval=300
   # BT Setting
   bt-require-crypto=true
   bt-max-peers=100
   enable-peer-exchange=true
   follow-torrent=true
   listen-port=6881-6999

42.亦可在NotePad++里面编辑,然后修改名字为“aria2.conf”。
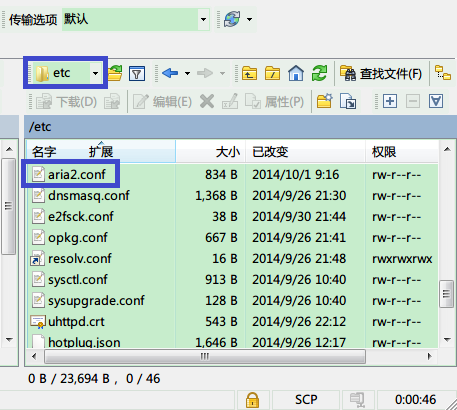
43.使用WinSCP连接到路由器,将此文件(aria2.conf)复制到“/etc”目录下。
44.输入命令“aria2c –conf-path=/etc/aria2.conf”从配置文件启动aria2。

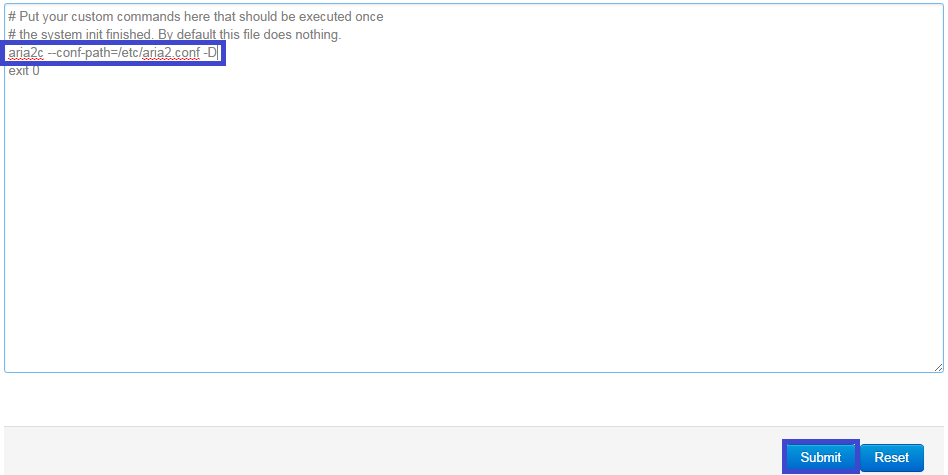
45.确认可以从配置文件正常启动后,使用浏览器登录路由器,在“System”下点击“Startup”并向下拉动右侧滑动条,找到“Local Startup”框, 输入“aria2c –conf-path=/etc/aria2.conf -D”,并点击右下方“Submit”保存,使aria2在路由器启动是自动在后台运行。
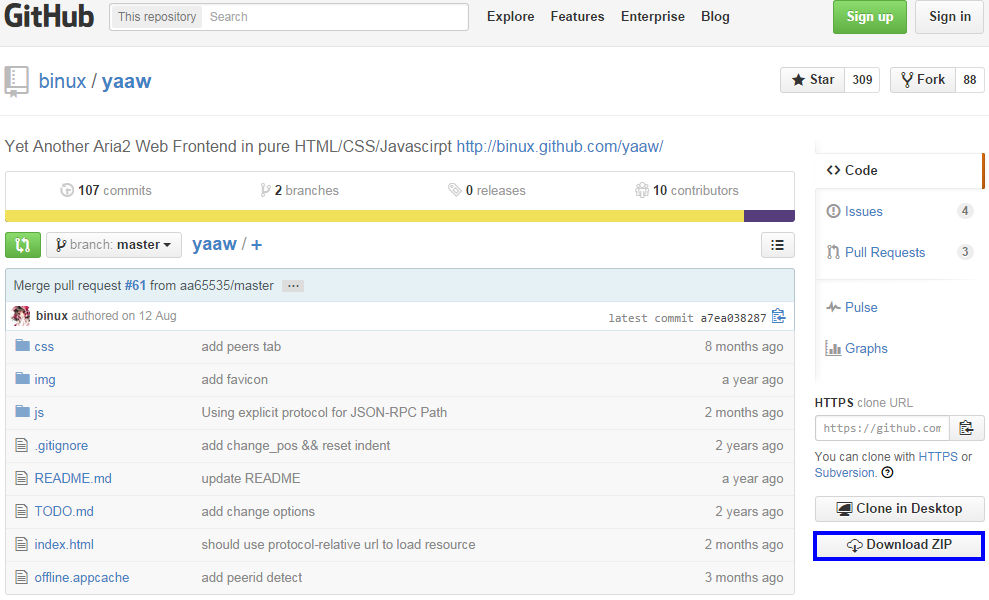
46.因aria2默认为命令行界面,为方便起见,安装图形管理界面YAAW(Yet Another Aria2 Web),点击这里下载。 亦可将以下网址复制到浏览器打开,然后点击右下方的“Download ZIP”按钮下载。 https://github.com/binux/yaaw
47.解压此文件,将文件夹名修改为一个您喜欢的名字(本例中修改为aria2),并使用WinSCP将此文件夹复制到路由器“/www”目录下。

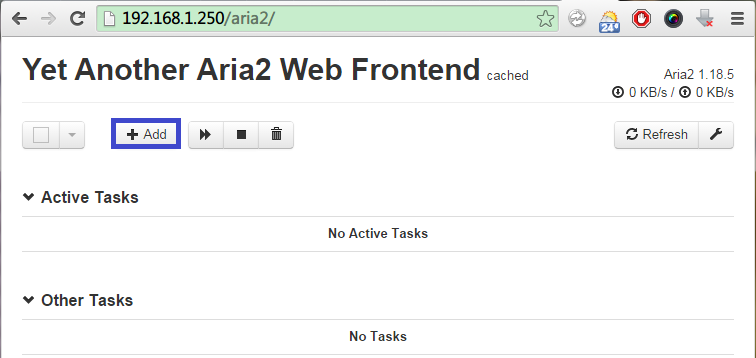
48.在浏览器地址栏输入“路由器IP地址/文件夹名字”(本例中为192.168.1.250/aria2)即可打开YAAW,点击“Add”添加种子文件。 如出现“internal server error”错误,则需检查aria2是否已正常运行或查看YAAW作者网页。
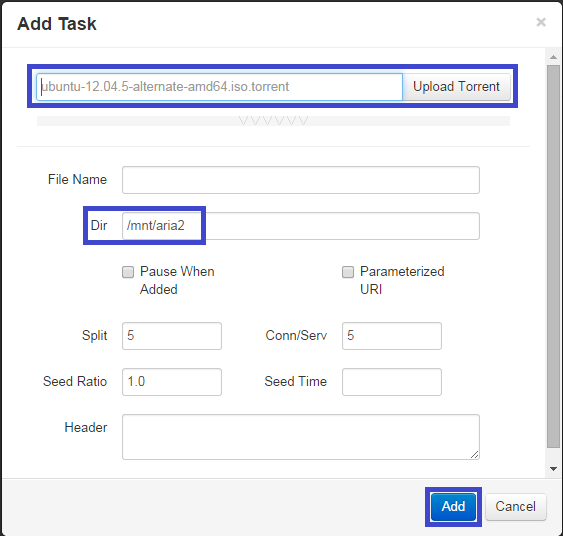
49.点击“Upload Torrent”添加种子文件,亦可直接输入下载地址。注意在下图蓝色框内“Dir”输入您设置的下载目录(本例中为/mnt/aria2),点击“Add”按钮确定。
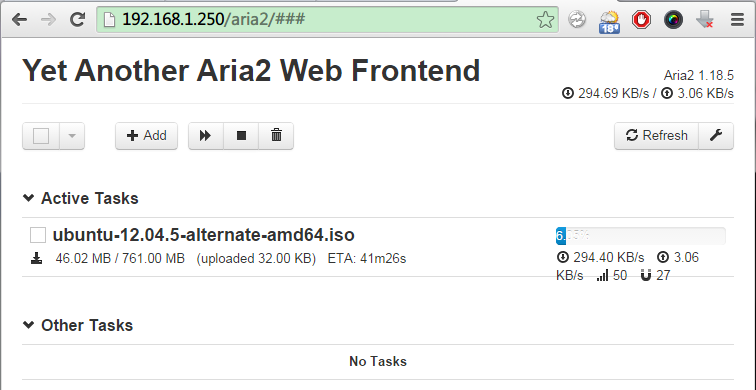
50.开始下载文件。
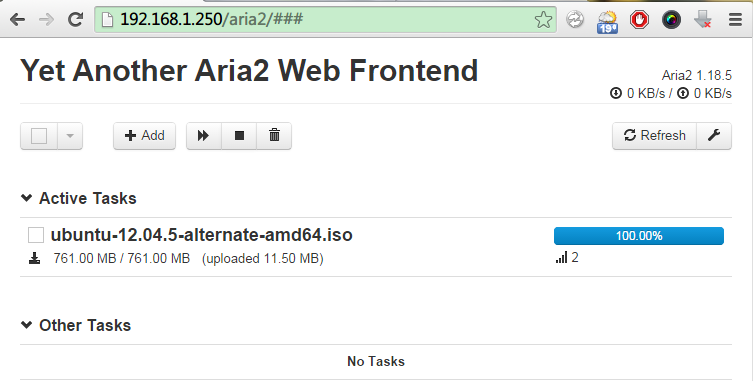
51.文件下载完毕。
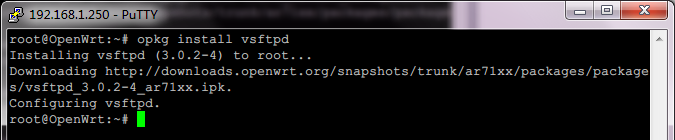
52.因OpenWrt默认不支持FTP,故需要安装vsftpd(very secure FTP daemon),在PuTTY里面输入“opkg install vsftpd”安装。
53.在浏览器里打开路由器控制界面,点击“System”并选择“Startup”,确认vsftpd已经默认启动,建议重启路由器查看是否启动。

52.使用FileZilla把文件复制到本机即可。