Making TWRP backups is a must if you’re going to be rooting and tweaking Android. But if your phone is encrypted, you may have some issues with your PIN or password lock after restoring from a backup. Here’s what’s going on.
If the backup you’re restoring uses the same PIN as your current system, everything should go swimmingly. However, if the system you’re restoring to uses a different PIN than the system you’re restoring from, you may run into some quirks. When you reboot your phone, it’ll ask you for a PIN, saying “PIN required when you restart device”. In some cases, you’ll have to enter your latest PIN when you boot, and your old PIN to get into your phone. In other cases, you may not be able to unlock your phone at all. But don’t panic: in both cases, this is easily fixable.
If Your Device Is Stuck Using Two PINs or Passwords
After restoring from backup, you may find that your device accepts two PINs: your most recent PIN at boot, and your old PIN (from the backup you restored) for unlocking the device. This isn’t a huge problem, but can be confusing since you need to remember both PINs. Thankfully, the solution is simple: Just reset your PIN in Android’s settings.
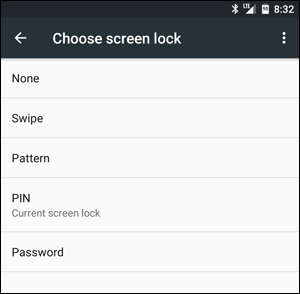
Head to Android’s Settings app and go to Security > Screen Lock. From there, tap on PIN or Password to choose a new PIN or password to lock your phone.
After doing so, that is the PIN or password you will use for everything–at boot and at the lock screen.
If Your Device Won’t Unlock At All
Here’s where things get really dicey. In some rarer cases, your most recent PIN will work at boot, but no PIN will work to unlock the screen–meaning you can’t access anything on your phone. Thankfully, this is fixable too–it just takes a few more steps.
First, boot back into TWRP’s recovery environment. It’ll likely ask you for a password–enter your most recent working PIN (the one you were using before you restored from backup). If you didn’t have a PIN, type in default_password. You’ll be greeted with the main TWRP window.
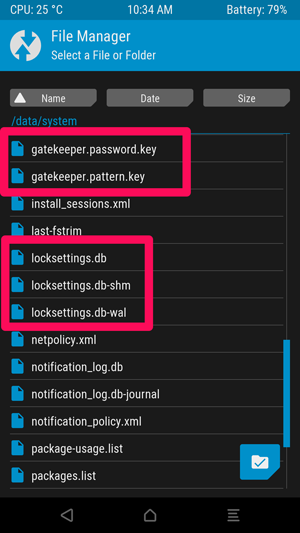
Then, head to Advanced > File Manager, and go to the /data/system folder. Scroll down and find the two files with the .key extension. Delete both of them (by tapping on the file and then tapping the “Delete” button). Then, delete all the files containing the word locksettings.
So on my Nexus 5X, for example, I deleted the following files:
password.key
pattern.key
locksettings.db
locksettings.db-shm
locksettings.db-wal
Once you’ve deleted all the key and locksettings files, reboot your system. If it asks you to install SuperSU, choose “Do Not Install”.
You may be prompted for a PIN before your phone finishes booting. Once again, it should work with your most recent PIN–the one you were using before you restored from backup.
Once Android starts, your lock screen should appear, with no PIN or password prompt. Unlock your phone (yay!) and head to Android’s Settings. Scroll down and go to Security > Screen Lock. From there, you can choose a new PIN or password to lock your phone.
After doing so, that is the PIN or password you will use for everything from here on out.
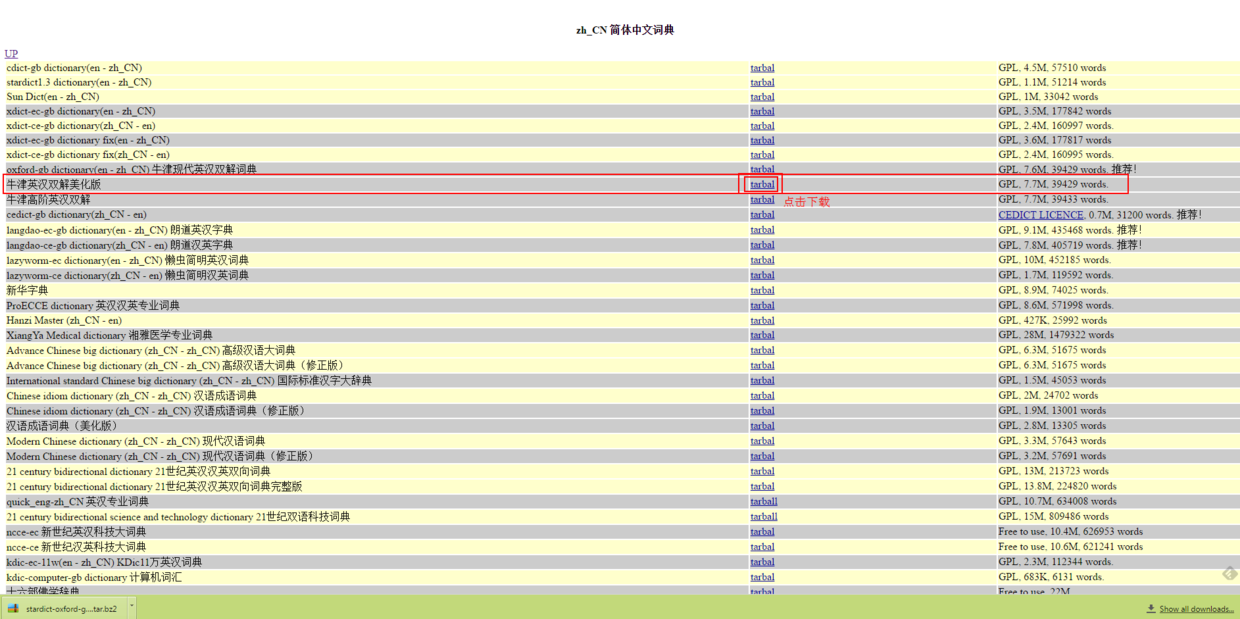
Dropbox(流量太大长期被Dropbox关闭分享请使用以下分流链接), then click the Add to my Dropbox, 中文的话点击『复制到我的Dropbox』,尽量不要使用网页下载,一来下载不稳定并且容易损坏原文件,二来会增加Dropbox的流量而被暂时禁掉掉分享链接!!我用了几年前注册过的Dropbox帐号对以上词典进行分流,下载方式同上,建议通过『复制到我的Dropbox』方式下载。如果你还没有Dropbox帐号的话不妨猛击我的Dropbox推广链接
进入音频或图片所在文件夹. find . -name "*" -print | zip -9 /tmp/En-En-your dictionary.dsl.dz.files.zip -@
另外一种方法就是 for d in ./\*. ; do zip -9 En-En-your-dictionary.dsl.files.zip "$d" ; done
goldendict使用维基百科不显示图片-not display pictures while using Wikipedia
自行到github编译goldendict最新版-go to https://github.com/goldendict/goldendict. The readme file will tell you how to compile from the source. Arch Linux下只需使用AUR中的git版本即可,大爱Arch!^_^
版权问题
以上词典均由网络收集…
音标问题
1.音标可用文件:
https://www.douban.com/note/308047059/
GoldenDict支持CSS,文件名为article-style.css,用记事本编辑如下:
article-style.css:
body {
font-family: “Lucida Sans Unicode”,Tahoma, Verdana, sans-serif;
}
##Introduction If you’re developing on Ubuntu Linux, you need to add a udev rules file that contains a USB configuration for each type of device you want to use for development. In the rules file, each device manufacturer is identified by a unique vendor ID, as specified by the ATTR{idVendor} property.
##System requirements Ubuntu,Fedora or other linux systems.
##Install
1.Open the console to copy the file “51-android.rules” to “/etc/udev/rules.d/51-android.rules” by executing the command below. To Achieve it,you should be sure that you have the root permission.
2.To give it appropriate permissions next execute the command:
sudo chmod a+r /etc/udev/rules.d/51-android.rules
3.Then execute:
sudo service udev restart
4.When plugged in over USB, can verify that your device is connected by executing adb devices from your SDK platform-tools/ directory. If connected, you’ll see the device name listed as a “device.”
##License
Copyright (C) 2014 Snowdream Mobile <[email protected]>

Licensed under the Apache License, Version 2.0 (the "License");
you may not use this file except in compliance with the License.
You may obtain a copy of the License at

        http://www.apache.org/licenses/LICENSE-2.0

Unless required by applicable law or agreed to in writing, software
distributed under the License is distributed on an "AS IS" BASIS,
WITHOUT WARRANTIES OR CONDITIONS OF ANY KIND, either express or implied.
See the License for the specific language governing permissions and
limitations under the License.
Originally Posted by Shurrik81 Hello everyone,
yesterday i installed the latest nightly of CM13.
Everything works well so far but i encountered some Problems with Titanium Backup.
The Format of my SD Card is external (as in CM12) and TB has no write Permissions for it. (“This Folder is not writable”)
I had the same Problem in 5.1.1, workaround was to edit the Permissions in the platform.xml file.
But in CM13 this file looks different.
Has anyone a Solution for this?
Thank you!
Shurrik
Hey I am here to solve all your problems, hehe… hopefully.
You need to change the way that the app accesses your SD card. Go into the Titanium Backup preferences (Menu > Preferences) and click ‘Backup folder location’. Then click on ‘Storage provider’ and then ‘DocumentProvider storage’. Then just select the root of your SD card. You can then use TB to set your backup location on the SD card.
If that doesn’t work, check that TB has storage permissions (Settings > Apps > Titanium Backup > Permissions > Storage).
Last week, we released the final CM-13.0 releases, updated to the latest security patches, in anticipation of what follows.
Yesterday, Cyanogen Inc (Cyngn) announced that they were shutting down the infrastructure behind CyanogenMod (CM). This is an action that was not unpredictable given the public departure of Kondik (cyanogen himself) from the company, and with him our last remaining advocate inside Cyngn’s leadership.
In addition to infrastructure being retired, we in the CM community have lost our voice in the future direction of CM – the brand could be sold to a third party entity as it was an asset that Kondik risked to start his business and dream. Even if we were to regroup and rebuild our own infrastructure, continuing development of CM would mean to operate with the threat of sale of the brand looming over our heads. Then there is the stigma that has grown to be attached to anything named ‘Cyanogen’. Many of you reading this have been champions of clarifying that the CM product and CyngnOS were distinct, yet the stain of many PR actions from Cyngn is a hard one to remove from CM. Given CM’s reliance on Cyngn for monetary support and the shared source base, it’s not hard to understand why the confusion remains.
It will come as no surprise that this most recent action from Cyngn is definitely a death blow for CyanogenMod.
However, CM has always been more than the name and more than the infrastructure. CM has been a success based on the spirit, ingenuity and effort of its individual contributors – back when it was Kondik in his home, to the now thousands of contributors past and present.
Embracing that spirit, we the community of developers, designers, device maintainers and translators have taken the steps necessary to produce a fork of the CM source code and pending patches. This is more than just a ‘rebrand’. This fork will return to the grassroots community effort that used to define CM while maintaining the professional quality and reliability you have come to expect more recently.
CM has served the community well over its 8 long years. It has been our home, bringing together friends from all over the world to celebrate our joy of building and giving. Its apt then that on this Eve of a holiday we pay our respects. We will take pride in our Lineage as we move forward and continue to build on its legacy.
While looking around at the decompiled SecSettings2.apk, I noticed that all of the App Ops (application permissions) stuff was still present. So, I decided to look for a way to enable the Settings menu option for Application Permissions.
The xml files all seemed to have the entries required to display the option, but the smali code was preventing it.
Note that there are apps in the store that will give you this feature, but this method doesn’t require an additional app and it uses the built-in settings menus.
I have not tested every permission, but I did disabled “location” for several apps and that worked perfectly.
This is an easy mod if you know how to decompile/recompile.
There are 2 ways to implement the Application Permissions menu option:
Method 1 (requires deodexed app and smali edit)
Decompile the deodexed SecSettings2.apk.
In the smali folder, navigate to comandroidsettingsLockscreenMenuSettings.smali
You will find the “Application Permissions” menu under the “Applications” settings menu. (screenshot #2)
Disclaimer: This is intended mainly for rom devs to use, but if you like making your own mods, then feel free to give it a try. I take no responsibility for any modifications you make to your device. Always ensure that you have the required files to restore if something goes wrong.